Monday, March 29, 2010

mmmcrafts turns two

Thank you, everybody! Comments are now closed.


(kazoos blowing, confetti shower falling, huzzahs all round)

mmmcrafts x 2 years =
279 posts
900 followers
over 3000 subscribers
over 500 sales in the shop (thanks so much!)
at least 784 cups of strong coffee consumed (conservative estimate)
countless laughs, snorts, aha moments and warm gushy feelings from all your great comments.

And so so much learned. That's what it's all about for me. Trying new stuff. Making new things. Learning new methods. Honing my skills. Having crises. Innovating under pressure. Getting some creative Me-time. Being inspired by others. And sharing that with you.

I've enjoyed every minute. Well, most of them. I've had a lot of wild-eyed full-on apoplectic moments (and dragged you along), but those were more to do with dysfunctional crafting mania/time management handicap than blogging. I never ever imagined when I wrote my first lonely post that I would have 'met' this many of you and been enriched so much by the crafting and blogging community.

To all my faithful commenters, a thousand thanks, and you know who you are. I really really appreciate it when you take the time to wade through the weird (but necessary, believe me) security word and give some feedback or share a little of yourselves. I dig hearing from you. I even enjoy the occasional snide remark. Not mentioning any names.
(loud clearing of throat that vaguely sounds like the word 'robyn')

To Robyn and Olivia, thank you above and beyond for being the best pattern guinea pigs, proof readers, style advisers, and craft consultants a girl could have. I love you guys!

And I have to mention all those who have taken a moment to write and encourage me in my faith in Christ, I just can't tell you what that means. My thanks to all you present day Barnabases, may we all stand firm in the faith and grow in the Word. All glory to God.

Thank you. Thank you. Thank you.

And you know I had to have a giveaway, since this is an Occasion. I'm giving away one tooth pillow for each year I've blogged, made with my own little wizened hands (using my basic free pattern you can find here if you'd like to make one).

A pinky pink Tooth Fairy girl with her coin bag and wings,

and a blue Tooth Marshal who is ready to round up some wayward teeth.

They are made from wool-blend felt with safety eyes, and each has a mouth pocket that functions as both the tooth depository and also the place for the coins. I also sewed a larger pocket on back if the Tooth Fairy likes to leave something too large to put in the mouth pocket.

Each has a ribbon loop for hanging over the doorknob or dresser pull, because the modern enlightened Tooth Fairy is not into fishing around under pillows. NOPE.

For a chance to win, all you have to do is make one comment. (Originally I was asking you to share how you found my blog, but after the first 40 comments it became clear what a completely silly question this is, since no one can remember, ha! I was just trying to shake it up, you know. Oh well.) And, if you have a preference, let me know if you want the blue or the pink tooth. I'll be randomly selecting two winners* on Saturday, April 3.

Yay! Happy birthday, mmmcrafts. (blows kazoo) Looking forward to another creative year.

*I'm willing to ship internationally, within reason. I mean if you live on Tristan da Cunha or in an Antarctic research station we may have to discuss.

Sunday, March 28, 2010

c'mon. green up already.


Waiting for our grass to match my shoes. Brown grass + Easter photos = Ick.

Thursday, March 25, 2010

future sewing a) disasters or b) triumphs (TBD)

Do you read A Dress A Day? That Erin is funny. And has mad dressmaking skillz. She featured the McCalls 8335 pattern (shown above, left) one day as her Pattern Story feature. I fell in love. Found it somewhere, etsy or ebay, can't remember which. (Random: every time I type the word ebay, I type ebaby instead. Every. Time.) (Like the last two times in this paragraph. No lie. Even when I was typing it to complain how I mistype it.)

The Butterick 4692 pattern was purchased on impulse when I was on an etsy troll for tunic patterns. I may have been a bit over excited. But it could be good as a dress. Just longer than shown.


How did I not know about Sew Liberated's Schoolhouse Tunic until now? Maybe late to this party. Love what I've seen on flickr, especially this one with the added ruffles. I'm very excited to try it.

And the duro dress, Simplicity 3875. Another fever set off by Erin at A Dress A Day. Robyn has made one from this pattern and since the bodice turned out too short for her it might do well for me, Larissa Short Pockets. We shall see!


I've never sewn a Vogue pattern. Found this one (2690) in the bargain bin at the local thrift shop and thought I'd try it sometime. It's been in the drawer forgotten for a few years. Looks fairly simple. Maybe worth a try.

And lastly this McCalls Easy Knits 3133 from the thrift store. Just because it says "A Pounds Thinner Pattern". And because I am ready to try some knits right after I learn to use this:


It came with a CD and a user's manual. I cannot wait to get into it, but I have some projects that need to be done before I do. I love user manuals. I know, it's a little strange.

Monday, March 22, 2010

what I'm up to


Outside my window it is gloomy, rainy and chilly. Inside my head it is sunny and warm, and Easter dresses are taking shape.

Friday, March 19, 2010

Dardikism

Cup of Wild, watercolor, by Helen Dardik

We Are One, watercolor, by Helen Dardik

I fully support Dardikism, a philosophy which reveres the creative imaginings of Helen Dardik. Ok, I made that up. But her work is so delightful that she should have an -ism.

I've long drooled over her fantastic patterns and illustrations, so imagine my delight to find some original watercolors for sale in her etsy shop. Being the connoisseur of any bracing hot beverage in a mug, I had to have Cup of Wild, and she even threw in (!) another painting entitled We Are One. I need to find some great frames for these so they can go up on my wall.


While I was in a Dardik fever, I went ahead and bought her Embroidery For Little Miss Crafty as well, and it is just chock full of lovely, whimsical things for young girls (or youngish 40 yr olds) to sew and stitch. I might share it with my girls. (And if you missed it last year, here is a very timely, very sweet and very free bunny embroidery pattern on Helen's blog.)

Wednesday, March 17, 2010

and the winners are...


And now, by random number generator, the winners of the Bib & Booties accessories patterns are:

1) acornmoon
2) derenda
3) annmarie

Congratulations! Happy bib, bootie and carrot making to you! I'll be emailing you soon with the pattern.

(If you would like to sew a bunny with a blanket also, that pattern is sold separately as the Baby Binky Bunny pattern, and is on sale through April 3 for 20% off the regular price.)

Thanks for participating, you sweet folks!

Monday, March 15, 2010

may I suggest a bunny? with accessories?


Just (barely) in time for Easter, here's Bib & Booties, a PDF accessories pattern designed to compliment the Baby Binky Bunny softie pattern.

The pattern shows you how to make these accessories:

1) embroidered felt bib with rick rack trim,
2)
embroidered fabric bib with bias binding

3) bunny booties

4) carrot softies from either felt or fabric, with a ribbon
loop in the back so your bunny can hold it.

(If you would like to sew a bunny with a blanket also, that pattern is sold separately as the Baby Binky Bunny pattern, and can be found here.)

If you have the time and some fabric scraps that need a purpose, a Baby Binky Bunny with Bib & Booties accessories would make a sweet surprise in someone's Easter basket. To help you with that, the Baby Binky Bunny pattern is now 20% off through April 3.

And... to celebrate the release of Bib & Booties, I'll give away three accessories patterns to three random commenters on Wednesday the 17th! Just leave one comment, and be sure to include your email address.

Wednesday, March 10, 2010

shopping in my closet, part 2 (in which I convert a long denim dress into something I'd like to wear)

The finished product.

The original dress.

This is a dress that was a hand-me-down from my sister Libby. All my sisters live for the times that Libby cleans out her closet. There's always great stuff to be had, and a lot of it. I scored this one several years ago, and it needed an update.

The facing pinned on. I made the facing from the leftover material.

First thing to go was the long length. I cut it off at the knee length I wanted, then made a facing to hem it with from the material that was cut off. I could have allowed length for a turned hem and done it that way, but I prefer doing the facing to avoid having to gather the extra hem width on an A-line.

A facing is basically the same shape as the bottom of the dress, about 2 inches or so deep. It is sewn on with right sides facing and then flipped under and blind hemmed. After I did that, I also ran two lines of stitching around the hem to mimic the original look.

The new hem (bottom two) compared with the old one (top). The new one doesn't have the same weathered, crinkled character, but maybe it will after washing, drying and a really hot iron.


Next thing to go was the long sleeves. After trying it on and marking it, I cut them off shorter than I wanted because I planned to use the old skirt hem as a new cuff.


The sleeves were more roomy than I wanted, so I took some tucks in them before adding the new cuffs.


Here's the finished sleeve. The old skirt hem is now the new cuff, with a button stolen from the old cuff.

Maybe you have unwearable things lurking around that just need some love, a trim and a few stitches? It's a good feeling to remake something that is just taking up space in your closet into something you'll enjoy for a few seasons. As a matter of fact, I've already worn it. Now on to the next piece on the pile...

P.S. I cannot tell you how excited I am as I await the (hopefully imminent) arrival of my new serger! Yay! I've been dreaming of getting one for a while. Can't wait to get my greedy little fingers on that thing and rev it up.

Monday, March 8, 2010

shopping in my closet, part 1 (in which I convert an old pair of bootcut jeans into a new pair of skinny jeans)


I've been admiring so many in the blogosphere that are taking old/unwearable clothes and remaking them into new, beautiful things. I'd really like to try a pretty ruffle shirt like the one my BFF made from her husband's old dress shirt. But first things first, as I have a growing mountain of clothing in my craft room that needs fixing or updating.

My most urgent need is jeans to wear tucked inside my newish lovely boots. I didn't own a pair of skinny jeans until a couple of weeks ago. After I bought one pair I got the idea to convert my old bootcut jeans (which are too short now anyway) into skinny jeans from some similar transformations I've seen on several great YouTube videos.

People, this is the easiest wardrobe revamp you could hope for. Really. It takes like twenty minutes and can save you some serious jean money.

This is the process in a nutshell:

1) Turn your old pair of bootcut jeans inside out and lay them down flat. Lay your favorite pair of skinny jeans on top.


2) Find out which seam on your old jeans has the pretty topstitching. Align the edges of the skinny legs along the bootcut seam that is topstitched (this could be the outside seam or the inside seam). You don't want to take in the seam that is topstitched. It will look funny since you can't replicate the topstitching. You want to take in the side that has a regular seam so your new one will blend in. As it happens, the pair I was working with didn't have topstitching on either side.

3) Once it is all aligned carefully and you have the seams nice and flat, trace along the edge of the skinny leg to mark your new seam line on the bootcut leg. Pin in place, taking care to match up the hem of your old jeans nicely.


4) Using a heavy duty needle on your machine (really. don't skip this step), sew your new seams on each leg. Now before you trim and finish the new seams, try the jeans on to be sure they fit the way you like. You may need to make minor adjustments before you finish and press your seams.

Erm. The girls make up their own beds. Good for them.
Bad for photo styling.

Voila. You really can't tell where my new seam starts and the old one ends. Just saved myself some money. Oh, yeah.

Wednesday, March 3, 2010

Simplicity 3835, third go

with thick belt

with thin belt

or sans belt. entering Frumpville?

Schmoopie and I went out of town recently and I was seized with the usual mania to make myself something fabulous* to take along. Thankfully this compulsion did not overcome me in the hours I was supposed to be packing, like usual. I did in fact give myself several days lead to tackle the Built by Wendy dress again, this time determined to get the sizing right and also to sew in my first invisible zipper.

*Everything I make inside my head turns out fabulous. Of course. Things only go awry in the real world.

I used the flat sheet I had thrifted earlier in a great eggplant color. (As a rule, I do not use fitted sheets, unless they are new in the package. I have to draw the line somewhere.) I actually spent more money on the lining fabric than the dress fabric, but I managed to find a nice liner that was almost the same exact color as the sheet at Jo-Ann. What are the odds?

front

back

This time I went back to the size 12, and just added more room in the shoulders and chest. I did this by simply sewing it with a half inch seam instead of the full 5/8 inch seam. I think the bottom is a bit too full, too A-liney. Needs to be straighter. I also shortened the waist, but I think I might shorten it a tad more next time. Yes, there will be a next time. Remember this fabric? Sigh.

I didn't alter the pockets this time, but I added 2 inches to the length to make up for shortening the waist and also to make it a bit longer than last time. I found out it is a bad idea to sew the lining into the hem. I got the lining a bit shorter than the dress somehow, and after I sewed it into the hem it made the dress hang weird. The seam ripper got a good workout. It's better to leave the lining hanging loose, check.

I had really high hopes of embroidering a pattern on the neck and pockets in cinnamon, gold and turquoise, but I ran out of time. I guess I can still do that.


I admit I was afraid of the invisible zipper. To prep, I read several tutorials, and found this one to be the most helpful. I used it in conjunction with the directions that came with the zipper itself and I think the whole process went very well. I had no trouble finding the required invisible zipper foot near the zippers at my local fabric store.

I have to say that now I've done one, I think invisible zippers are actually easier than regular zippers to put in, and the results are certainly more attractive. I guess I need to qualify that: easier as in less frustrating, not less time consuming. Try as I may, I always manage to pucker the fabric when I sew in a regular zipper. The biggest drawback to the invisible zipper was having to figure out how to attach the plastic invisible zipper foot to my machine. But now I have that figured out, the next one shouldn't take as much time.

Monday, March 1, 2010

make a quickie skirt lining

Closeup of the lining sewn to the skirt facing.
Sorry about the purple thread.
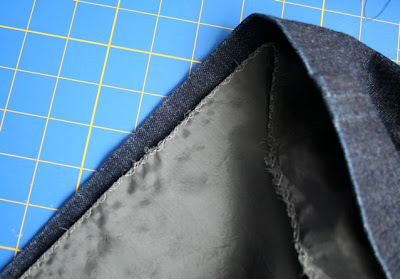

Closeup of hem of lining inside the skirt. It's just overlocked, not hemmed.

I have a perfect straight dark denim skirt from the Gap that I love, but every time I wear it with tights, the denim catches on my knees. The visual effect being that as I walk, the skirt also walks. Up my thighs.

Of course I have a half slip that I wear to avoid this, but it adds bulk at the waist and doesn't solve the problem completely because it is not the ideal length and tends to ride up as well. I find myself constantly either trying to reach in and pull the slip back down (nice) or grabbing the hem of the skirt off my tights. Not a great way to look all ladylike.

I had a eureka after I made this dress with a lining. Why not just line my favorite skirt and solve this annoying problem for good? {smack of hand on forehead} I can't believe I didn't do this a long time ago.

It was so easy. I can now wear the grabbiest, knubbliest tights under the skirt with no problems.

NOTE: I make no claim that the below is the correct way to line a garment professionally. As a matter of fact, it would probably make any self-respecting tailor feel pretty queasy. No, this is all about Easy, Fast, and Solving The Problem Already. Not about tailoring excellence.
1) Lay your straight or A-line skirt inside out on the floor and measure it across the widest part (this is probably the hem). Double this number. That is your skirt's circumference. Now add an inch, for seam allowance. This is value [A].

2) Now find the bottom of the waistband facing. Measure from this part to your hem. Now subtract a half an inch. This is so your lining won't hang below your hem. This is value [B].

3) Cut a piece of lining fabric that is [A] wide and [B] long. This is slippery stuff, I know. I found it was more manageable to lay it on the carpet* to cut than on my worktable, because it kept slithering off my worktable.
*Listen, I have builder grade el-cheapo carpet in my house, so scissors can't do much damage. If you have costly looped Berber, then for Pete's sake get back up on your worktable!

4) Pin it right sides together and sew the back seam with 1/2 inch seam allowance, locking your stitches and leaving the seam open the appropriate length to accommodate your skirt's zipper. If your skirt has a slit, leave an opening to correspond to that also. Trim and finish your seam.

5) Now overlock or zig zag all the unfinished edges of your lining piece. I have an overlock stitch on my machine that I use for this. (I didn't turn any nice hems for the lining. Remember? Easy. Fast. Not excellent. Of course, you always have that hem option, just remember to add the hem allowance in before you cut.) Now, iron the whole lining on the synthetic setting.

6) Turn your machine to the longest stitch length and sew around the top of your lining to create a gathering stitch. Sew two lines of this gathering stitch if you tend to break your thread when gathering.

7) Turn your skirt wrong side out. Pin the lining wrong sides together to the waistband facing at the zipper, side seams, and the middle of the front. Draw up your gathering stitches to fit, pinning as you go. The gathering doesn't have to be all perfectly distributed. No one will see it unless your suitcase pops open in baggage claim, and if that happens you'll likely be more focused on chasing your underwear around the conveyor belt.

8) Sew the lining by hand to your facing with a whip stitch, catching a small bit of facing and then the lining below the overlock/zig zag stitches. Take care to only sew through the layer that makes up the facing and not the outside layer, or your stitches will show on the outside of your skirt.

9) Tack down the lining around your zipper with a few stitches, and do the same for your slit if you have one. You can also anchor your lining to your side seams with a few stitches close to the hem if you like.

Like I said. Quick. Easy. Done and done!