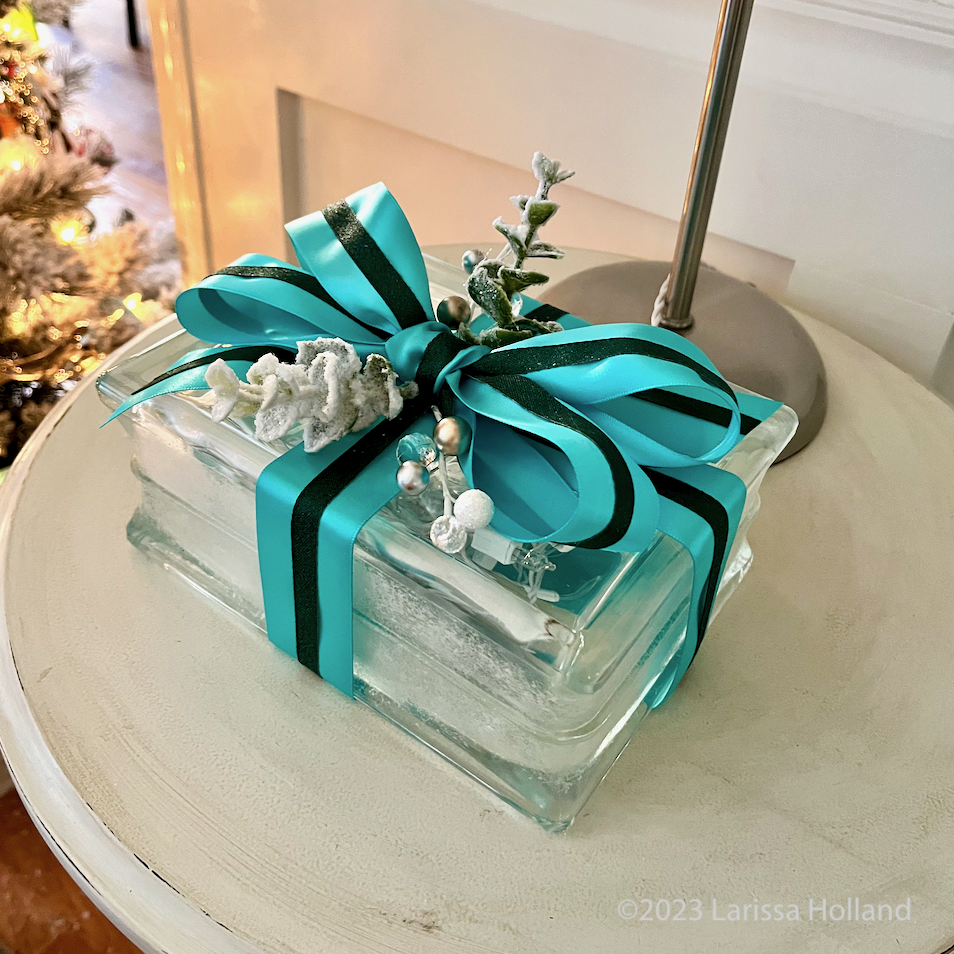
Have you guys ever done this Christmas craft? It's pretty easy and I love the way the lighted presents add festive magic to tabletops and bathrooms. Anyone who can tie a bow and use a hot glue gun can do this craft. My sister Leigh had a Christmas craft party years ago and we made them. I got the big idea a couple years ago to repeat that party with my own friends and I planned it all and bought the supplies and then ended up getting sick and not being able to attend my own craft party. But my friends had a blast making them.
WHAT YOU NEED:
- Glass brick with a hole in the side to feed in a string of lights. Back in the day you had to purchase the bricks from your local Home Depot or Lowes and make the hole yourself using a drill bit for glass. Forget that! Craft stores have clued into this and nowadays you can usually find glass bricks in various sizes with handy premade holes available at your local craft/fabric superstore.
- If your brick is clear and not frosted you will want to frost just the sides (not the top or bottom) with a spray paint designed to look like frosted glass. That's at the craft store too.
- A string of lights to put inside. Battery powered or electric, depending on whether you have an outlet handy where you want to put the finished present. Just make sure the wires are either white or metallic. The green wired kind won't look as nice. I think warm white lights look best.
- Wired ribbon to make the bow. It's also nice to glue on some festive berries, pine cones, or greenery if you like. If you make your bows using a bowmaker jig, you may need some thin wire or twist ties to secure the loops. You can also use non-wired ribbon (I did on one because I loved the color) but wired ribbon gives nicer results and you can fluff it up after storage.
- Fray Check to keep the cut ends of the bow from raveling
- A hot glue gun
- A frothy coffee (optional)
1) Frost the sides (not the top or bottom) of your glass brick using the frosted glass spray paint and let that dry. (I won't attempt to tell you how to drill a hole in a glass brick since I've never done that, so I'll assume you can purchase a brick with nice big hole in back from your craft store.)
2) Feed in your string of lights, leaving the electric plug or battery pack on the outside of the brick. The hole/plug will be in the back.
3) Measure and cut lengths of wired ribbon to wrap around the center of your brick in both directions, being sure to neatly overlap and hot glue the ribbon to the center top of the brick and not the bottom (so it can sit flat). Don't worry, your big ol' bow will cover the overlaps.
4) Make a big ol' bow with your wired ribbon. (Bow tutorials abound online.) A classic bow or a fancier one with more loops are both fine, just be sure it's big enough to cover most of the top of the brick. It's a nice touch to angle or notch the ends of the bow. Use Fray Check on the cut ends to keep them looking nice.
5) Hot glue the bow in place in the center on top along with any little embellishments you want to add, like berries, greenery, sparkly bits, etc.
Tada. You're done! Plug it in or turn on the battery pack and enjoy. Makes a nice gift too!