Showing posts with label Christmas ornaments. Show all posts

Thursday, February 29, 2024

Ghost of Christmas Yet To Come pattern now available!


I'm so happy to say that Ghost of Christmas Yet To Come is now in my Etsy shop. This pattern is the fifth in my Ebenezer Ornament Series, which is inspired by my love for Charles Dickens' spooky Victorian novella, A Christmas Carol. Besides the ghost figurine, there is a second bonus ornament included in this pattern: Scrooge's gravestone!

The difficulty level is intermediate – not for beginners. If you've completed my Twelve Days Ornament Series, you are likely ready to step into the Ebenezer series! (Twelve Days is a great primer as it builds your skills when you do the patterns in order.)

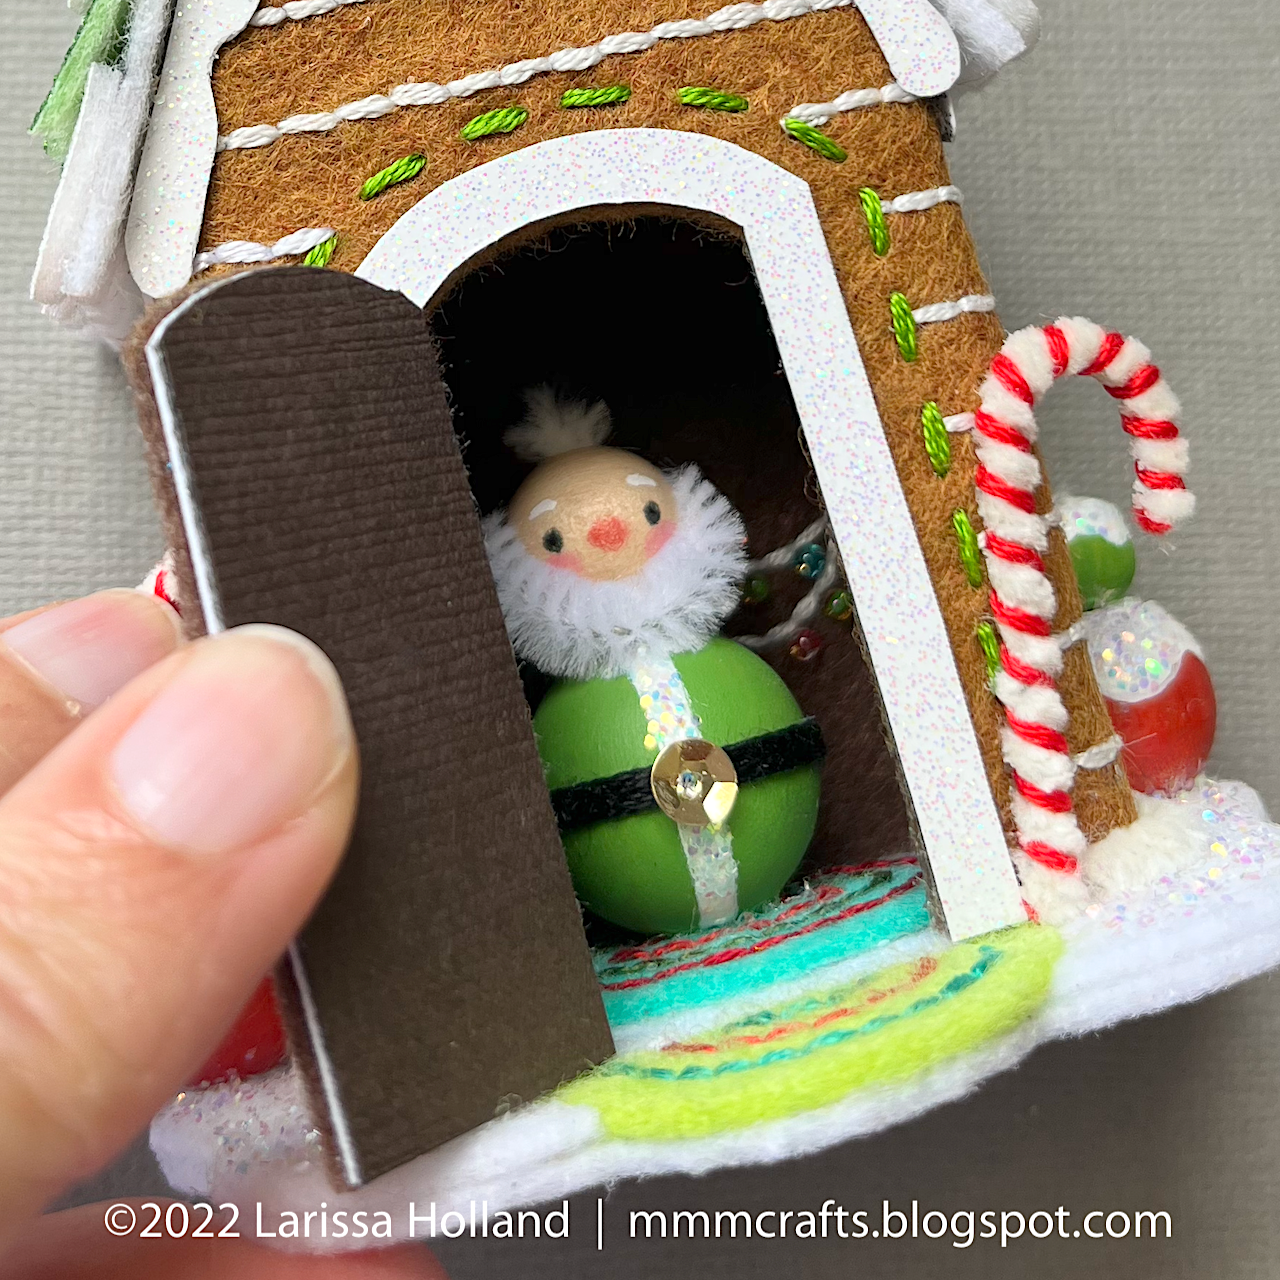
Skills needed for this particular pattern are backstitch, whipstitch, detached chain stitch, drawing on the face with pencils, precision cutting/sewing/glueing of very small pieces, and working with pipe cleaners, beads, and sequins. 

As with the rest of my ornament patterns, Ghost of Christmas Yet To Come is organized into detailed step-by-step instructions with scads of diagrams and tips.

The pattern includes 15 years to trace and embroider on the back, if you like.

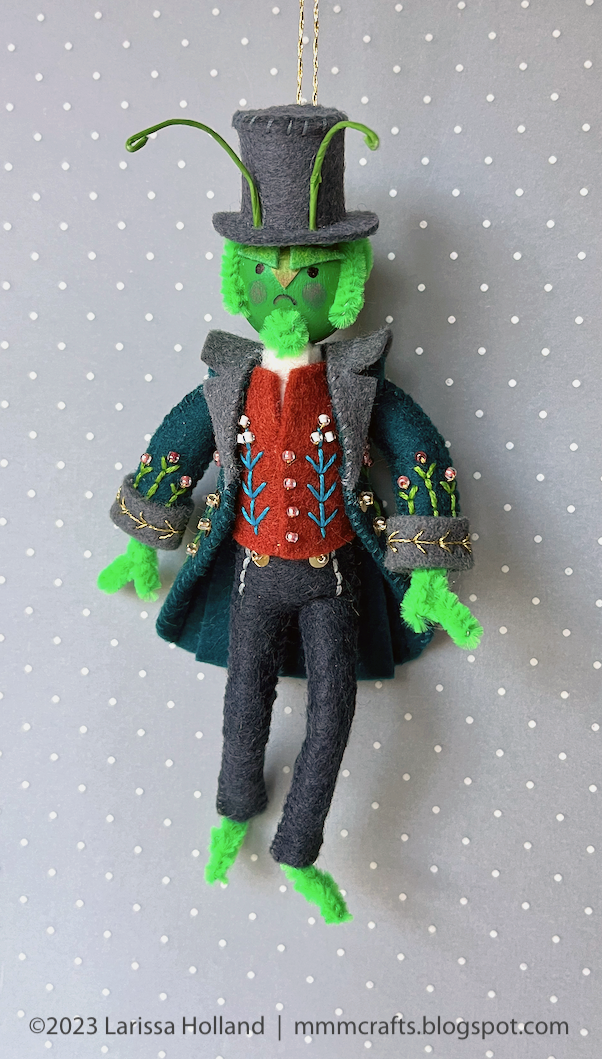
This eerie, silent spirit is described by Dickens as dressed in black from hood to toe, with the only distinguishable feature being his pointing hand. You can see I took some artistic license in my choice of colors and in the fact that the spirit's face is visible within the hood. Feel free to be more faithful to the text and use only shades of black felt and floss, if you like! I just couldn't do it. #becausecolor


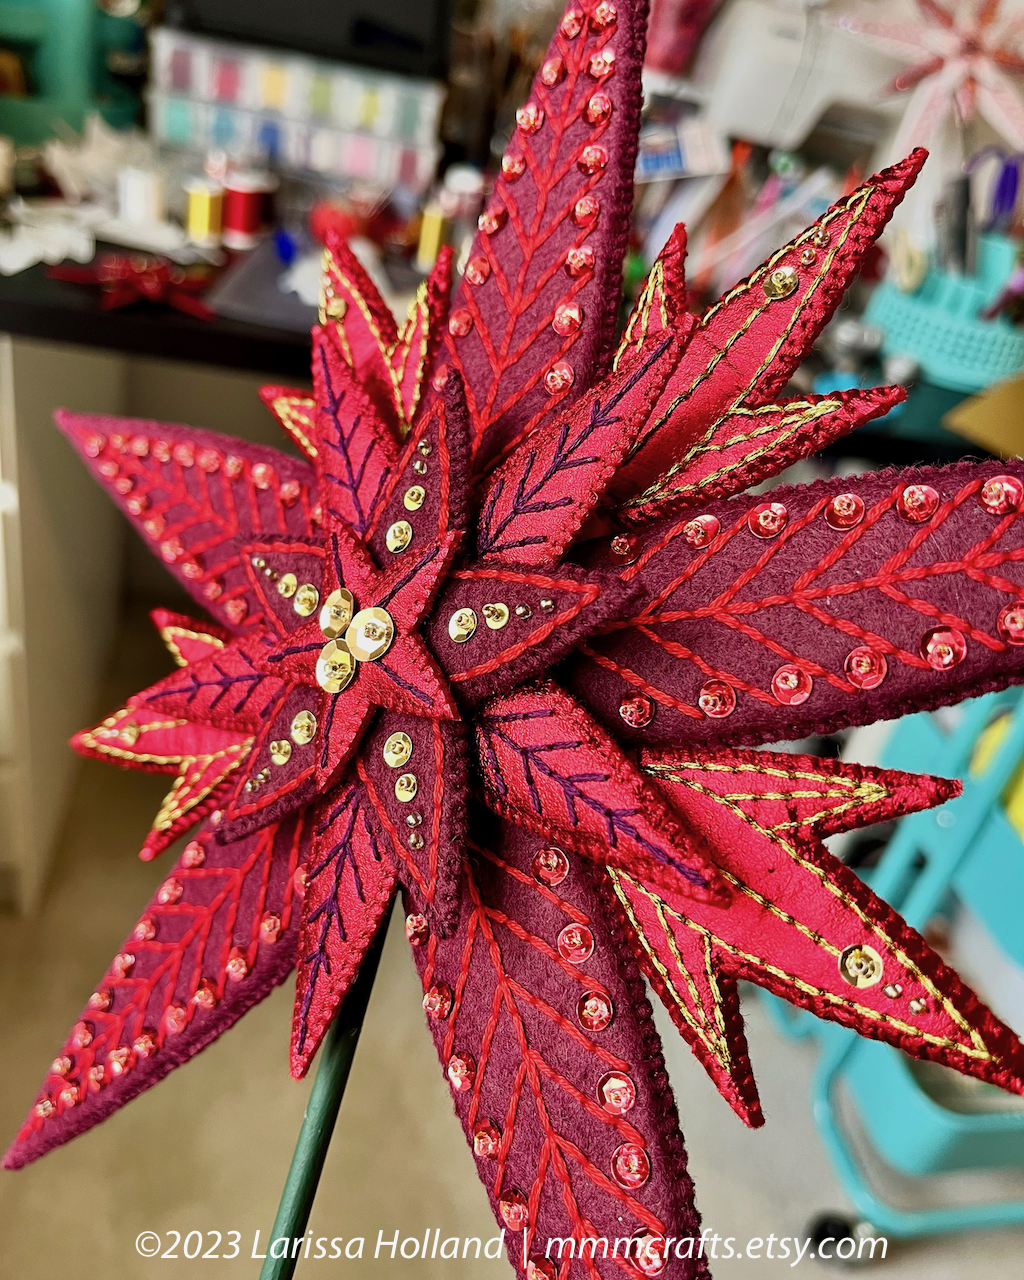
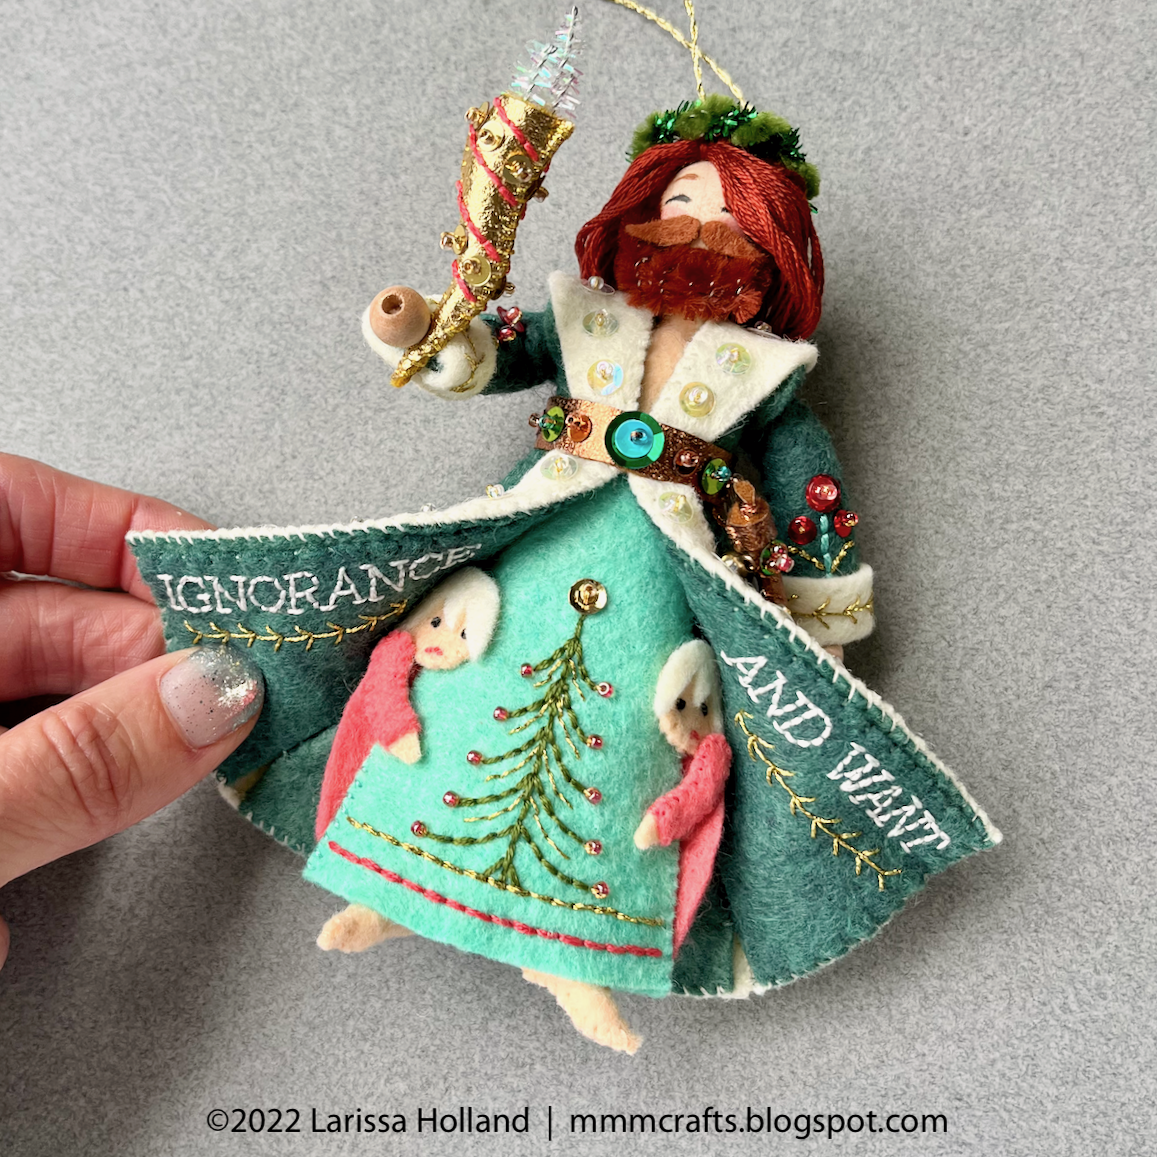
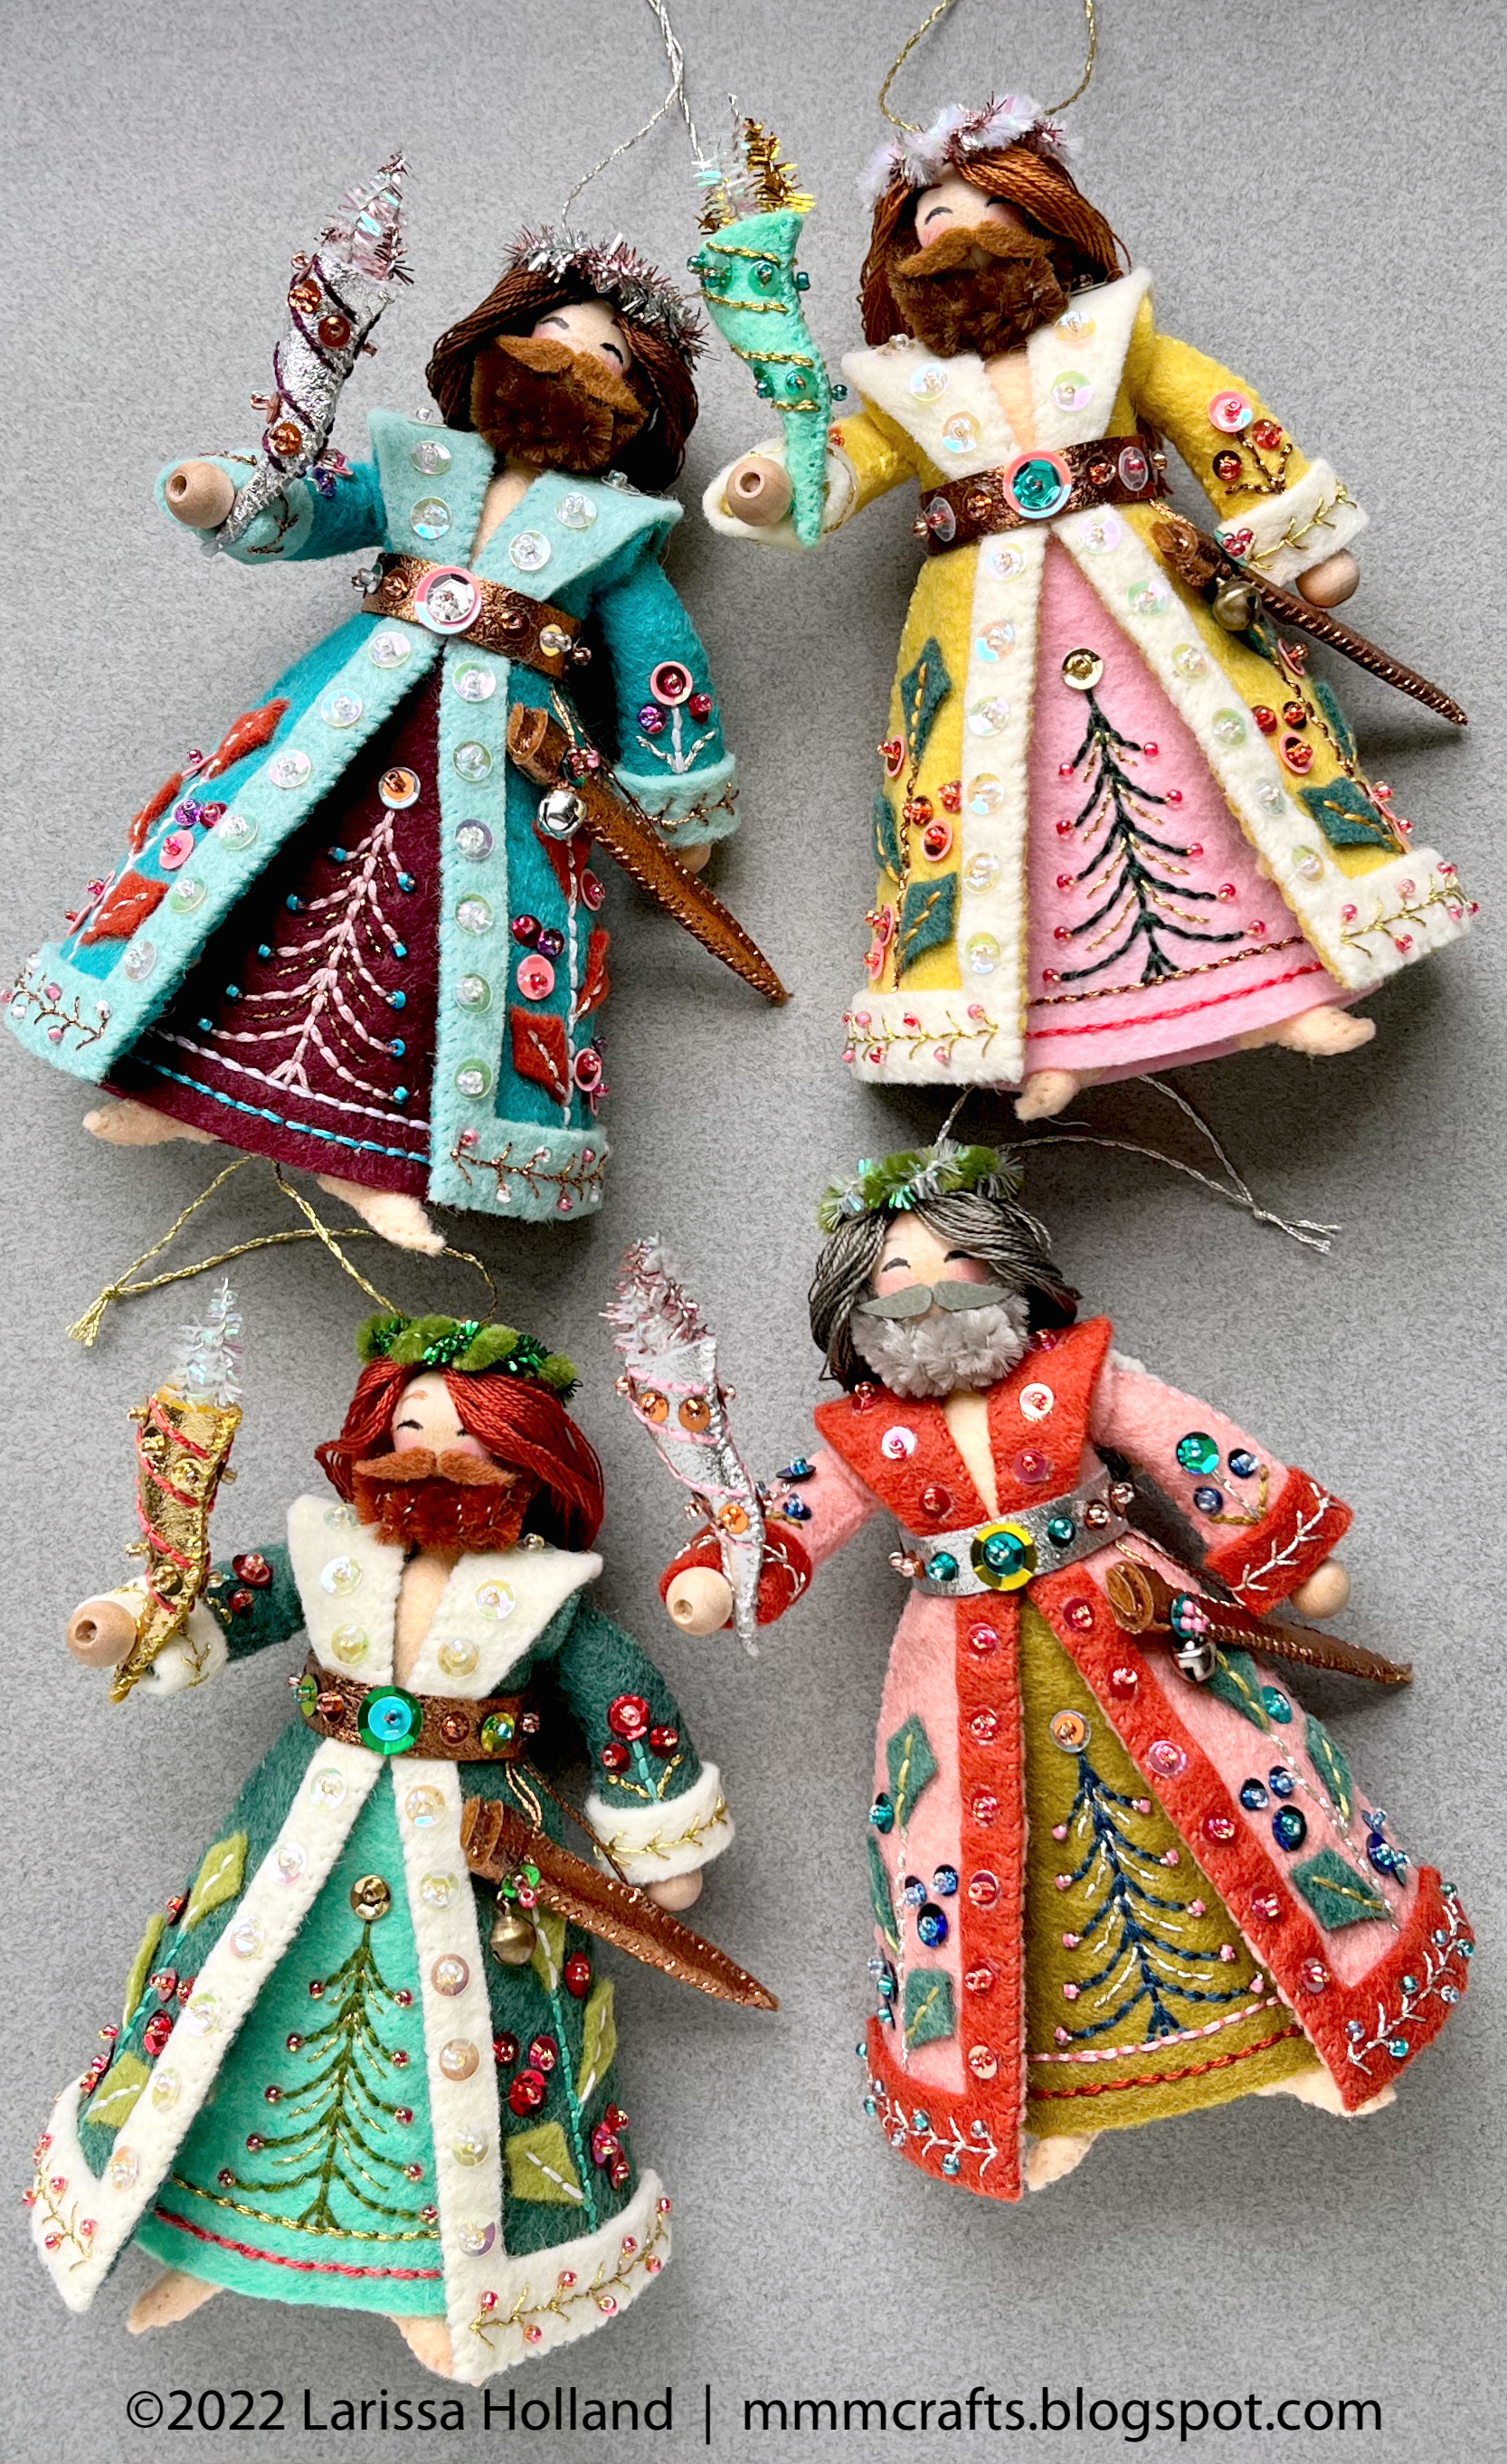
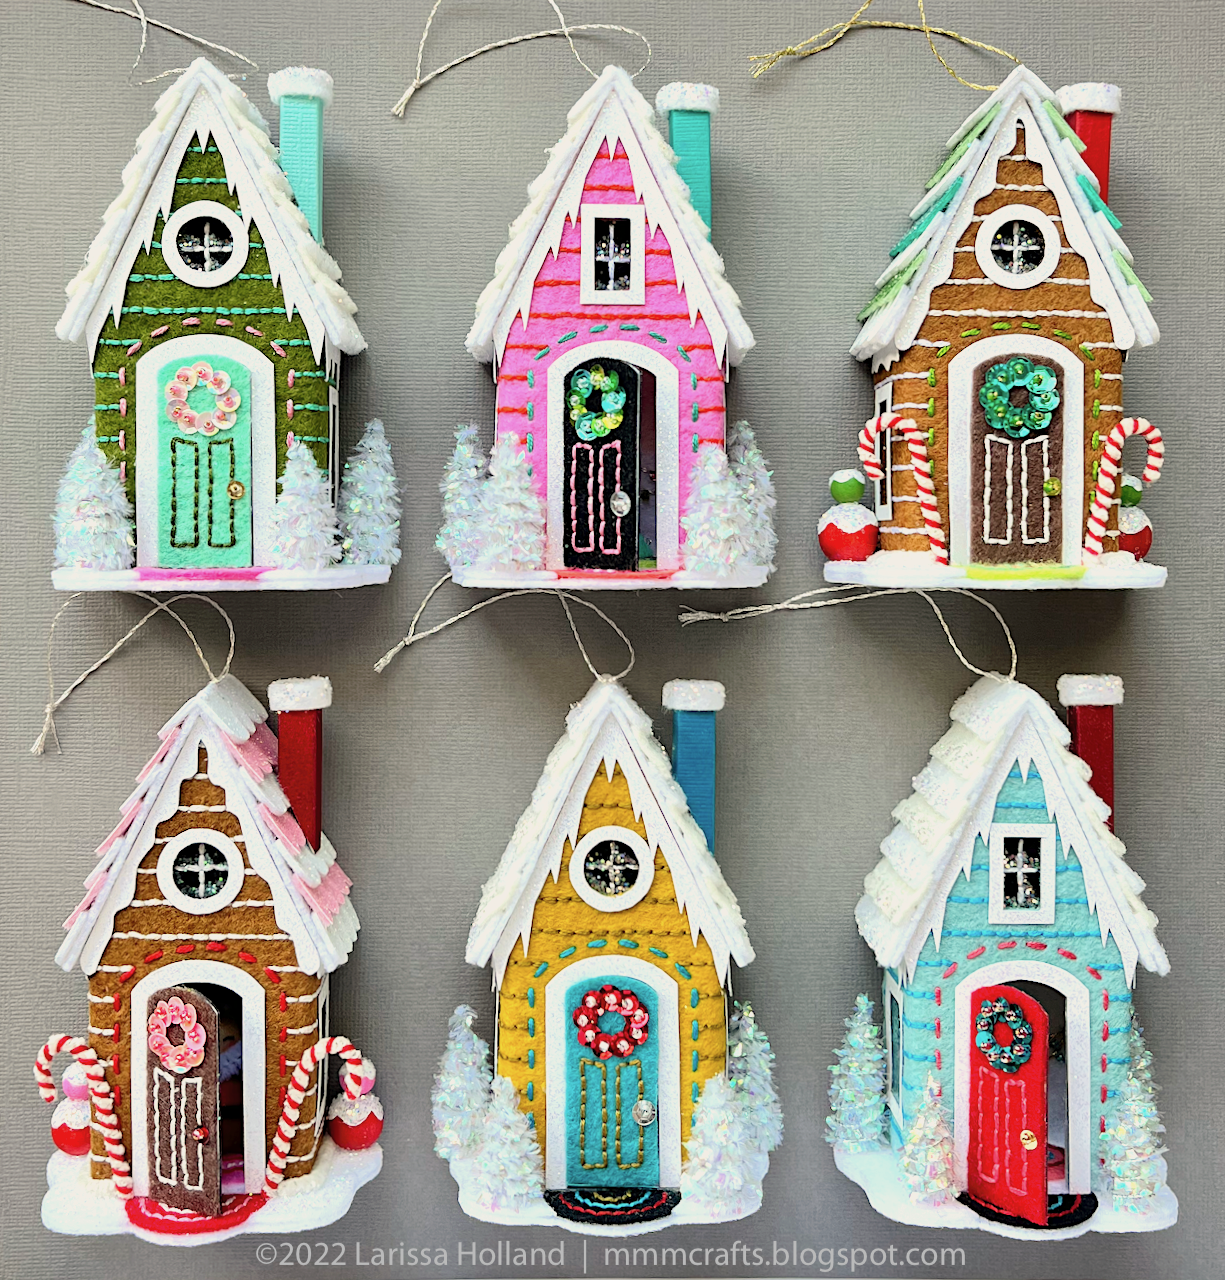
The dirge of spirits you see above were all made with the same two Benzie Ebenezer color palettes I curated for the rest of the series. Nary a black robe among my samples because I just can't resist using lots of color, y'all. My apologies to Mr Dickens, but I have it on good authority from a Dickens scholar that he loved to dress in garish colors, so I'll just say this is a tribute to his personal fashion sense! I had fun coming up with the thorns/wilting flowers on the robe and skull embroidery motif for his gown, and wanted them to have some nice pop! 

Because this pattern has two ornaments, it will take about three or four crafternoons to make a Ghost of Christmas Yet To Come set. Put on a good movie or podcast, make a hot cuppa, and enjoy the process. It will be worth it!  :-) 

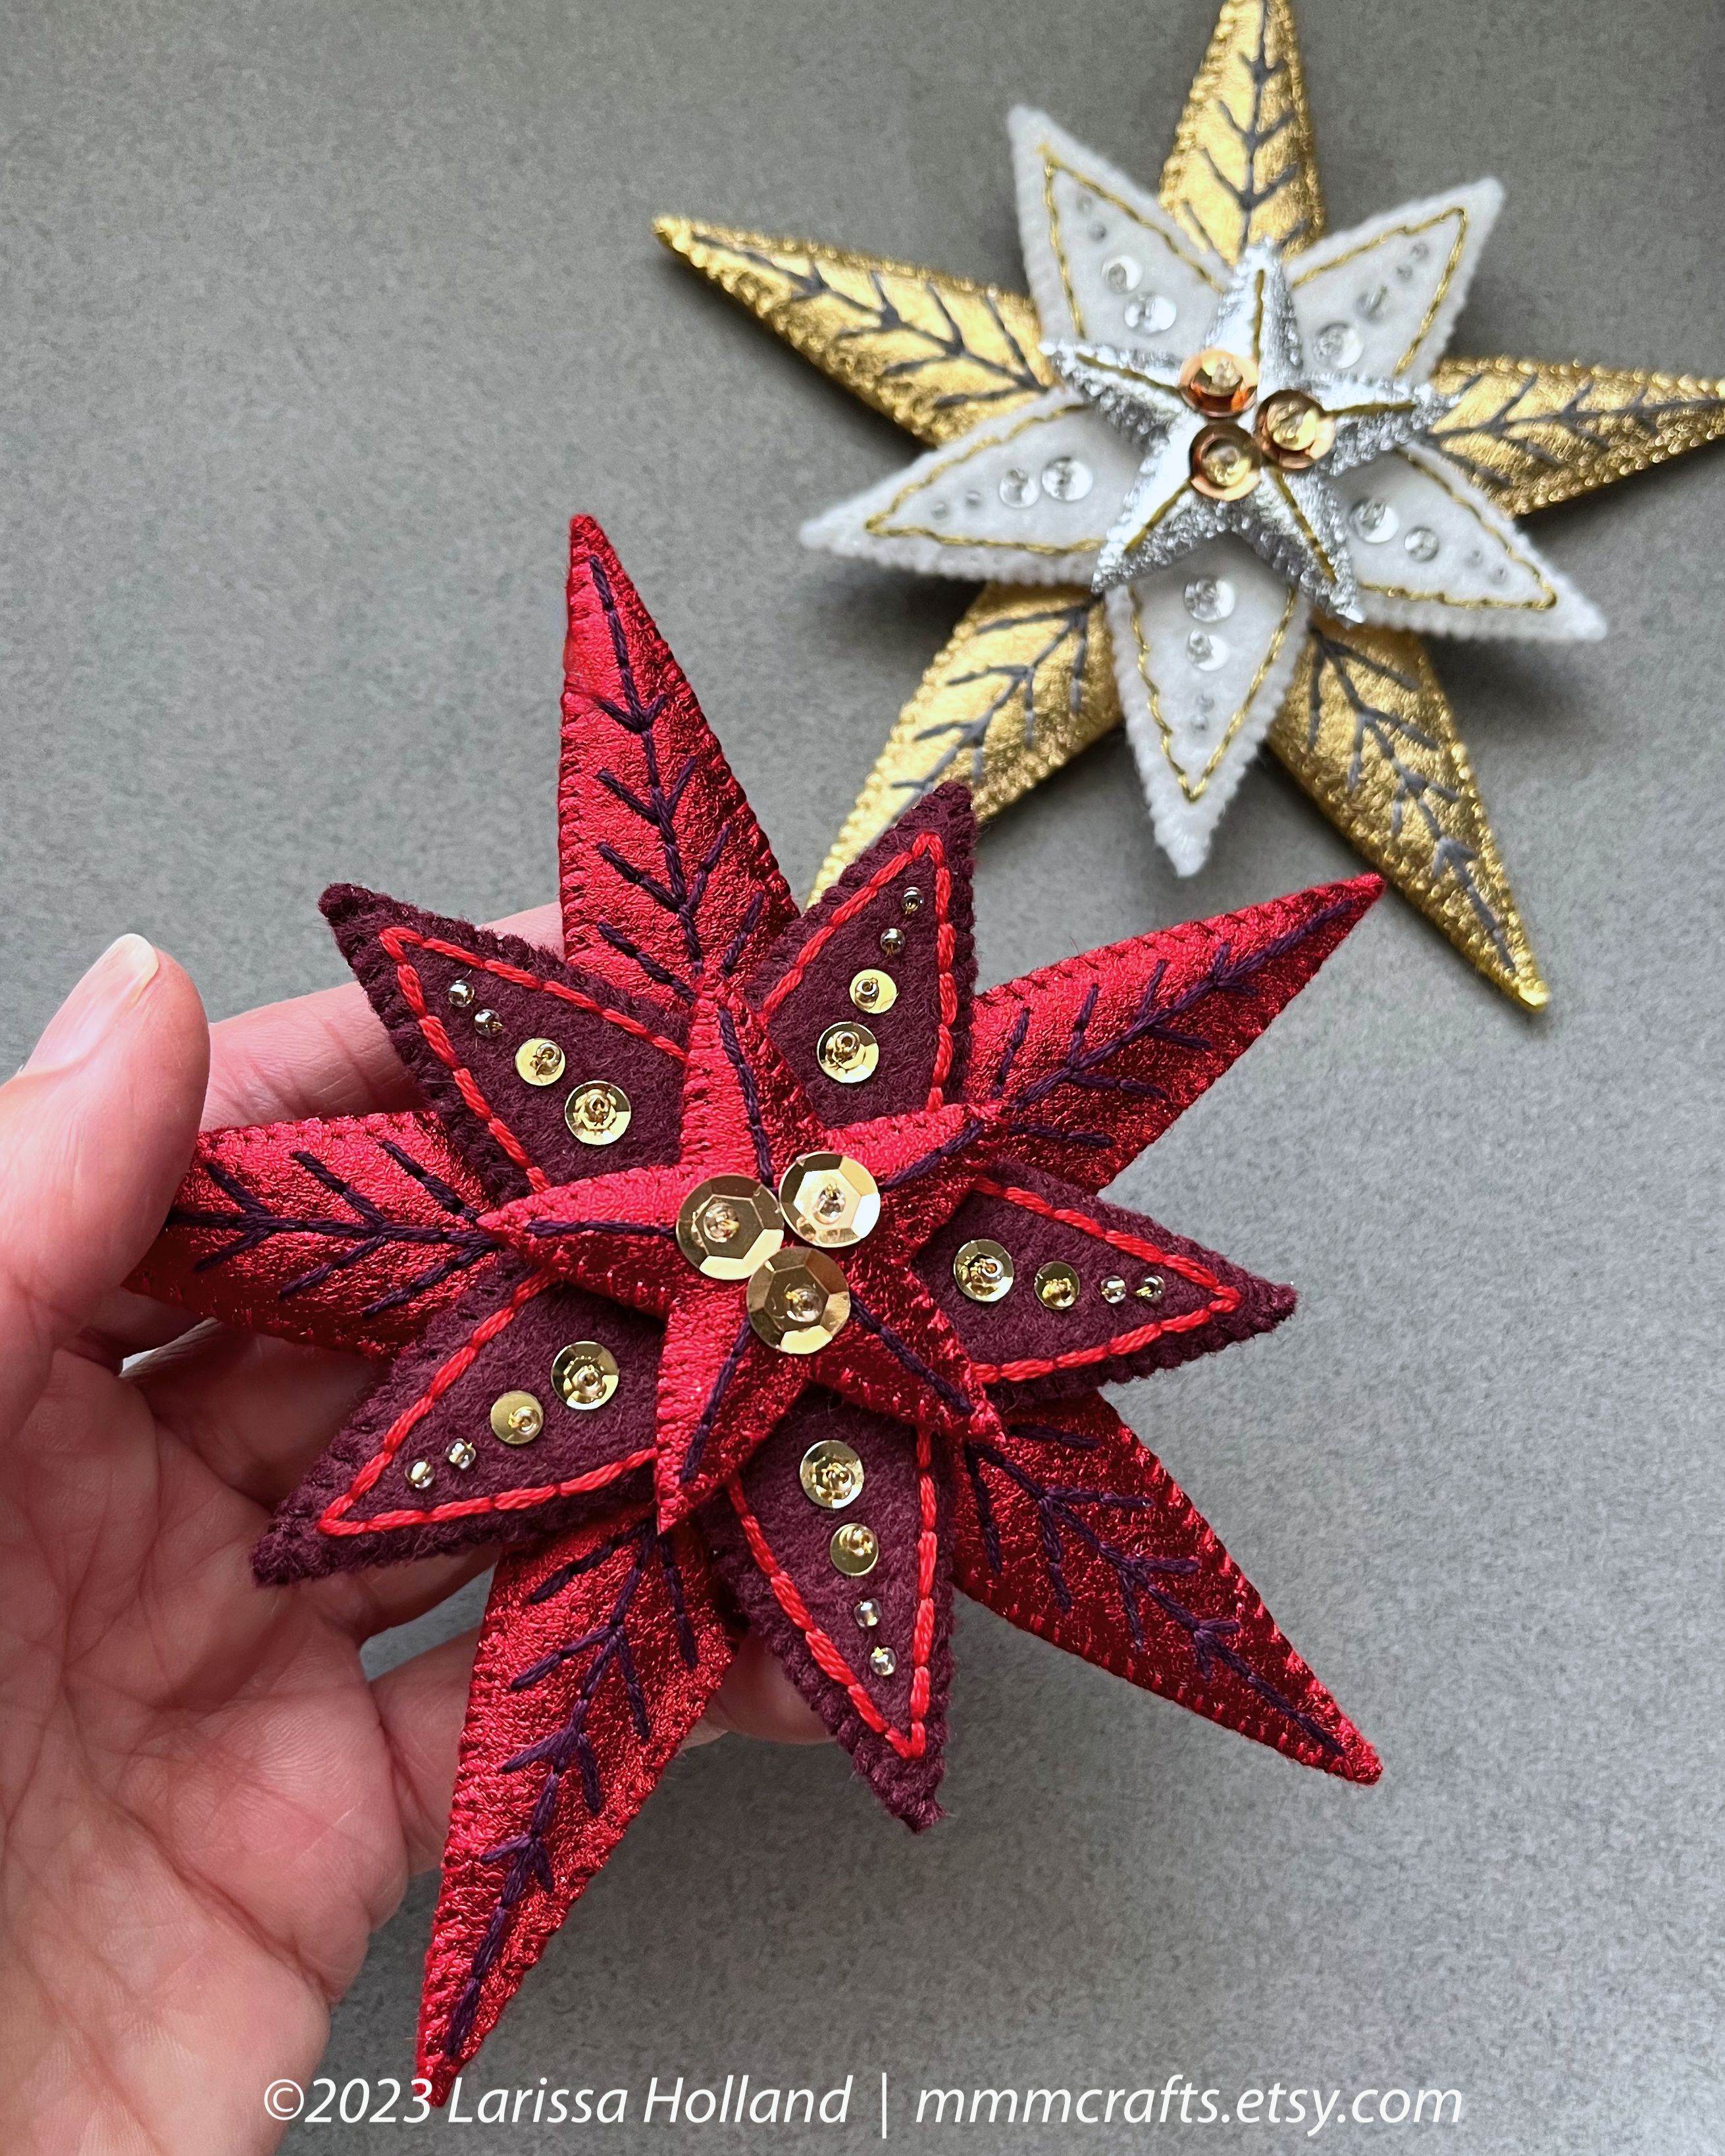
And don't forget the Victorian glam! Choosing to add some metallic embroidery, metallic tassel, and metallic wool felt accents (like the petals) will level up the holiday sparkle.

This ornament is best constructed using Sulky Stick 'n Stitch (aka Sticky Fabri-Solvy) which makes the process much faster, easier, and more accurate. If you already have the materials on hand to make the other patterns in the series, you might just need a few more things like a flat scrap of Pellon 70 Peltex (or sub a white piece of stiffened craft felt), colored pencils, white gel pen, and some white or iridescent glitter. There's a full materials list on the first page of the pattern shown below. Click to zoom:


I will be publishing detailed color guides for these samples soon. Ish. Those will coordinate directly with the amazing felt/floss/notions kits put together for your buying convenience at Benzie Design

To purchase the instantly downloadable PDF pattern, visit my Etsy shop. :-) 

Wednesday, December 6, 2023

make lighted glass block Christmas presents


Have you guys ever done this Christmas craft? It's pretty easy and I love the way the lighted presents add festive magic to tabletops and bathrooms. Anyone who can tie a bow and use a hot glue gun can do this craft. My sister Leigh had a Christmas craft party years ago and we made them. I got the big idea a couple years ago to repeat that party with my own friends and I planned it all and bought the supplies and then ended up getting sick and not being able to attend my own craft party. But my friends had a blast making them.


WHAT YOU NEED:

  • Glass brick with a hole in the side to feed in a string of lights. Back in the day you had to purchase the bricks from your local Home Depot or Lowes and make the hole yourself using a drill bit for glass. Forget that! Craft stores have clued into this and nowadays you can usually find glass bricks in various sizes with handy premade holes available at your local craft/fabric superstore. 
  • If your brick is clear and not frosted you will want to frost just the sides (not the top or bottom) with a spray paint designed to look like frosted glass. That's at the craft store too.
  • A string of lights to put inside. Battery powered or electric, depending on whether you have an outlet handy where you want to put the finished present. Just make sure the wires are either white or metallic. The green wired kind won't look as nice. I think warm white lights look best. 
  • Wired ribbon to make the bow. It's also nice to glue on some festive berries, pine cones, or greenery if you like. If you make your bows using a bowmaker jig, you may need some thin wire or twist ties to secure the loops. You can also use non-wired ribbon (I did on one because I loved the color) but wired ribbon gives nicer results and you can fluff it up after storage.
  • Fray Check to keep the cut ends of the bow from raveling
  • A hot glue gun
  • A frothy coffee (optional)


TO MAKE:

1) Frost the sides (not the top or bottom) of your glass brick using the frosted glass spray paint and let that dry. (I won't attempt to tell you how to drill a hole in a glass brick since I've never done that, so I'll assume you can purchase a brick with nice big hole in back from your craft store.)

2) Feed in your string of lights, leaving the electric plug or battery pack on the outside of the brick. The hole/plug will be in the back. 

3) Measure and cut lengths of wired ribbon to wrap around the center of your brick in both directions, being sure to neatly overlap and hot glue the ribbon to the center top of the brick and not the bottom (so it can sit flat). Don't worry, your big ol' bow will cover the overlaps.

4) Make a big ol' bow with your wired ribbon. (Bow tutorials abound online.) A classic bow or a fancier one with more loops are both fine, just be sure it's big enough to cover most of the top of the brick. It's a nice touch to angle or notch the ends of the bow. Use Fray Check on the cut ends to keep them looking nice. 

5) Hot glue the bow in place in the center on top along with any little embellishments you want to add, like berries, greenery, sparkly bits, etc.

Tada. You're done! Plug it in or turn on the battery pack and enjoy. Makes a nice gift too! 

Sunday, November 12, 2023

ghost couture


Making steady progress on the Ghost of Christmas Yet To Come. Forgive my artistic license here, but I find I just can't restrict myself to varying shades of black. My apologies, Mr Dickens. 

The pointing hand is made with cotton pipe cleaners. It's easy, no worries. And I've decided I don't want to cover up any portion of his robe, so I think I will make the gravestone a separate ornament and throw it in as a bonus. 


I posted this initial test hood/head earlier and I'm still working out how best to do his facial features, which according to the text can't be seen at all. But there has to be a bead inside the hood, so I'll settle for casting his creepy face in deep shadow by wiring the rim of the hood. 

See other patterns in this ongoing series:
https://mmmcrafts.blogspot.com/p/ebenezer-ornament-series.html

Friday, November 3, 2023

Not Even A Mouse pattern is in the shop!


Yay! My new Not Even A Mouse PDF pattern is now available in my Etsy shop: mmmcrafts.etsy.com

Skill level: INTERMEDIATE
(If you finished my Twelve Days series, you are ready!)

Not Even A Mouse is the 5th ornament in my ongoing 'Twas The Night ornament series. It is entirely hand sewn. Sleepy mouse and Teddy are both removable so they can be ceremonially tucked in on Christmas Eve. 


There are options in the pattern to give Mouse a tether or fix him permanently in place. The natural grabbiness of the wool felt keeps the free range mouse securely tucked in. He even stays put when I turn the ornament upside down!


The samples you see here are made with my curated Classic or Retro 'Twas The Night palettes at Benzie Design. One of my samples also features a small amount of their lovely gold metallic felt if you want your teacup handle and foot to be extra fancy!

I'm so excited to be FINISHED! I hope you enjoy sewing your sleepy lil' mice and teacups.
Pattern available here: mmmcrafts.etsy.com

Coming next: The fifth ornament in my Ebenezer series, Ghost of Christmas Yet To Come.

Tuesday, September 5, 2023

back to school means mmmaking!


Back to school means back to cozy fall crafting! Looking for a project? May I suggest my Twelve Days Ornaments? (Shown here in cheerful Benzie Design wool felts and DMC flosses, but choose any colors you like!)

A set of these heirloom wool felt ornaments made by your own clever hands will be such a joy to bring out each year at Christmas. And they are easier to make than they look because of the magic of Sulky Stick n Stitch!

Find the patterns in my Etsy shop:
mmmcrafts.etsy.com

Monday, August 28, 2023

time for Christmas crafting!


Christmas is coming! Do you have your fall crafting planned? May I suggest a nice coffee, a good movie, and a handsewn woolfelt ornament project? They make lovely gifts and are always treasured heirlooms brought out each year.

I have beginner friendly and intermediate PDF pattern downloads in my Etsy shop! All with detailed, step by step instructions: mmmcrafts.etsy.com

SHOWN ABOVE: Intermediate level 'Twas The Night ornament patterns:
1 - Santa Claus
2 - Mrs Claus
3 - Little Elves
4 - All Through The House

Sewn with my curated @benziedesign felt palettes: Classic and Retro. Detailed color guides:

Monday, August 21, 2023

i like michigan


Hey guys! I’ve been on break for a bit. We took a family trip to Michigan before our two girls left for college. I’d never been to Michigan! Conclusion: I’d go back. 

Lovely summer weather (75 as opposed to 96 at home) and it’s generally gorgeous. I learned what a Yooper is. I learned that hostas and hydrangeas and every kind of flower get ginormous and are super happy there. I learned there is a very large Christmas store in Frankenmuth (see photo above, I really wanted to buy more pink glass Christmas joy but was constrained by the size of my carry on)

I looked across the river at Canada. Hey, Canada! Maybe next time, Canada! I learned that Lake Huron has very clear water and wondered why water shoots spectacularly out the backs of the ferries. I learned where the good coffee is on Mackinac. I viewed lots of puzzling sculptures, saw more antique cars than you can shake a stick at, fled from yellow jackets, made friends with koi (I miss you, Spotty and Orangey), and toured a Frank Lloyd Wright house.

In short, it was fun. And now the girls are safely settled in at their schools and it’s back to 96 degrees and an empty nest. And designing stuff.

#mmmcrafts #travelisfun #michigan #stignace #saultstmarie #mackinacisland #grandrapids #butididnttryapasty

Thursday, July 27, 2023

not even a mouse: prototype - year is in, chip is out


More prototype photos. I've found a placement for the year that I like the best – on the cup bottom where the maker's mark would be. Because the ornament hangs from the front rim edge at a slight angle, the cup bottom is at the back of the ornament.
 
The chip – meh. I don't think it adds much to the finished look, it's a pain to manage across the three sewn layers of the cup, and it seems to cause the cup rim to pull out of round. Three strikes – it's out. Maybe an optional embroidered crack instead.

I do like the embroidered ticking stripes on the pillow, but I'm going to try another version with more. Side Sleeper Mouse is the winner! But not happy with Mouse yet because eight year old inner Larissa insists that he can be removed from the blanket (because fun) and therefore he needs optional tiny arms and legs and a wee tail and the blanket needs to be secured somehow for easy in and out.
 
I envision small fingers tucking Mouse in bed with Teddy on the night before Christmas, when all through the house, not a creature should be stirring, not even a mouse. A fun tradition to do on Christmas Eve?
 
But of course if your inner 40 year old says NO way to that because you don't wish for carefully handsewn Mouse to go MIA every year, you may certainly glue him and Teddy in place.

Several have mentioned a tiny tiny stocking, and you may be unsurprised to know that one had already been included in the pattern for trying out on the previous round. So far I haven't gotten to try the stocking because I'm still working out the bigger stuff. It may go the way of the chip. LOL

Tuesday, July 25, 2023

maybe a chip in the cup?

This teacup in progress will have a chip in it. If I like the chip I'll make it an option in the pattern. Little known fact: House mice are commonly known to repurpose your discarded china cups as their tiny little beds. Actually, that is not a little known fact nor a generally known fact because I just made it up, but it sounds true. 

The chip is part of another round of revisions and samples I'm making as I fine-tune all of the pattern pieces. I think I like this teacup embroidery pattern better than the previous coral pink cup (see earlier post), but I'll wait to see how it all looks sewn together. I can't believe I forgot to include the year on the cup somewhere. Doh! I'll have to work that in somehow. More photos to come!

This Not Even A Mouse pattern is the upcoming 5th pattern in my 'Twas The Night ornament series. 

Wednesday, July 19, 2023

not even a mouse: prototype


Couple of prototype photos of my new 'Twas The Night pattern in development: Not Even A Mouse!
 
This sample is by no means final, as I'm still experimenting with details. Cheese wedge was a fail. Not included. Teddy bear was lifted directly from my Wee Mouse pattern and it will be included for sure. I think the side sleeper mouse looks so cozy and snuggled in, so he will probably be the final mouse rather than back sleeper mouse. (But I find back sleeper mouse pretty charming and wanted to do another round of changes on him later, maybe a one-off ornament. Cute little guy with his stumpy legs. Needs fattening up though, bless him. And arms.)

The felt pillow is currently too small. I love the cotton ticking pillow from my Wee Mouse pattern, but I don't want to oblige you to buy special fabric for a less-than-2-inch pillow, so I'm trying a hand embroidered ticking stripe. I'm not currently happy with the embroidery designs on the cup or blanket, and blanket isn't the right size yet...Blah blah blah and about 50 more details I'm dithering about. On we go!

Not Even A Mouse is the upcoming 5th ornament in my 'Twas The Night Ornament Series. Shop all my patterns here!

Tuesday, April 4, 2023

Lodestar ornaments


The upcoming Lodestar Tree Topper pattern will include a few variations, like the Christmas ornaments you see here. Out of this one pattern you will be able to make a fancy tree topper, window pendant, garland, ornaments, mini tree topper, and mini ornaments. 


I forgot to post this photo to my blog, which shows the very poinsettia-like red tree topper with the fancy new alternate 3 point rays in place. Those are also included as an option in the pattern, or you can use the original 1 point rays.

It's still going to be a while until I can release the pattern, but it's going well. I have written and illustrated the first draft, and am now making final samples and edits. The sample making will only take 1000 years. LOL Fewer if I have more coffee. It's slow stitching, y'all.

Tuesday, February 14, 2023

i heart you


happy heart day!
may there be chocolate

Shown: True Love Heart ornament from my Lord a-Leaping pattern made with Benzie Design wool-blend felts, Sulky Stick n Stitch, DMC embroidery flosses. Pattern: mmmcrafts.etsy.com

Thursday, January 19, 2023

a more detailed look at the Lodestar Tree Topper


Here's a look at the completed Lodestar prototype. I posted a video of it on my IG and Facebook pages if you'd like to hop there to see it twirl.
  • Size of the star itself is 11 in. wide x 11 in. tall x 2 in. deep (28 cm x 28 cm x 5 cm) and including the painted dowel lollipop stick it is 17 in. tall (43 cm).
  • All hand sewn and embroidered using the Sulky Stick N Stitch wash-away stabilizer. Materials needed are wool felts, DMC flosses, thread, 5 mm and 8 mm sequins, glass beads, Pellon 70 Peltex, FabriTac permanent fabric glue, 3/16" wood dowel, matte green paint (or whatever color best matches your Christmas tree)
  • This topper should coordinate well with any MmmCrafts ornaments. You can make it with or without the embroidery/metallics and choose coordinating colors to achieve any look you'd like. I do not have any plans to design series specific toppers, but I won't rule it out.
Included in the pattern will be a pendant version to hang in your window or doorway, which will not have a dowel (obviously) and will have the missing point of the star included in place of it. Also pondering including a matching Christmas tree ornament, but I may make that a separate pattern because it would be a good beginner project. In that case, I'd include the suggestion for how to do it in the tree topper pattern (it's basically the three outermost stars with a hanging loop added and the year on the back.) 

If you have a mini tree, for a topper you might just want to buy the future ornament pattern and squash two ornaments together over a couple of pipe cleaners or a thin dowel for the topper. And then you can make mini ornaments using only the outermost star.

The completed one shown above was made with Benzie felts: Aqua and silver metallic. I'm working right now on a new pink/white/red sample after some tweaks to the pattern (shown below). It's Benzie white wool blend and pink metallic felts.


DIFFICULTY: While this is not difficult to make by any means, it does take patience. It uses a basic backstitch for all the embroidery and a whipstitch to put it together. I suggest taking large embroidery stitches to make it go faster. I'm using about a 4 mm stitch here (3/16"). There are one million pieces and 6 pattern pages so far. LOL. If you use Sulky stabilizer for all the pieces (including the Pellon) you'll get two tree toppers from one 12 pack of Stick N Stitch. It saves a lot of time with tracing, but it does use up a lot of stabilizer.
 
I will ponder how to organize a version which will save pages of Sulky by excluding all of the non-embroidered and interfacing pieces so that those who wish to can just trace and cut out those pieces the old school way or with freezer paper. :-)

Friday, January 6, 2023

humbug for my schmoopie - handmade gift 2022


I'm married to a tall, slender, wonderful man who does not love the hurry scurry flurry of December. He's all about faith, family, humor, and good times, but he is just so not about the long train of sparkly events and gift wrapped expectations around Christmas Day. 

In contrast, that poor man is married to me, a procrastinating perfectionist Christmas addict who loves everything about the holidays, even the hurrying, scurrying, and especially the flurrying. So much so that I often create more hurry and scurry than strictly necessary. 

He does his best to put up with the yearly cavalcade of Christmas crazy with no comment and only a little bit of good natured grinchiness. Bless him. So this year I crafted him this specially made-with-love Humbug ornament. Cute little guy! With his grumpy wumpy face and curly green antennae. So fun to make – I was smiling the whole time.

I put it together (at the 9th hour of course!) by modifying the head of Mr Scrooge, the body of Mr Marley, and the hat from Lord a-Leaping. I used a 22 mm head instead of 20 because I wanted to exaggerate it a bit, and I elongated and slimmed down the legs to look more like my beloved real-life six-feet-four-inch Christmas curmudgeon. 

His hair, insect feet, and hands are made from mini green chenille stems, which just do not photograph very well. They are not this neon bright in real life but somehow that particular shade just really blows out in my photos.


It will be so fun to put this Humbug up on our family tree year after year! And I hope it brings a grinchy smile to my sweetie's face every time he sees it.

Thursday, December 15, 2022

Ghost of Christmas Present pattern now available!


I'm so happy to say that Ghost of Christmas Present is now in my Etsy shop. This pattern is the fourth in my Ebenezer Ornament Series, which is inspired by my love for Charles Dickens' spooky Victorian novella, A Christmas Carol

You'll find the difficulty level to be intermediate – not for beginners. If you've completed my Twelve Days Ornament Series, you are likely ready to step into the Ebenezer series! (Twelve Days is a great primer as it builds your skills when you do the patterns in order.)

Skills needed for this particular pattern are backstitch, whipstitch, French knot, drawing on the face, precision cutting/sewing/glueing of very small pieces, and working with chenille stems, beads, and sequins. This one is more complex because of the many small details, not to mention the hidden figures of Ignorance and Want inside the robe! 

As with the rest of my ornament patterns, Ghost of Christmas Present is organized into detailed step by step instructions with scads of diagrams and tips.

The pattern includes 17 years to trace and embroider on the back, if you like.

This short lived spirit is the favorite of many Dickens devotees because of his cheerful demeanor and the fact that he represents the joy, peace, and plenty of Christmas day itself. He is written as a jolly giant, wearing a long, fur-trimmed green robe and holding a magical horn-of-plenty shaped torch with which he sprinkles Christmas joy. He is wearing a holly crown and a jeweled belt, from which hangs an empty, rusty scabbard which represents the absence of war and brotherhood of man. And the best part for Dickens fans: Inside his robe are hidden the pitiable figures of Ignorance and Want, which make their startling appearance toward the end of Scrooge's time with this spirit.


Because of the many pieces, it takes about three crafternoons to make a Ghost of Christmas Present. Put on a good movie or podcast, make a hot cuppa, and enjoy the journey. All 101 steps. :-) 

Don't forget the Victorian gleam! Choosing metallic embroidery threads, tinsel/iridescent chenille stems, and metallic wool felt accents will add even more holiday sparkle to the already glittery sequins and beads.

This ornament is best constructed using Sulky Stick 'n Stitch, which makes the process much faster, easier, and more accurate. If you already have the materials on hand to make Scrooge, Marley, or the Ghost of Christmas Past, you might just need a few more things like metallic wool felt, tinsel and regular chenille stems, and an optional mini jingle bell. There's a full materials list on the first page of the pattern shown below. Click to zoom:


The sparkle of spirits you see above were all made with the same two Benzie Ebenezer color palettes I curated for the rest of the series. I exercised a bit of artistic license in the color of the robes and crowns #becausecolors. I wanted to show you some possibilities with different hair colors too. (Did you know the spirit's hair is initially brown but turns gray with age by the time he disappears?) I also wanted to show the option to make the mustache from card stock (zoom in on the gray haired spirit) if you don't want to purchase a sheet of wool felt just for that tiny mustache. 

Pro tip: If you are buying it anyway or have some already on hand, check out the wool sides of Benzie's metallic and glitter felts for possible mustache colors. The back of the Bellwether bronze metallic felt is a nice warm brown and made excellent mustaches for both of my brunette samples, and the mustache on my redhead is the back of the Bellwether copper glitter felt. As a bonus, the backing makes the tiny tiny pieces less likely to fray apart.

Because chenille stems come in limited colors, I recommend buying the chenille stem for the beard first and then choose matching DMC floss hair and felt (or card stock) for the beard to match. 

I will be publishing detailed color guides for these samples soon. Ish. Those will coordinate directly with the amazing felt/floss/notions kits put together for your buying convenience at Benzie Design

To purchase the instantly downloadable PDF pattern, visit my Etsy shop. :-) 

Wednesday, November 23, 2022

Update on Mr Christmas Present


UPDATE: For those of you waiting patiently on the Ghost of Christmas Present pattern, I thought I’d jump in here to say that despite having high hopes of adding it to the shop in time for my Thanksgiving sale, that just ain’t happening. I must accept. Hopes dashed. 

It’s just physically impossible with the samples I need to make and the photos which need to be taken. So I will let myself enjoy some turkey and my girls being home from college and I’ll shoot for releasing just as soon after Thanksgiving as I can possibly make it. That will hopefully be plenty of time for your Dickensian Christmas crafting.

In the meantime here are some supplies you might need to gather: 
All the usual items needed for my people ornaments (wool felts, wood beads, floss, cotton pipe cleaners, Sulky Stick N Stitch (2 sheets), fabric markers/pencils for faces, Tacky Glue, stuffing) but here are some others for this ornament:

1) One or two chenille stems for his twisted holly crown (I like two different colors or finishes, like one regular and one metallic)

2) Metallic or iridescent chenille stem scraps in one or two colors for the torch flame

3) Metallic wool felt for his belt and scabbard and possibly his torch

4) A tiny jingle bell (4-6 mm) as an optional decoration on the scabbard

5) A chenille stem for his beard in any shade of medium brown or red, plus a skein of matching DMC floss for his hair, plus a tiny tiny scrap of coordinating wool felt for the mustache. In the photo, you can see the reverse side of the bronze metallic felt does well for a mustache, but you can also source a brown felt from your felt stash. Another option is to cut his mustache from matching sturdy card stock if you don’t want to buy a sheet of felt just for that. In that case I recommend adding a coat of Mod Podge to make it more durable.
 
6) Metallic sewing thread for attaching sequins/beads, plus the usual seed beads and sequin array needed for the Ebenezer series. In this case you will need an 8 mm one for the belt buckle and it’s good to have both 4 and 5 mm to alternate for the holly berries if you like. Using one or the other is also an option if you don’t have both.

7) Metallic DMC Diamant is such a nice option for some of the embroidery — it just adds Victorian glam.
 
Alright! I hope that is helpful for your planning. 
(Shown above: Ghost of Christmas Present redhead in progress featuring a side part and an unfiled thumbnail in serious need of a manicure)

Thursday, November 10, 2022

a host of ghosts smiling at me


I'm certainly in cheerful company over here as I work to get this Ghost of Christmas Present ornament pattern in the shop in time for Christmas makings. Besides the smiling host of ghosts, a lot of espresso, chai tea, and old episodes of NewsRadio are helping me along. I'm still deep in edits and sample makin'.

More info on the Ebenezer series and where to buy

Thursday, October 27, 2022

what's your favorite color?


One of the best things about making your own wool felt ornaments? Choosing your very favorite colors. Apparently, I like pink. What's your favorite color?

Now's the perfect time for cozy handmade Christmas gift making, and heirloom ornaments are always treasured! I offer hand sewn step-by-step PDF patterns for confident beginners as well as intermediate challenge seekers. 

Have a look round my blog for lots of ornament info:
https://mmmcrafts.blogspot.com/p/ornament-series.html
and my Etsy shop to purchase the patterns:
https://www.etsy.com/shop/mmmcrafts
Happy to answer questions! Contact me via my shop for a speedy answer.

Maybe choosing your own colors is not your thing? No worries, I also have curated color guides on my blog with materials kits available from Benzie Design and Felt On the Fly.

Pictured above: Hand embroidered wool felt ornaments made from my patterns: Twelve Days Ornament Series, 'Twas the Night Ornament Series, Ebenezer Ornament Series, and also Snow Bird.

Thursday, September 15, 2022

details, details...


Details, details...

Trying out the best way to include the pitiable little figures of Ignorance and Want while still keeping the outward cheerful Christmas Present aesthetic. I confess I had ruled out including these two hidden children for simplicity's sake, but a comment from a follower on Facebook sent me down this irresistible rabbit hole. (You know who you are, Ursula. :-) Thanks.)

It is an interesting challenge to hide them well underneath the robe, and they will make a lovely little Easter egg for any Dickens fan who peeks inside the robe just in case. 

I'm rolling my chair across the carpet from my work table back to the Mac now, armed with a new round of adjustments for the next version. It should go much smoother adding these details as I sew instead of after the fact, like here. Better finishing.

I'm also still working out the details of the magical torch (mostly happy with it) and the best method to hang the empty scabbard from his belt. I'm leaning toward something allowing a little free swing action and maybe a tiny bell somewhere. Because bells are fun.

Simplicity. *snorts* Bah! 

Thursday, August 11, 2022

All Through The House: detailed Benzie color guides, kits available!

All Through The House is the fourth pattern in my 'Twas the Night Ornament Series. Here are the detailed felt/floss/sequin/bead color guides for you below, so that you can easily make houses that look like my Benzie felt samples seen in the photo above, including the gingerbread samples. 

Benzie Design has long been one of my favorite places to purchase wool-blend felts (and they also have 100% wools). They have stellar customer service, quick shipping, and their felt, floss, sequins and beads are an absolute joy to work with! They will be very happy to help you with what you need, including a good many of the tools and other notions you'll need for this series.

First, some handy links to get you started:
To buy the All Through The House pattern: mmmcrafts.etsy.com

To buy the Classic or Retro felt palettes featured below:
Benzie 'Twas the Night felt palettes

To buy the helpful notions kit:
Benzie 'Twas the Night notions kit

To shop their beautiful sequins & beads:
Benzie Sparkle & Shine page

They are looking into providing a kit for the gingerbread samples also, so check with them about that. You can also purchase what you need a la carte from my guides below.

Looking to shop some of the notions locally? Check out this post.


OK! Here are the Benzie color guides:


Classic Palette Blue/Red Original House

BENZIE FELT COLORS:

Swan: House wrap 
White: A shingles, chimney rim
Ecru: B shingles
Chartreuse: Christmas tree (I cheated and used a color here which is not in the Classic palette. If you don't have the Retro palette, just use white for your tree, like the yellow house below. If you have the Retro palette, you could also use Moss, if you prefer.) 
Coral: Interior rug

STIFFENED CRAFT FELT COLORS:

White: Foundation, roof base, interior walls, interior window covers 
Black: Windows, welcome mat
Red: Door

CARD STOCK COLORS:

White iridescent glittered: Window frames, door frame, icicles 
Shimmer red: Chimney
White: Roof braces
Red: Door backing

FLOSS/SEQUIN/BEAD COLORS:*

House wrap: DMC 3845 clapboard, DMC 892 running stitch, DMC 666 year
Door: DMC 892 panels, teal 5 mm cupped sequins, Benzie Red seed beads, Benzie 4 mm Gold Metallic sequin doorknob w Benzie Gold Metallic seed bead
Windows: DMC B5200, medium grind iridescent glitter
Welcome Mat: DMC 666, DMC 3845, DMC 892
Christmas Tree, String Lights: DMC Diamant D3852, Benzie Teal and Red seed beads, 6 mm gold tinsel chenille stem
Interior Rug: DMC 666, DMC 3845
Hanging loop: DMC 5283
*All sequins/beads sewn with gold sewing thread


Classic Palette Yellow/Blue Original House:

BENZIE FELT COLORS:

Mustard: House wrap 
White: A shingles, chimney rim, Christmas tree
Ecru: B shingles
Peacock: Door (stiffened with Aleene's Stiffen Quik)
Swan: Interior rug

STIFFENED CRAFT FELT COLORS:

White: Foundation, roof base
Black: Windows, welcome mat
Red: Interior walls and window covers

CARD STOCK COLORS:

White iridescent glittered: Window frames, door frame, icicles 
Blue to match door: Chimney
White: Roof braces

FLOSS/SEQUIN/BEAD COLORS:*

House wrap: DMC 831 clapboard, DMC 3844 running stitch, DMC 3844 year
Door: DMC 831 panels, red 5 mm cupped sequins, Benzie White seed beads, silver 5 mm sequin doorknob w Benzie Silver Metallic seed bead
Windows: DMC Diamant D168, medium grind iridescent glitter
Welcome Mat: DMC 666, DMC 3845, DMC 831
Christmas Tree: DMC Diamant D3852, Benzie Teal and Red seed beads, 6 mm gold tinsel chenille stem
String Lights: DMC Diamant D168, Benzie Teal and Moonstone seed beads
Interior Rug: DMC 3844, DMC 831
Hanging loop: DMC 5283
*All sequins/beads sewn with silver sewing thread


Retro Palette Pink/Orange Original House

BENZIE FELT COLORS:

Flamingo: House wrap 
White: A shingles, chimney rim
Ecru: B shingles
Julep: Christmas tree
Chartreuse: Interior rug
Marigold: Welcome mat

STIFFENED CRAFT FELT COLORS:

White: Foundation, roof base, interior walls, interior window covers 
Black: Windows, door

CARD STOCK COLORS:

White iridescent glittered: Window frames, door frame, icicles 
Blue-green: Chimney
White: Roof braces
Black: Door backing

FLOSS/SEQUIN/BEAD COLORS:*

House wrap: DMC 608 clapboard, DMC 3850 running stitch, DMC 606 year
Door: DMC 603 panels, teal 6 mm cupped sequins, apple green 5 mm cupped sequins, kelly green 5 mm cupped sequins, Benzie Moonstone seed beads, silver 5 mm cupped sequin doorknob w Benzie Silver Metallic seed bead
Windows: DMC B5200, medium grind iridescent glitter
Welcome Mat: DMC 601, DMC B5200
Christmas Tree: DMC Diamant D316, Benzie White and Moonstone seed beads, 6 mm silver tinsel chenille stem. (If you can't source the pink Diamant you can sub in DMC 601 or D168)
String Lights: DMC Diamant D168, Benzie Foxglove, Teal, and Green seed beads
Interior Rug: DMC 3850, DMC 601
Hanging loop: DMC 5283
*All sequins/beads sewn with silver sewing thread


Retro Palette Olive/Mint Original House

BENZIE FELT COLORS:

Moss: House wrap 
White: A shingles, chimney rim
Ecru: B shingles
Julep: Door (which has been stiffened with Aleene's Stiffen Quick), interior rug
Chartreuse: Christmas tree
Flamingo: If you can't find bubblegum pink stiffened felt, sub Flamingo for the welcome mat

STIFFENED CRAFT FELT COLORS:

White: Foundation, roof base 
Black: Windows
Bubblegum pink: Welcome mat, interior walls and window covers (If you cannot find pink stiffened felt, sub white stiffened felt for the interior walls/covers and use Flamingo wool blend for the welcome mat.)

CARD STOCK COLORS:

White iridescent glittered: Window frames, door frame, icicles 
Mint linen texture: Chimney and door backing
White: Roof braces

FLOSS/SEQUIN/BEAD COLORS:*

House wrap: DMC 3851 clapboard, DMC 603 running stitch, DMC 603 year
Door: DMC 580 panels, iridescent pink 5 mm cupped sequins, Benzie Foxglove seed beads, Benzie 4 mm Gold Metallic sequin doorknob w Benzie Gold Metallic seed bead
Windows: DMC B5200, medium grind iridescent glitter
Welcome Mat: DMC 934, DMC 3851
Christmas Tree: DMC Diamant D3852, Benzie Foxglove and Red seed beads, 6 mm gold tinsel chenille stem
String Lights: DMC Diamant D3852, Benzie Red and Green seed beads
Interior Rug: DMC 580, DMC 603
Hanging loop: DMC 5283
*All sequins/beads sewn with gold sewing thread


Gingerbread Version, Pink/Red
 
BENZIE FELT COLORS:
Nutmeg: House wrap 
Flamingo: Interior rug
White: Chimney rim
Bellwether White Glitter: A Shingles (or sub White wool blend)
Bellwether Pink Glitter: B Shingles (or sub Pink or Flamingo wool blend)

STIFFENED CRAFT FELT COLORS:

White: Foundation, roof base 
Black: Windows
Red: Welcome mat
Brown: Door, interior walls and window covers (If you cannot find brown stiffened felt, sub white or red stiffened felt for the interior walls/covers, use red stiffened felt for the door, and sub Pink glitter wool or Pink/Flamingo wool blend felt for the welcome mat. You'll also need to change the doorknob color and welcome mat embroidery colors to contrast.)

CARD STOCK COLORS:

White iridescent glittered: Window frames, door frame, icicles 
Red shimmer: Chimney
White: Roof braces
Dark brown: Door backing (if you change the door to red, just match the door)

FLOSS/SEQUIN/BEAD COLORS:*

House wrap: DMC B5200 clapboard, DMC 666 running stitch, DMC B5200 year
Door: DMC B5200 panels, medium pink 5 mm cupped sequins, Benzie Red seed beads, Benzie 4 mm Red Metallic sequin doorknob w Benzie Red seed bead
Windows: DMC B5200, medium grind iridescent glitter
Welcome Mat: DMC 603, DMC B5200
Candy Canes: DMC 666
Gumdrop Shrubs: Tulip red permanent fabric marker, pink and white acrylic paint, medium grind iridescent glitter
Santa Claus: DMC 310 belt, 5 mm silver sequin, medium grind iridescent glitter
String Lights: DMC B5200, Benzie Red and Foxglove seed beads
Interior Rug: DMC 666, DMC B5200
Hanging loop: DMC 5283
*All sequins/beads sewn with silver sewing thread


Gingerbread Version, Green/Teal/Red

BENZIE FELT COLORS:
Nutmeg: House wrap 
Julep: Interior rug
White: Chimney rim
Chartreuse: Welcome mat
Bellwether White Glitter: A Shingles (or sub White wool blend)
Bellwether Clover Green Glitter: four B Shingles
Bellwether Julep Glitter: two B Shingles

STIFFENED CRAFT FELT COLORS:

White: Foundation, roof base 
Black: Windows
Brown: Door, interior walls and window covers (If you cannot find brown stiffened felt, sub white or red stiffened felt for the interior walls/covers, and use green or red stiffened felt for the door.)

CARD STOCK COLORS:

White iridescent glittered: Window frames, door frame, icicles 
Red: Chimney
White: Roof braces
Dark brown: Door backing (if you change the door color, just match the door)

FLOSS/SEQUIN/BEAD COLORS:*

House wrap: DMC B5200 clapboard, DMC 906 running stitch, DMC B5200 year
Door: DMC B5200 panels, teal 6 mm cupped sequins, Benzie Green seed beads (but I wish I had used Benzie Red), Benzie 4 mm Clover Metallic sequin doorknob w Benzie Green seed bead
Windows: DMC B5200, medium grind iridescent glitter
Welcome Mat: DMC 666, DMC 943
Candy Canes: DMC 666
Gumdrop Shrubs: Tulip red permanent fabric marker, apple green and white acrylic paint, medium grind iridescent glitter
Santa Claus: DMC 310 belt, 5 mm gold sequin, medium grind iridescent glitter
String Lights: DMC B5200, Benzie Red, Green, and Teal seed beads
Interior Rug: DMC 666, DMC 937
Hanging loop: DMC 5282
*All sequins/beads sewn with gold sewing thread


I hope these guides were helpful! (Looking for other color guides? Check here.) The way I've combined these Benzie Classic and Retro felt colors are just a few of the possibilities! Feel free to follow these guides exactly or come up with your own lovely color variations. I'd love to see what you make. :-) Here's the IG hashtag: