Tuesday, December 30, 2014

handmade gifts 2014: downhill skier ornament for trent


Nephew Trent received this downhill skier made from wood beads, toothpicks, pinecone, pipe cleaners, popsicle sticks, wool felt and a jingle bell.


It was fun to put together. Same pattern as the previous pinecone elf ornaments, only this time more athletic!

Monday, December 29, 2014

handmade gifts 2014: penguin ornaments for asher and gage


When I saw the MS pinecone penguins I was charmed and then determined to make my own version. I didn't follow their tutorial because I wanted to use painted wooden beads for the heads and stiffened black felt for the wings and feet instead of acorn caps and pinecone petals. So I made it up as I went along.

The tall ornament is for big brother Gage and shorty is for little brother Asher.


I used the bead hole on the front of the faces to insert cotton pipe cleaner beaks. I painted store bought pinecones with white acrylic paint on the tips only and then hot glued the finished heads, wings and feet. The fun part was adding the tiny ear muffs, scarves and hat.


They look cute from behind too. Especially shorty. The hole on the back of the head was a convenient place to add the hanging loop after I inserted a twisted black pipe cleaner.

More penguins coming!

Sunday, December 28, 2014

handmade gifts 2014: replacement doll for audrey


Meet Amelia. A little bird told me a few months ago that a certain puffy green doll was lost in the move and that there was sadness. Well, we can't have that. While I couldn't remake the doll to match Miss MIA, I did make her a red-haired sister. Blue, flowery and not as poofy puffy. I was excited about this at first but I hope that doesn't create more sadness. You never know with these things. There may be green terry cloth nostalgia to overcome.


You can't really tell but she also has pink streaks in her hair. I thought Audrey might like that. I tell ya, I made a royal hash of the hair at first and you can probably tell if you look closely (so don't look closely). It has been six years since I made the first doll and the instructions are a study in brevity. They don't include tips for the long hair so I have no idea how I did it for the first doll. This doll does have hair, and it is sewn on in places, so I'm calling it a win.

If you make the Martha doll, be sure to use very stretchy jersey knit for the head, hands and feet. Also it's very helpful to sew a basting circle on the feet and hand squares to use for gathering, draw them up, tie them off, and then stuff them, not the other way round. I didn't use batting to fill them as instructed, I used polyfil for the whole doll.

I think the pocket on the original doll was intended for baby teeth. This doll has a wee little pocket too, which is still good for teeth or whatever tiny treasure needs to hide there. Maybe small, folded, very secret lists.
 

Saturday, December 27, 2014

handmade gifts 2014: gold ring and goose a-laying ornaments for robyn


Presenting Robyn's very tardy Gold Ring and Goose A-Laying ornaments. Super tardy. Three years tardy. Wait, that can't be right. Wow, is that right? Great gophers, it is right. But I'm back on track! Halfway to your complete set, Robyn. Longest running Christmas gift ever.


I like to include some sparkly sequins and glass beads on these one-of-a-kinds for her.


I had fun making them despite the fact this is actually the second ring and fourth goose ornament I've made for her during the dry spell. Sometimes it takes a few years tries to get it right. (Yes, dear readers, this is a sneak peek of the future patterns number 5 and 6.)

Thursday, December 25, 2014

a merry Christmas to all


Love and joy come to you
And a merry Christmas too
And God bless you and send you a happy New Year
And God send you a happy New Year!

Mmmcrafts readers, thanks so much for going with me through another year of creative makery (and time mismanagement). 

May your Christmas be so merry and bright, filled with the love of God and with family, friends, peace and happiness. I'll see you again with more Twelve Days ornaments and general manic crafting in the new year.

My next post will kick off the parade of handmade: all the gifts I made for Christmas that I couldn't show you until after the gifting!

Sunday, December 21, 2014

you + paper + Christmas music


Let the festooning begin! Still time to make some old fashioned Christmas decorations. Put on some Mel Tormé, get out your scissors, pour a cup of hot chocolate and make like Buddy.

Craft Finnish stars and hang them up. They look complex but are easy to make. I made mine last year using this tutorial. I packed them carefully away so I have them hanging up again this year. Last week the girls and I made mini Finnish stars from some sparkly paper for the girls' mini tree toppers (we used 6 inch x 1/2 inch strips). They work well as tree toppers because they just slip over the top spike of the tree, no holder necessary.


Of course you must cut snowflakes and tape them everywhere! They look nice on windows or fluttering from threads. Make a blizzard. Here's my tutorial.


And then make these clever and easy Simple Paper Stars made from origami paper. Add a few hundred paper chains and you are ready for Santa, Buddy style.


And I just saw these lovely paper ornaments from Design & Form. Pretty minimal instructions but you'll be OK. Very simple but nice! I need to make a couple of small paper trees for my mantel and I think I'll use this method.

And you know who has much knowledge about paper Christmas ornaments? Jessica Jones:
How About Orange paper ornaments posts

Just keep scrolling through those blog posts. She also has a great Christmas project Pinterest board going too. No shortage of ideas there. So much papery fun to be had! You may need another cup of cocoa.

Monday, December 1, 2014

Flora Needle Book erratum

Hey, guys! Just to let you know that there is a typo on the Flora Needle Book pattern itself that has now been corrected, thanks to vigilant mmmaker Melissa. Thanks, Melissa! I always appreciate it when you guys take the time to contact me about these things. It makes it a better pattern for everyone!


The pattern piece for the COVER is the correct size, however the size notation on the pattern piece is incorrect: it should be 5.5 x 3 inches instead of 5.5 x 3.5 inches. To correct your pattern all you need to do is cross out the 3.5 and write in 3.

Again, the pattern piece itself is the correct size, it's the pattern label that is incorrect. Let me know if you have any questions! Sharp eye, Melissa!

Wednesday, November 26, 2014

French Hen pattern is in zee shop!


At last! French Hen patterns are available and just waiting to be made for your Christmas tree. This is the third pattern in my Twelve Days pattern series. (Here are the first two patterns: Partridge & Pear, Turtle Dove.) I'll continue to release patterns until the entire series is available. This is the last one for this year, and hopefully still in time for some holiday hand making fun.


This pattern utilizes the magical and amazing time-saving properties of Sulky Printable Stick 'n Stitch (formerly known as Sulky Printable Sticky Fabri-Solvy), a stabilizer that makes quick work of these ornaments. There is no tracing or transferring of embroidery designs. Just sew right on top of the printed lines:


If you can do basic hand embroidery stitches then you can do this project. There are helpful tips for whipstitch, backstitch and French knots in the Resources section of the pattern. And of course, lots of step by step diagrams. I'll be using the same stabilizer method for each of the ornaments in the series.

You can find all three currently available patterns in this Twelve Days series in both my Etsy and my Craftsy shops.

Saturday, November 22, 2014

quickie gadget cozy


I took some time out of my manic hen sewing to whip up this gadget cozy for my sister-in-law, Tiffany. She just got a new birthday purse and her old cozy did not match. Shocking! So I had to do something about that.


It's fun to revisit a pattern that I put together a while ago. Completely fresh eyes to look it over. And reading my own instructions keeps me from making the doofus mistakes I would make when I'm trying to get a project done in a hurry.


Start to finish took about an hour. It's a very quick project and a handy thing to have in your purse for kleenex or gadgets or anything that needs an anchor. I keep mine hanging from the strap inside my purse so I don't have to fish around for my phone in the bottom of my bag with all the bobby pins and cough drop wrappers.

Thursday, November 13, 2014

say bonjour to my leetle friend


Zees is my new French Hen ornament design, numbare three in zee series (here is numbare one and numbare two). I sink she is très bon. Ok, ok, je suis désolé, Juju, I'll stop it now.


I'm still writing the pattern (whilst wearing a jaunty beret and of course seeping a café au lait) but I'm determined to get it done and released soon! This one will be made in the same time-saving method as the first two patterns, utilizing the fantastic Sulky stabilizer to quickly do the embroidery and with no pattern tracing or transferring of embroidery designs. Sweet.

Tuesday, November 4, 2014

this foot was made for walkin'


Haha, get it? Walking foot. The first few lines of machine quilting have been sewn on my throw quilt. I spent a long, knee popping time over the weekend crawling around on the floor and baste stitching my pinned quilt sandwich together. Can't say I enjoyed that part. I also can't say I'm exactly enjoying the machine quilting part just yet.


I've wonkified my straight lines so far and am now regretting my choice of off-white thread. It's just so very visible on my dark, solid backing. At first I thought the contrast would be great but now it is merely spotlighting my ineptitude. LOL. This throw will have a lot of handmade charm.

And oh yeah, I changed my mind again about the block design since I last posted. I do super love how the new quilt top arrangement came out, and also love my wonky hugemongous double cross on the back...but I am going to force myself to wait and show you the finished quilt soon. That will help motivate me.

Thursday, October 23, 2014

what I'm up to


Through some misguided vote of confidence I've been put in charge of planning my extended family's Christmas gathering this year. So naturally I've decided to make it as heinously complex as possible with a progressive dinner! And caroling! And a trivia contest! And Secret Santa gifts! And no football watching, gadget staring or napping whatsoever! We will have old fashioned fun if it kills us.


Also I'm attempting to finish this simple-turned-soul-sucking throw quilt I planned to whip out, oh, nine months ago. I'm so tired of seeing the stack of fabric that I intentionally put right in my way on a crucial corner of the work table. Every day an inner dialog like this:

Oh. There's that stack of quilt fabric. Again.
(stab of guilt)
I should really finish that because it would be nice to be able to use this end of the table.
And I totally will.
Later.
(Places coffee cup on top of stack)

So even though there are many things I'd love to be making right now, like Liberty tops and French Hen ornaments, I'm forcing myself to work on this stinkety quilt project. Which I'm having to do the hard way now because in my novice quilting fervor I started right away to whack it all apart and sew it together nine months ago to create a random, rectangular pieced throw. No design needed! Sewn randomly together! It'll be quick! I'm gonna love it!

After staring at it for months and not loving it, I've decided I can't possibly continue with that idea, I simply must make one that looks more like this:


I'm learning through this process that perhaps I'm not cut out to be a habitual quilter. Because cutting squares is BORING. Especially when you have to cut each one individually from your fabric because you are a doofus and have already cut it once and now have to turn it just so in order to squeak two squares out of each piece. GAH. At least with the white fabric I've been able to cut several squares at a time.

Another reason I'm not cut out to be a quilter is I freak out over small inaccuracies of cutting and sewing. How do you people make everything come out so neatly matched? I sweat over everything because I know my mistakes are going to snowball as I go along. Which requires tedious pauses to square up each square. It drives me insane.

Wish me luck. I'm plodding on with it, casting longing glances at my felt and shirt patterns.

Sunday, October 12, 2014

Nani IRO Wiksten blah blah blah


Yes, it's another Wiksten tank (also here, here and here). I'm building quite a collection of them. I've worn them a lot in the summer and now they'll make great layering pieces for fall. I purchased this beautiful Nani IRO double gauze a few months back but only just got around to making this because we took a family trip to the Bahamas.

As I stood over my work table I puzzled for some time about the best way to cut out the tank and still have the most interesting pieces of the large abstract print located in the best spots. I was also trying to save enough fabric to eke out something else in future so that doubled the quandary. There was no perfect solution in the end so I just closed my eyes and cut.

Monday, September 29, 2014

welcome home and happy birthday, Hobyn


Did I tell you? My dear bestie and her family have now moved back stateside. Yay! Their years in Rio were lovely but there's no place like home. And now it's her birthday. So I thought a couple of mementos from her time in the warm southern climes of Brazil would be appropriate!

First I put together a photo book of our time together in Rio. I love making iPhoto books. I spend way, way too much time arranging everything just so. (If you'd like to see more about the trip, go here, here and here.)

Then with the help of my intrepid brother-in-law, Robby, I was able to make the Brazilian coins I brought home from my trip into this charm bracelet.


Sometimes it's a little unfair how pretty coins from other countries are. I especially like the two-tone gold/silver ones.


This bracelet looks a lot like the one I made myself when I was a young teen. And that is because this one is made from the same silver necklace that I frankensteined to make my own coin bracelet some thirty years ago. *coughhoardercough*

Just goes to show you, pack ratting pays off. I think that double chain makes a cracking charm bracelet! And goodness knows the silver finish has proven impervious to the passage of time. (And I still have enough for at least two more bracelets!)


After my failed first two attempts at drilling tiny holes in the coins myself (I don't know why it was so hard for me, this tutorial makes it look like a piece of cake), I handed that job over to a professional. Thanks, Robby! Once that was done, the rest was easy. Harvested jump rings and put the lobster clasp on and finished. I love the cheerful clinky clink sound it makes on your wrist.


I also threw in these pattern weights for her that I've been meaning to make for months. Pretty easy to make. The tutorial is here.


Basically you hot glue two 3/4" oversized zinc washers from the hardware store together and then wrap them tightly with ribbon to make it purty. If you hate to pin patterns you need to make yourself some of these. So that's everyone. I still need to finish my own set. I have been known to anchor my patterns with scissors, rulers, jars, coffee cup, and anything else within arm's reach on my craft table. These will be really handy. And less sloshy.


And lastly, her birthday card. A September birthday deserves a warm, orangey autumnal card. (It's also pumpkin spice flavored.) It is made from paper, wool felt, ribbon, and those tiny pom poms you can get en multicolored masse at the craft store. I never thought I'd have a use for tiny, pale orange pom poms but I did. Hoard, people.

Wednesday, September 24, 2014

curated felt color collection/felt & floss color guides for Turtle Dove


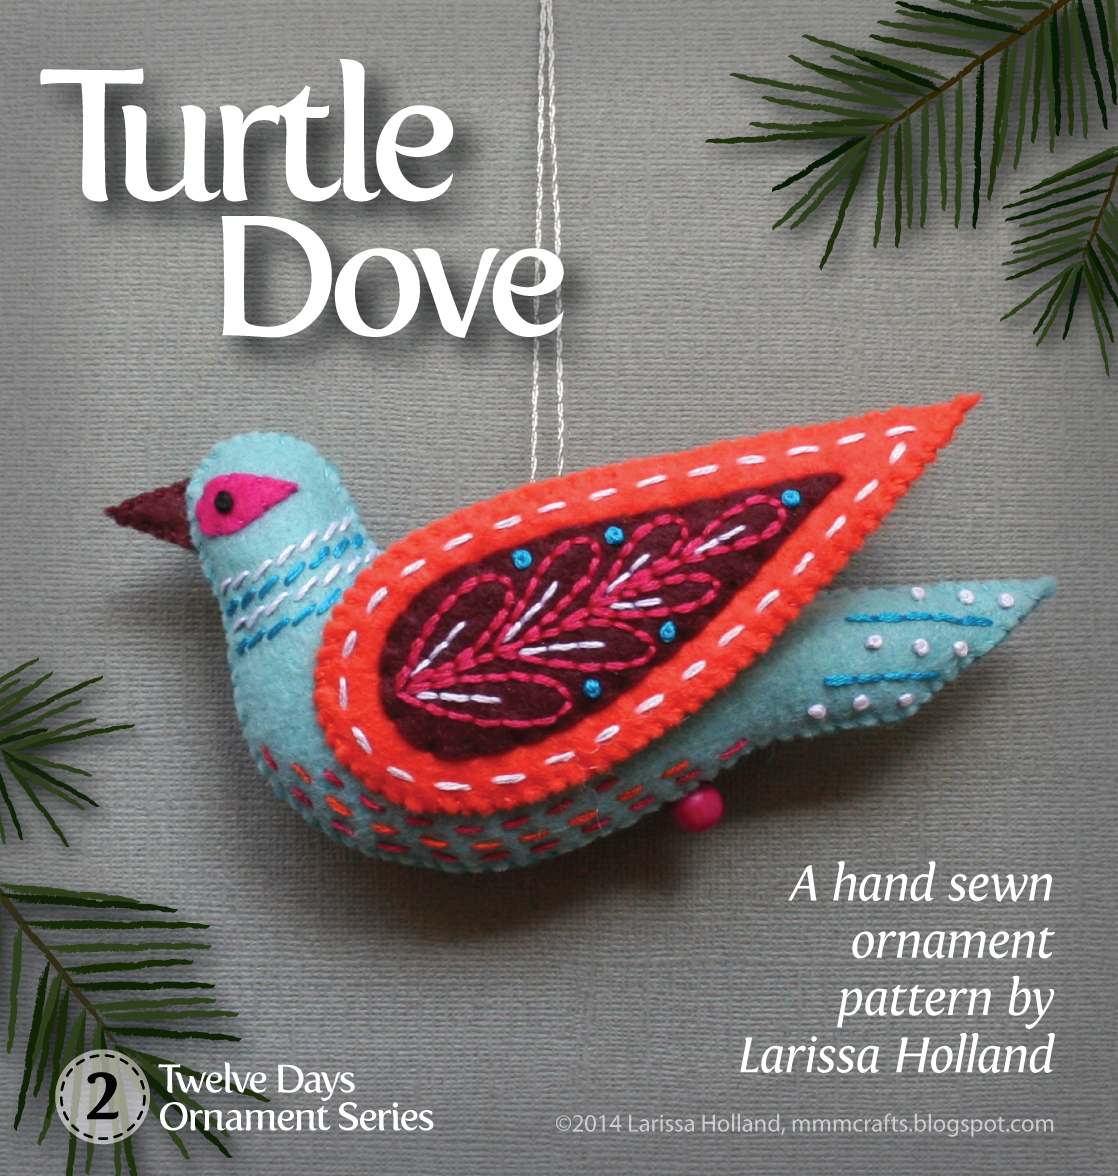
Once again, Benzie Design has come through with a bundle of felts and floss that you can purchase if you want to make Turtle Dove ornaments that look like my samples in the picture above!

This Benzie felt collection includes:
1) Peacock
2) Aqua
3) Swan
4) Magenta
5) Burgundy
6) Orange
7) Mustard
8) Ochre
9) Silver
10) Graphite

It's an easy and quick way to get the matching wool blend felts and flosses for my pattern. I highly recommend Renae's shop. I've always received the best customer service and lovely wool-blend felts!


The photo above shows the pretty felts alongside the matching floss bundle. You will need the matching flosses in order to sew your pattern pieces together, so purchasing the floss add-on is handy. PLEASE NOTE: You will also need to purchase contrasting colors of floss for the decorative embroidery from your local craft store.


Blue/orange Turtle Dove felt colors:
Body: Swan (optional: I used Peacock for the body back)
Wing: Orange
Wing inset and beak: Burgundy
Eye detail: Magenta

Blue/orange Turtle Dove decorative embroidery colors:
DMC Blanc (white) or B5200 (snow white)
DMC 310 (black)
DMC 3844 (dk bright turquoise)
DMC 3804 (dk cyclamen pink)
DMC 947* (burnt orange)

Grey/mustard Turtle Dove felt colors:
Body: Silver (optional: I used Graphite for the body back)
Wing and eye detail: Mustard
Wing inset and beak: Graphite

Grey/mustard Turtle Dove decorative embroidery colors:
DMC Blanc (white) or B5200 (snow white)
DMC 310 (black)
DMC 3799 (v dk pewter gray)
DMC 3852* (v dk straw)
DMC 947* (burnt orange)
DMC 666 (bright red)

*These colors are included already in the floss bundle

You can purchase the curated wool-blend felts only OR you can purchase the felts bundled with the matching floss. The pull down menu includes options to purchase the Partridge & Pear felt/floss collection as well, and that list will grow as I release new patterns in the series. Pretty awesome!

Monday, September 22, 2014

you'll be gladder without your bladder


Gladder. That's not a word but it's funny. I quite enjoyed making these cards for Chelsea and Mattheus. It was a nice break from Christmas ornaments. My niece Chelsea has recently parted ways with her recalcitrant gall bladder...


(if you didn't know, this is really and factually what a sick gall bladder looks like)

 ...and neighbor Mattheus had a birthday.


Both cards are 4.25 x 5.5 inches folded (that way you can get two cards from one 8.5 x 11 sheet of card stock, so I prefer this size). You can see I was feelin' the black/chartreuse/green/orange color palette. The paper eight and the gall bladder were drawn and cut from card stock and then enhanced with colored pencils and punches. I used foam pop dots to elevate them on the black card stock and then added white gel pen details. Taped an iTunes gift card inside and voila!

FYI: If you are wondering about a felt color collection for Turtle Dove, Renae at Benzie Design is working one up as we speak! Great choice if you would like to make some Turtle Dove ornaments that are the same colors as mine. The felt bundle (with matching floss) will be available in her shop soon. I'll post about it!

Friday, August 29, 2014

Turtle Dove pattern in the shop!


I'm done, I'm done! Here's the second ornament in the Twelve Days ornament series, Turtle Dove. (Here's the post for the first set, Partridge & Pear.) I'm really happy with the way this turned out and I'm still loving the Sulky stabilizer which makes this handmade ornament series so so easy to make. If you can handle basic embroidery stitches you can totally do this project, and do it well.


The key is the Sulky Printable Stick 'n Stitch (formerly known as Sulky Printable Sticky Fabri-Solvy), a wonderful felt crafting stabilizer. You simply print my ornament pattern on the water soluble stabilizer, adhere it to felt and then embroider right through it. No tracing or transferring complicated embroidery patterns by hand. Outstanding! Read through this earlier post to learn more about how the process works. I've listed some sources where you can purchase the stabilizer in the pattern.


You can purchase this instant download Turtle Dove pattern PDF in either my Etsy or my Craftsy shops. Go to the listing to get more details on the pattern itself. I hope you enjoy it!