Showing posts with label prototype. Show all posts

Thursday, December 7, 2023

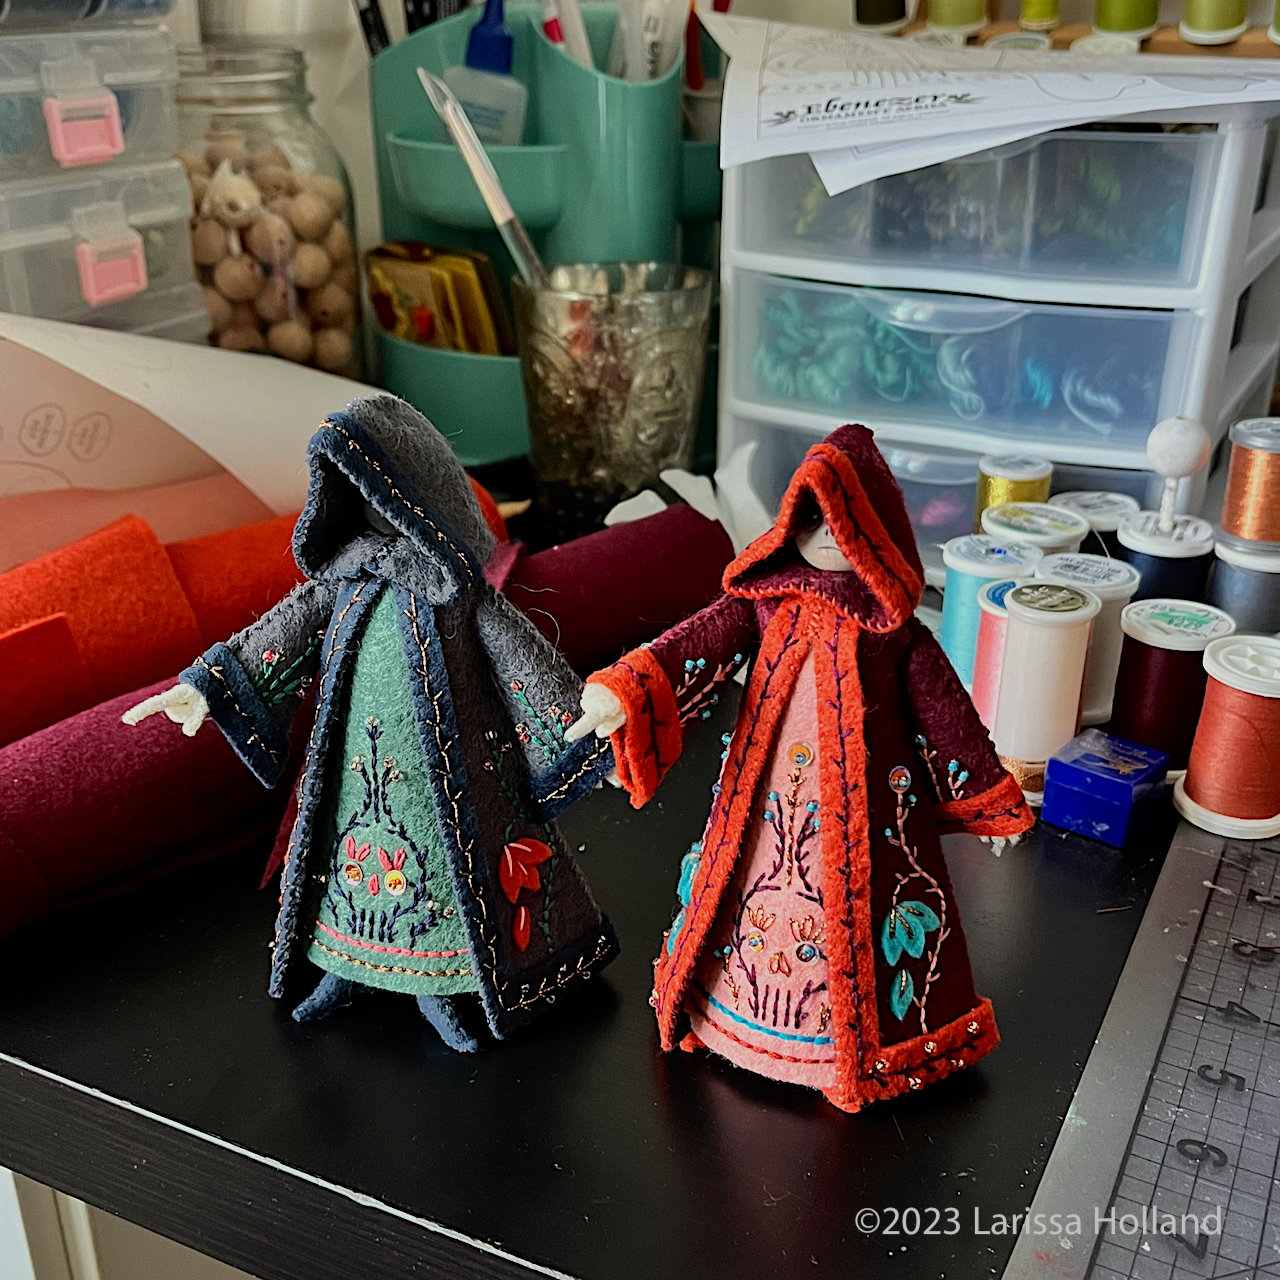
Mr Yet To Come 3.0

Here's Mr Yet To Come 3.0 (right) hanging out with Mr 2.0 (left). I think most of the design kinks are worked out on him this go round. I will change only a couple minor things for 4.0 and I have a good mental outline of the order of steps needed for his build. I'm still trying to make a gravestone I like, though. It's fighting me. 

My top priority is getting this pattern released before the end of the year. Will it happen? *suspenseful music plays* No one knows! Stay tuned...

(This Ghost of Christmas Yet To Come ornament will be the 5th in my ongoing Ebenezer Ornament Series. The first four patterns are available in my Etsy shop: mmmcrafts.etsy.com)

Sunday, November 12, 2023

ghost couture


Making steady progress on the Ghost of Christmas Yet To Come. Forgive my artistic license here, but I find I just can't restrict myself to varying shades of black. My apologies, Mr Dickens. 

The pointing hand is made with cotton pipe cleaners. It's easy, no worries. And I've decided I don't want to cover up any portion of his robe, so I think I will make the gravestone a separate ornament and throw it in as a bonus. 


I posted this initial test hood/head earlier and I'm still working out how best to do his facial features, which according to the text can't be seen at all. But there has to be a bead inside the hood, so I'll settle for casting his creepy face in deep shadow by wiring the rim of the hood. 

See other patterns in this ongoing series:
https://mmmcrafts.blogspot.com/p/ebenezer-ornament-series.html

Tuesday, July 25, 2023

maybe a chip in the cup?

This teacup in progress will have a chip in it. If I like the chip I'll make it an option in the pattern. Little known fact: House mice are commonly known to repurpose your discarded china cups as their tiny little beds. Actually, that is not a little known fact nor a generally known fact because I just made it up, but it sounds true. 

The chip is part of another round of revisions and samples I'm making as I fine-tune all of the pattern pieces. I think I like this teacup embroidery pattern better than the previous coral pink cup (see earlier post), but I'll wait to see how it all looks sewn together. I can't believe I forgot to include the year on the cup somewhere. Doh! I'll have to work that in somehow. More photos to come!

This Not Even A Mouse pattern is the upcoming 5th pattern in my 'Twas The Night ornament series. 

Wednesday, July 19, 2023

not even a mouse: prototype


Couple of prototype photos of my new 'Twas The Night pattern in development: Not Even A Mouse!
 
This sample is by no means final, as I'm still experimenting with details. Cheese wedge was a fail. Not included. Teddy bear was lifted directly from my Wee Mouse pattern and it will be included for sure. I think the side sleeper mouse looks so cozy and snuggled in, so he will probably be the final mouse rather than back sleeper mouse. (But I find back sleeper mouse pretty charming and wanted to do another round of changes on him later, maybe a one-off ornament. Cute little guy with his stumpy legs. Needs fattening up though, bless him. And arms.)

The felt pillow is currently too small. I love the cotton ticking pillow from my Wee Mouse pattern, but I don't want to oblige you to buy special fabric for a less-than-2-inch pillow, so I'm trying a hand embroidered ticking stripe. I'm not currently happy with the embroidery designs on the cup or blanket, and blanket isn't the right size yet...Blah blah blah and about 50 more details I'm dithering about. On we go!

Not Even A Mouse is the upcoming 5th ornament in my 'Twas The Night Ornament Series. Shop all my patterns here!

Thursday, January 26, 2023

Lodestar Tree Topper 2.0 and still revising


Here are the two samples of upcoming pattern #lodestartreetopper I’ve made so far. The second prototype is the pink/white one on the right. Hard to tell by looking, but I made a bunch of minor adjustments, changed the construction to be better, and made it slightly larger overall. 


hmmmmm I don’t know about that pink/red color scheme though. Something about the red stitching in the arms bothers me — they look like a circulatory system or something? LOL I may rethink the embroidery colors for the final pink version. 


What I do love on both prototypes are the pretty metallic felts from @benziedesign. They add holiday *glimmer.* I have to take a break for a couple of weeks to do other stuff but then I’ll be back with the next version. Which will hopefully be the final version. And then the real work begins to make the samples, write the instructions, draw the diagrams, etc... 
More experimental color combos coming up!

Thursday, January 19, 2023

a more detailed look at the Lodestar Tree Topper


Here's a look at the completed Lodestar prototype. I posted a video of it on my IG and Facebook pages if you'd like to hop there to see it twirl.
  • Size of the star itself is 11 in. wide x 11 in. tall x 2 in. deep (28 cm x 28 cm x 5 cm) and including the painted dowel lollipop stick it is 17 in. tall (43 cm).
  • All hand sewn and embroidered using the Sulky Stick N Stitch wash-away stabilizer. Materials needed are wool felts, DMC flosses, thread, 5 mm and 8 mm sequins, glass beads, Pellon 70 Peltex, FabriTac permanent fabric glue, 3/16" wood dowel, matte green paint (or whatever color best matches your Christmas tree)
  • This topper should coordinate well with any MmmCrafts ornaments. You can make it with or without the embroidery/metallics and choose coordinating colors to achieve any look you'd like. I do not have any plans to design series specific toppers, but I won't rule it out.
Included in the pattern will be a pendant version to hang in your window or doorway, which will not have a dowel (obviously) and will have the missing point of the star included in place of it. Also pondering including a matching Christmas tree ornament, but I may make that a separate pattern because it would be a good beginner project. In that case, I'd include the suggestion for how to do it in the tree topper pattern (it's basically the three outermost stars with a hanging loop added and the year on the back.) 

If you have a mini tree, for a topper you might just want to buy the future ornament pattern and squash two ornaments together over a couple of pipe cleaners or a thin dowel for the topper. And then you can make mini ornaments using only the outermost star.

The completed one shown above was made with Benzie felts: Aqua and silver metallic. I'm working right now on a new pink/white/red sample after some tweaks to the pattern (shown below). It's Benzie white wool blend and pink metallic felts.


DIFFICULTY: While this is not difficult to make by any means, it does take patience. It uses a basic backstitch for all the embroidery and a whipstitch to put it together. I suggest taking large embroidery stitches to make it go faster. I'm using about a 4 mm stitch here (3/16"). There are one million pieces and 6 pattern pages so far. LOL. If you use Sulky stabilizer for all the pieces (including the Pellon) you'll get two tree toppers from one 12 pack of Stick N Stitch. It saves a lot of time with tracing, but it does use up a lot of stabilizer.
 
I will ponder how to organize a version which will save pages of Sulky by excluding all of the non-embroidered and interfacing pieces so that those who wish to can just trace and cut out those pieces the old school way or with freezer paper. :-)

Saturday, January 14, 2023

lodestar tree topper prototype


New design underway for a tree topper! I like how it's coming together so far. It's not complicated to make, but it sure takes a while. There are lots of pieces and lots of stitching, y'all.
 
It will have the same 3D layered star design on both sides so it can be viewed from either direction. (Or you can skip the back side if your tree is always against the wall. That's the lovely part of DIY.) Where's the cone, you say? I don't like dealing with those, as they never seem to work well or stay straight. This one will have a 3/16" wood dowel instead (painted to match your tree). So it will be like a star lollipop which will be secured to the tree top with your choice of pipe cleaners or zip ties and the dowel will disappear under the needles against the trunk. Easier to secure and straighten, IMO.

This design has been living in my head for a good long while, so it's nice to let it out. Lodestar means guiding star. I think it will be a nice topper for any sort of tree, because you can make it however you like in whatever colors you like, with stitching or no stitching, sparkle or sans sparkle. 

I have a few adjustments to make for the next sample, but this version is fairly close. Materials needed are wool felts (any combo of regular, metallic, or glittered), flosses, sequins, glass beads, Pellon 70 Peltex or stiffened craft felt, FabriTac glue, matching threads, 3/16 wood dowel, and paint which matches your tree color. Lots of frothy coffee, chocolate, and a nice long dialog heavy mini series you've been meaning to watch are recommended.

Wednesday, November 23, 2022

Update on Mr Christmas Present


UPDATE: For those of you waiting patiently on the Ghost of Christmas Present pattern, I thought I’d jump in here to say that despite having high hopes of adding it to the shop in time for my Thanksgiving sale, that just ain’t happening. I must accept. Hopes dashed. 

It’s just physically impossible with the samples I need to make and the photos which need to be taken. So I will let myself enjoy some turkey and my girls being home from college and I’ll shoot for releasing just as soon after Thanksgiving as I can possibly make it. That will hopefully be plenty of time for your Dickensian Christmas crafting.

In the meantime here are some supplies you might need to gather: 
All the usual items needed for my people ornaments (wool felts, wood beads, floss, cotton pipe cleaners, Sulky Stick N Stitch (2 sheets), fabric markers/pencils for faces, Tacky Glue, stuffing) but here are some others for this ornament:

1) One or two chenille stems for his twisted holly crown (I like two different colors or finishes, like one regular and one metallic)

2) Metallic or iridescent chenille stem scraps in one or two colors for the torch flame

3) Metallic wool felt for his belt and scabbard and possibly his torch

4) A tiny jingle bell (4-6 mm) as an optional decoration on the scabbard

5) A chenille stem for his beard in any shade of medium brown or red, plus a skein of matching DMC floss for his hair, plus a tiny tiny scrap of coordinating wool felt for the mustache. In the photo, you can see the reverse side of the bronze metallic felt does well for a mustache, but you can also source a brown felt from your felt stash. Another option is to cut his mustache from matching sturdy card stock if you don’t want to buy a sheet of felt just for that. In that case I recommend adding a coat of Mod Podge to make it more durable.
 
6) Metallic sewing thread for attaching sequins/beads, plus the usual seed beads and sequin array needed for the Ebenezer series. In this case you will need an 8 mm one for the belt buckle and it’s good to have both 4 and 5 mm to alternate for the holly berries if you like. Using one or the other is also an option if you don’t have both.

7) Metallic DMC Diamant is such a nice option for some of the embroidery — it just adds Victorian glam.
 
Alright! I hope that is helpful for your planning. 
(Shown above: Ghost of Christmas Present redhead in progress featuring a side part and an unfiled thumbnail in serious need of a manicure)

Monday, September 5, 2022

sneak peek of next Ebenezer ornament


Guess who? Here is a sneak peek of the next ornament pattern in my Ebenezer ornament series, straight from my work table. This prototype ornament is fairly close to final, but he’s missing his magical torch and empty scabbard. 

He's been living on paper and in my head for a long while so he leapt out fully formed and didn't give me much trouble design wise. A refreshing change! I'm hoping to have this finalized and in the shop in plenty of time before Christmas -- wish me luck.

Wednesday, May 26, 2021

Ghost of Christmas Past prototypes underway

I'm working hard on producing the third pattern in my Ebenezer Ornament Series, Ghost of Christmas Past. I only have a few tweaks to make before I have the final version. I'm pretty happy with how it's all gone so far! Earlier version is on the left, Mr Headless on the right is the latest.

I've seen many productions or movies which portray this ghost as a woman, so you may be a bit surprised to learn it's actually described as a boy/man in the book. That's the version I'm going with, however, this is DIY and you are the boss. If you'd like to craft this spirit as an ethereal woman instead to match the nostalgia of your memories, it is entirely up to you! 

As written by Dickens, this ghost is kind of tricky to represent faithfully as a felt ornament. I've done my best to hit the highlights! And some artistic license is thrown in there. Here's the description of what Scrooge sees when his bed curtains are drawn aside:

"It was a strange figure–like a child: yet not so like a child as like an old man, viewed through some supernatural medium, which gave him the appearance of having receded from the view, and being diminished to a child's proportions. Its hair, which hung about its neck and down its back, was white as if with age, and yet the face had not a wrinkle in it, and the tenderest bloom was on the skin. The arms were very long and muscular; the hands the same, as if its hold were of uncommon strength. Its legs and feet, most delicately formed, were, like those upper members, bare. It wore a tunic of the purest white; and round its waist was bound a lustrous belt, the sheen of which was beautiful. It held a branch of fresh green holly in its hand; and, in singular contradiction of that wintery emblem, had its dress trimmed with summer flowers. But the strangest thing about it was, that from the crown of its head there sprung a bright clear jet of light, by which all this was visible; and which was doubtless the occasion of its using, in its duller moments, a great extinguisher for a cap, which it now held under its arm."

Admittedly already a challenge to represent with a crafted Christmas ornament, but even further than that:

"Even this, though, when Scrooge looked at it with increasing steadiness, was not its strangest quality. For as its belt sparkled and glittered now in one part and now in another, and what was light one instant, at another time was dark, so the figure itself fluctuated in its distinctness: being now a thing with one arm, now with one leg, now with twenty legs, now a pair of legs without a head, now a head without a body: of which dissolving parts, no outline would be visible in the dense gloom wherein they melted away. And in the very wonder of this, it would be itself again; distinct and clear as ever."

So um yeah, you'll just have to use your imaginations for that last shape-shifting part. As a designer, I landed on a candle-like youth with blooming cheeks and long white hair, sporting bare arms and feet, wearing a tunic trimmed with flowers and holding a holly branch and a hat-sized snuffer in his hands. The light pouring from his head is tricky to represent, so I'm probably going to settle for a tinsel crown with a simple flame shape in the back. I'm still thinking that one through.

New craft items you'll need to make this pattern: If you've been making the Ebenezer series already, you have most of what you need already on hand, but there are a few things that are new:

  • 24 or 26 gauge cloth covered or paper wrapped floral stem wire (for the holly branch). I've used white in my sample photo, but I will probably also use green, which is easier to find than white. It takes one 18 inch stem to make a holly branch. 
  • Benzie Design's Bellwether metallic felts for the belt, snuffer, and some leaves. It adds such a rich sheen! I love using it for this. You may of course opt to use regular wool felt for those parts if you wish. It still works!
  • Three 4 mm round jewelry beads for holly berries. I found the tiny glass seed beads just didn't have enough presence for the berries. The sample you see is made with semi-precious stone beads I grabbed at my local Michaels, just because I liked the natural variations in hue.
  • 8 mm and 6 mm sequins in addition to the 4 or 5 mm ones you are already using. You'll need them for the belt buckle and flowers.
  • The spirit's hair is white DMC embroidery floss, and you can get two heads of hair from one skein.
I think that covers any new stuff. The rest is the usual wool felts, floss, wood beads, pens, stabilizer, tinsel pipe cleaner, metallic Diamant and metallic threads that you are already familiar with. 

Ever wonderful Benzie Design will continue to offer Ebenezer materials kits to get you going with most of what you need to make ornaments that match my color guides.

I hope to begin writing the pattern soon. Sooooo back to work for me! 

Friday, April 3, 2020

in which I design a new series while sheltering in place


"There's more of gravy than of grave about you, whatever you are." Said guess who?

That is right! You guessed it. This is a fairly tight prototype of Mr Scrooge, the first pattern in a new series called Ebenezer, based on Charles Dickens' Victorian novella, A Christmas Carol. I'm excited about it and I hope you'll enjoy it. It's going to be ornate and a bit spooky.

No worries, I'm also working on the third pattern design for my 'Twas the Night series. It's only in the design stages but I'll update when I can.

Design work is a nice distraction. I'm hanging in there. You? Air hugs to you, folks of the world, as we all hunker down and weather this pandemic. My cloistered family is just trying to get through each day and stay positive. We are now under a Shelter In Place order here in GA, but that is essentially what we've been doing already for weeks. I pray that you are well and staying encouraged, wherever you are in the world. I pray for all those on the frontlines of this nightmare, and also those working hard in the seldom noticed background, doing essential tasks to keep the world running. I'm trying to do my part to minimize the spread and stay informed. I'm going to sew some masks today.

Phil. 4:6-7 is my daily shelter right now. Maybe it will strengthen you too.

Saturday, November 16, 2019

Update on Mrs Claus!


Hello! Update on Mrs Claus: The pattern is not available yet, but she’s finally tweaked to my satisfaction (there was some pretty serious and distressing creative block on her accessories and proportions). This one shown is a tight prototype and super close to the final. Just one of the several things giving me lots of grief was how best to make her teeeny tiiiiny mistletoe ball. So many versions in the trash. Got that licked:


She can either hold this beaded mistletoe ball for a smooch with her fave elf, or an apple to give to her favorite reindeer (or to help detox Mr World Traveler after his night of endless cookies). The apple is simpler, but the mistletoe is easier to make than it looks, I promise.


This second #twasthenightornaments pattern is going to debut in my shop later than I’d like, but she’ll still be available to make for Christmas if you can squeeze it in. I’m working as fast as I can to make samples and write the pattern around trips out of town. If you want to make her, get a jump on the 'Twas the Night kits/materials offered at Benzie Design, and while you are at it also grab some stiffened felt for the tiny little wrapped gift and an 8 mm wood bead for the mistletoe/apple. (Benzie also sells both of those things!) In addition to a black and red gel pen for her face, you'll also need a white gel pen for her hair. The Santa Claus pattern is currently available: mmmcrafts.etsy.com

Monday, October 14, 2019

mrs claus underway


I'm in the middle of designing and sewing prototypes for Mrs Claus. She will be the second ornament in my 'Twas the Night Ornament Series. I know she is not mentioned specifically in Moore's poem, but I feel like she is a central part of the night before Christmas, just like every woman the world over. I imagine her bustling around North Pole headquarters, looking fabulous, sipping a latte while managing the overexcited elves, and already gelling plans for next year. 

This sneak peek shot shows an initial design for the hood on her coat. I'm still tweaking it for style and ease of construction. Ignore her smeared mascara -- LOL. I grabbed the wrong pen to draw her eyes because I was in a hurry. ha! (I usually use a gel pen or fine tip fabric marker for the eyes and mouth because I prefer the unsealed, flat look of the unfinished wood.) 

This test ornament does not have any embroidery but my next one will! And lots of sparkle. I hope to release this pattern in plenty of time for Christmas making. Fingers crossed. 

Thursday, January 24, 2019

santa claus ornament WIP


Two WIP photos of a future pattern for a Santa Claus ornament. Last year a sweet customer of mine contacted me to ask for a pattern for Santa Claus, and at the time it wasn't possible to do more than just suggest ways for her to modify the Piper or Drummer pattern to be a Santa Claus (also Maid makes a nice Mrs Claus with some mods). After pondering other things the I could change and add, I got pretty excited and curious to try my own version and maybe develop a pattern. I started it last year but had to set it aside and recently picked it back up. Here we go.

I really love this little bearded guy, and I'm thinking of maybe doing a short pattern series of North Pole residents. If you've made the Twelve Days series, you can definitely make this Santa. Which I will be developing alongside another series I'm designing inspired by Charles Dickens' A Christmas Carol. The plan is to release each one as it's done. I have so many ideas and so little time! It's my constant dilemma.