Showing posts with label Christmas. Show all posts

Wednesday, December 6, 2023

make lighted glass block Christmas presents


Have you guys ever done this Christmas craft? It's pretty easy and I love the way the lighted presents add festive magic to tabletops and bathrooms. Anyone who can tie a bow and use a hot glue gun can do this craft. My sister Leigh had a Christmas craft party years ago and we made them. I got the big idea a couple years ago to repeat that party with my own friends and I planned it all and bought the supplies and then ended up getting sick and not being able to attend my own craft party. But my friends had a blast making them.


WHAT YOU NEED:

  • Glass brick with a hole in the side to feed in a string of lights. Back in the day you had to purchase the bricks from your local Home Depot or Lowes and make the hole yourself using a drill bit for glass. Forget that! Craft stores have clued into this and nowadays you can usually find glass bricks in various sizes with handy premade holes available at your local craft/fabric superstore. 
  • If your brick is clear and not frosted you will want to frost just the sides (not the top or bottom) with a spray paint designed to look like frosted glass. That's at the craft store too.
  • A string of lights to put inside. Battery powered or electric, depending on whether you have an outlet handy where you want to put the finished present. Just make sure the wires are either white or metallic. The green wired kind won't look as nice. I think warm white lights look best. 
  • Wired ribbon to make the bow. It's also nice to glue on some festive berries, pine cones, or greenery if you like. If you make your bows using a bowmaker jig, you may need some thin wire or twist ties to secure the loops. You can also use non-wired ribbon (I did on one because I loved the color) but wired ribbon gives nicer results and you can fluff it up after storage.
  • Fray Check to keep the cut ends of the bow from raveling
  • A hot glue gun
  • A frothy coffee (optional)


TO MAKE:

1) Frost the sides (not the top or bottom) of your glass brick using the frosted glass spray paint and let that dry. (I won't attempt to tell you how to drill a hole in a glass brick since I've never done that, so I'll assume you can purchase a brick with nice big hole in back from your craft store.)

2) Feed in your string of lights, leaving the electric plug or battery pack on the outside of the brick. The hole/plug will be in the back. 

3) Measure and cut lengths of wired ribbon to wrap around the center of your brick in both directions, being sure to neatly overlap and hot glue the ribbon to the center top of the brick and not the bottom (so it can sit flat). Don't worry, your big ol' bow will cover the overlaps.

4) Make a big ol' bow with your wired ribbon. (Bow tutorials abound online.) A classic bow or a fancier one with more loops are both fine, just be sure it's big enough to cover most of the top of the brick. It's a nice touch to angle or notch the ends of the bow. Use Fray Check on the cut ends to keep them looking nice. 

5) Hot glue the bow in place in the center on top along with any little embellishments you want to add, like berries, greenery, sparkly bits, etc.

Tada. You're done! Plug it in or turn on the battery pack and enjoy. Makes a nice gift too! 

Monday, May 29, 2023

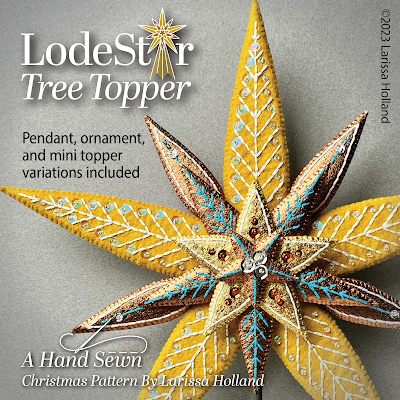
LodeStar Tree Topper pattern is now available!


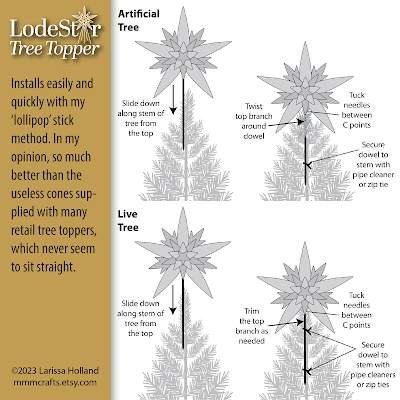
‘Lodestar' means guiding star. This hand sewn, sparkly, heirloom wool felt Christmas star is a lovely way to top your own tree or bless someone with an impressive handmade gift. I was inspired to design it because of my own fruitless search for the perfect star for my tree. If you are like me and do not love the useless cones attached to retail stars, you will love this pattern. The LodeStar lollipop stick is very easy to attach to your tree with pipe cleaners or zip ties, and will stay straight! Yay!


The skills needed for this pattern are not advanced, it just takes patience. If you can sew basic hand stitches (whipstitch and backstitch), cut shapes with precision, and work with seed beads and sequins, then you can make this project and make it well. I've even included dashes on the embroidery lines so you don't have to guess at stitch lengths (but you can certainly set you own lengths if you'd like).

The secret to making this project easily and accurately is Sulky Stick 'n Stitch, which is a wash away printable stabilizer. Just print my pattern in on the stabilizer, peel and stick it to the felt, and stitch right on the lines. So awesome.


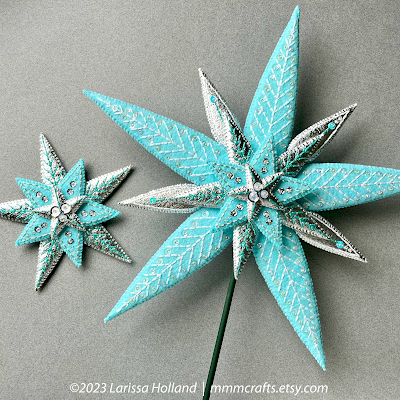
The Lodestar Tree Topper pattern includes two secondary ray styles (single-point and fancier triple-point) and options to make pendant, ornaments, mini ornaments, mini tree topper, garland, and an 'easy button' version of the topper. Basically, you can bedeck your world with sparkly Christmas stars.


All samples shown were made with Benzie Design wool blend and wool metallic/glitter felts. (They also have a lovely new selection of 5 mm and 8 mm sequins in really great mixed colors for you to check out. So shiny!)
 
Other materials you need to make a topper are a 12-inch 3/16 dowel, paint, floss, thread, seed beads, sequins, Sulky Stick 'n Stitch, Fabri-Tac glue, and Pellon 70 Peltex. That's not a complete list, but those are the highlights. Check the Etsy listing for more details. 

Happy sewing! :-)

Friday, May 19, 2023

final lodestar sample almost done


Final Lodestar Tree Topper sample is almost done. This time in Benzie Design bronze metallic, gold metallic, and mustard with splashes of bright blue DMC floss. I'm a sucker for that particular color combo (as you can see), but you could very easily substitute gold, olive green, or deep red DMC floss for the blue stitching if that matches your Christmas vibe better. This one would also look next-level luxe if you subbed gold metallic felt in for the mustard felt. Oooh.

You can see in the background there^ some other samples attached to the mini trees I have set up in my studio for testing. It is really easy to attach these toppers, y'all. Just feed the lollipop stick down along the trunk and twist the tip-top branch around the stick just under the star. Then secure the stick to the trunk with a pipe cleaner or zip tie. For a live tree you would just trim the tip-top branch if needed and tuck the remainder between the lower points of the star. No more wrestling with stupid cones! *kermit arms*

After this sample is finished, I'll need to do a final (hopefully) round of changes and edits to the instructions and then start photographing all the samples. Believe me, I cannot WAIT to get this pattern in the shop. 

Friday, April 21, 2023

two new lodestar samples done, two more to go


Two more final Lodestar Tree Topper samples completed, with probably two more to go. I need to make at least one pendant version to show you, and I think I may do that one as a simplified star, without the embroidery. 

I'm working on edits to the PDF pattern instructions on the fly. Progress is slow but steady, y'all!

Shown: Benzie felts: Aqua, Julep, White, silver metallic and gold metallic

Thursday, January 26, 2023

Lodestar Tree Topper 2.0 and still revising


Here are the two samples of upcoming pattern #lodestartreetopper I’ve made so far. The second prototype is the pink/white one on the right. Hard to tell by looking, but I made a bunch of minor adjustments, changed the construction to be better, and made it slightly larger overall. 


hmmmmm I don’t know about that pink/red color scheme though. Something about the red stitching in the arms bothers me — they look like a circulatory system or something? LOL I may rethink the embroidery colors for the final pink version. 


What I do love on both prototypes are the pretty metallic felts from @benziedesign. They add holiday *glimmer.* I have to take a break for a couple of weeks to do other stuff but then I’ll be back with the next version. Which will hopefully be the final version. And then the real work begins to make the samples, write the instructions, draw the diagrams, etc... 
More experimental color combos coming up!

Thursday, January 19, 2023

a more detailed look at the Lodestar Tree Topper


Here's a look at the completed Lodestar prototype. I posted a video of it on my IG and Facebook pages if you'd like to hop there to see it twirl.
  • Size of the star itself is 11 in. wide x 11 in. tall x 2 in. deep (28 cm x 28 cm x 5 cm) and including the painted dowel lollipop stick it is 17 in. tall (43 cm).
  • All hand sewn and embroidered using the Sulky Stick N Stitch wash-away stabilizer. Materials needed are wool felts, DMC flosses, thread, 5 mm and 8 mm sequins, glass beads, Pellon 70 Peltex, FabriTac permanent fabric glue, 3/16" wood dowel, matte green paint (or whatever color best matches your Christmas tree)
  • This topper should coordinate well with any MmmCrafts ornaments. You can make it with or without the embroidery/metallics and choose coordinating colors to achieve any look you'd like. I do not have any plans to design series specific toppers, but I won't rule it out.
Included in the pattern will be a pendant version to hang in your window or doorway, which will not have a dowel (obviously) and will have the missing point of the star included in place of it. Also pondering including a matching Christmas tree ornament, but I may make that a separate pattern because it would be a good beginner project. In that case, I'd include the suggestion for how to do it in the tree topper pattern (it's basically the three outermost stars with a hanging loop added and the year on the back.) 

If you have a mini tree, for a topper you might just want to buy the future ornament pattern and squash two ornaments together over a couple of pipe cleaners or a thin dowel for the topper. And then you can make mini ornaments using only the outermost star.

The completed one shown above was made with Benzie felts: Aqua and silver metallic. I'm working right now on a new pink/white/red sample after some tweaks to the pattern (shown below). It's Benzie white wool blend and pink metallic felts.


DIFFICULTY: While this is not difficult to make by any means, it does take patience. It uses a basic backstitch for all the embroidery and a whipstitch to put it together. I suggest taking large embroidery stitches to make it go faster. I'm using about a 4 mm stitch here (3/16"). There are one million pieces and 6 pattern pages so far. LOL. If you use Sulky stabilizer for all the pieces (including the Pellon) you'll get two tree toppers from one 12 pack of Stick N Stitch. It saves a lot of time with tracing, but it does use up a lot of stabilizer.
 
I will ponder how to organize a version which will save pages of Sulky by excluding all of the non-embroidered and interfacing pieces so that those who wish to can just trace and cut out those pieces the old school way or with freezer paper. :-)

Saturday, January 14, 2023

lodestar tree topper prototype


New design underway for a tree topper! I like how it's coming together so far. It's not complicated to make, but it sure takes a while. There are lots of pieces and lots of stitching, y'all.
 
It will have the same 3D layered star design on both sides so it can be viewed from either direction. (Or you can skip the back side if your tree is always against the wall. That's the lovely part of DIY.) Where's the cone, you say? I don't like dealing with those, as they never seem to work well or stay straight. This one will have a 3/16" wood dowel instead (painted to match your tree). So it will be like a star lollipop which will be secured to the tree top with your choice of pipe cleaners or zip ties and the dowel will disappear under the needles against the trunk. Easier to secure and straighten, IMO.

This design has been living in my head for a good long while, so it's nice to let it out. Lodestar means guiding star. I think it will be a nice topper for any sort of tree, because you can make it however you like in whatever colors you like, with stitching or no stitching, sparkle or sans sparkle. 

I have a few adjustments to make for the next sample, but this version is fairly close. Materials needed are wool felts (any combo of regular, metallic, or glittered), flosses, sequins, glass beads, Pellon 70 Peltex or stiffened craft felt, FabriTac glue, matching threads, 3/16 wood dowel, and paint which matches your tree color. Lots of frothy coffee, chocolate, and a nice long dialog heavy mini series you've been meaning to watch are recommended.

Sunday, December 25, 2022

merry Christmas!

A thrill of hope, the weary world rejoices.

Merry Christmas!

Monday, January 24, 2022

*New* Ebenezer 1-3 pattern bundle in the shop!


*New* discounted pattern bundle in the shop! The Ebenezer Ornament Series 1-3 bundle! Buy it as a bundle and save a little jingle. This PDF pattern bundle includes:
2) Mr Marley and 

As the Ebenezer series grows, I'll add more bundles.
To shop: mmmcrafts.etsy.com

Tuesday, November 17, 2020

Little Elves preview

Here's Little Elf Girl, the first design included in my upcoming new 'Twas the Night pattern. She's just coming back from fetching the letters in Santa's mailbox. It's cold out there!

...and Little Elf Boy, the second design included in the pattern. He's busy helping Santa to check off who's naughty and who's nice. You can customize the list to suit your own family. All nice I'm sure! ;-)

Toothpicks, permanent markers, gel pens, card stock, and a very fine tip writing pen will come in handy for the tiny accessories. You can use metallic felt, wool felt, or even card stock for the mail bag. Ooh or glitter felt maybe.


Both of these elf designs are almost final, with only super minor tweaks needed. I'll be writing the pattern and making the final samples next! All the samples will be in the two Benzie Design felt color palettes I've chosen for the series, Classic and Retro, but of course you can make your elves in whatever colors you like! 


Ah I see there's a helpful note on the back of the envelope. Santa's policy is 'trust but verify', little Tucker. :-)

Saturday, October 24, 2020

May I suggest a handmade ornament?


(Shown: my Twelve Days ornaments sewn with the curated Felt On The Fly 100% merino wool Jewel colorway. Buy the lovely complete felt kit in her shop, pattern not included.)

I find hand sewing to be so therapeutic, and handmade ornaments make truly special gifts that will be treasured and brought out every Christmas. A confident beginner can tackle my #twelvedaysornaments if they start with pattern No. 1 and go in order. The patterns increase in difficulty as you work your way up to No. 12, so that you build your skills!

Can you:
1) Cut small pieces with precision?
2) Sew basic hand stitches like whipstitch, backstitch, and French knot?
3) Print stuff?
4) Glue stuff?
5) Enjoy coffee?*
*Optional but recommended

If you answered yes to these questions, you can make these ornaments and make them well. It’s all about the Sulky stabilizer called Stick 'n Stitch. Print my pattern on the stabilizer, adhere it to the lovely wool felt, and stitch on the lines. NO tracing or transferring embroidery designs. Fantastic. My patterns are super detailed with step-by-step instructions and tons of illustrations. This page is chock full of information and tips for you if you are interested. Happy sewing to you!
 
PDF patterns are in my Etsy shop, mmmcrafts.etsy.com
Jewel colorway at Felt On The Fly, etsy.com/shop/FeltOnTheFly

Friday, July 26, 2019

Snow Bird pattern revisited


I recently took another look at a pattern I wrote in 2013, Snow Bird. It's a fun, uncomplicated hand sewn ornament. You can comfortably sew it up in one or two afternoons and have a really special handmade gift to give to someone. I like that it has a little Christmas sparkle added by sequins and silver lined seed beads. As I reviewed the pattern, I was inspired to make one, seen in the first photo above. *sigh* My weird wrinkly wrist. I had my arm at a strange angle trying to take the shot and simultaneously be my own hand model. Anyway. The felt colors I used are a mashup of FOTF and Benzie:
Head/wing details: FOTF Orange Red
Wings: FOTF Shrimp
Body: FOTF Lavender Pink
Beak: Benzie Peacock

I used sequins and beads I have in my collection (which are now catastrophically and maybe permanently mixed after I accidentally dropped the container they were sorted in) but also some lovely new sequins that were so kindly sent to me by Benzie Design. They are 4 mm and flat as opposed to the 5 mm cupped ones I usually find at my local craft store, so the smaller size is really nice for small details. They come in some reeeeeally gorgeous colors with coordinating seed beads. In spillproof containers. I'll have to experiment more with those!


As it happens, I've learned a couple things since 2013, so I did a few revisions to the instructions while I was updating the contact information (there's no such thing as my flickr page anymore haha). There was nothing wrong with the original instructions, but I changed them to utilize freezer paper for all the pattern pieces instead of just for the beak. I think that method is quicker and more foolproof when it comes to transferring accurately to felt. I also included a handy template to take the guesswork out of the beak placement.


Do you have your Christmas projects lined up already? Perhaps you need a Snow Bird in that list? You can find the PDF pattern here in my Etsy shop.

Monday, March 11, 2019

Lady Dancing all in green


Hey, guys! Checking in! Been busy but not blogging, obviously. This lady dancing ornament is the final hand sewn sample in the Emerald colorway for Felt On The Fly. (The other two colorways are found here: Sapphire and Gold.) I need to photograph all five of the finished Emerald samples and post them, but it's super gloomy here. I'm waiting for some sunshine!


When I can get some well-lighted photos, I'll be posting detailed felt and floss color guides here on the blog so you can easily make all 15 of my jewel toned ornaments! In the meantime, you can purchase all three of the curated wool felt color bundles (Sapphire, Gold, and Emerald) at Felt On The Fly.


Each of the three FOTF colorways look lovely on their own, but I think they look especially wonderful all combined:


More photos and detailed color guides are coming when Mr Blue Sky cooperates.
Aaaaand I made a Pinterest board for these colorways.
P.S. have I mentioned I hate DST? #grumpy #uselesstimejump

Thursday, January 17, 2019

some belated 2018 handmade Christmas gifts to show you


Unfortunately, December was not the leisurely, fireside, cozy crafting hiatus that I always always hope it will be. Always. Every year -- hopes dashed. It was of course (yes, of course, Larissa, you know this), a completely manic series of holiday events, graphic design deadlines, schoolwork, school events, speed shopping, gift wrapping, packing, traveling and cooking, the endless COOKING. With my birthday wedged in there in the middle.

But THIS year will be different. It's going to be magical and I'm going to have time to take it in and savor it! *squelching sound of slightly battered hope springing eternal*

Anyway, I did manage to make four small things, which I'll show you now, slightly after the fact. This pair of Twelve Days ornaments represent ALMOST the end of my serial gifting to my bestie, Robyn. I started this whole thing with the first gift to her in 2009 of a partridge and pear, so it's only been like 10 years. During the interim I designed the complete series of retail patterns, so now I feel I need to go back and redo the ones I sent her before I designed the patterns, because they don't match. She insists she does not need the redos and loves the originals, but it's really not about her anymore. LOL. No, just kidding, it is, but this way she gets a set that makes me happy and also a few extras that she can hide at the back of the tree.


I just had to redo her French Hen because this was the first one I gave her and I just like this new one so much better! I pulled in more corals to tie in her goose. These closeups show the sparkle I added in the form of glass beads and iridescent sequins.


And this is her yellow bedecked Lady Dancing (nailed it on the first try, at least until further notice), with the addition of some sparkle also.

On to the next pair of handmades:


Because I had the unbending desire to make my girls a handmade ornament that would be unique and special and different, I found myself staring at a pile of craft supplies at 1am on December 22nd (the day were leaving to go out of town), willing my exhausted muse to get off her fanny and make magic.

After some false starts, I pulled over a bin of wool balls (Benzie Design) and crafted these two Christmasy snowman... things... for my girls. They were supposed to be ornaments, but somehow ended up on mason jar lid stands. So now they are just figurines or something.


I pondered adding a clip underneath to clip them on the Christmas tree branches, but my girls say they prefer them freestanding. In that case I need to go back to IKEA and get another tiny cloche for the other one. If they still have them.

To make them, I used some acorns and acorn caps I had on hand, and these adorable painted wood Erzgebirge bunny and bird figurines I scored online a while back.


Isn't the tiny bird cute? The snowman's eyes and buttons are straight pins glued on. The nose is a cotton pipe cleaner. The scarf is a bit of wool felt.


I wasn't super happy with the finished products at the time, but maybe that was because it was 4 am and my frazzled muse was glaring at me while calling her union representative. They've grown on me since then. I think next time I make them I'll trim the bottoms off the wool balls (which are surprisingly dense) so the snowman parts can seem a bit more squashed together.