Showing posts with label gifts. Show all posts

Friday, January 6, 2023

humbug for my schmoopie - handmade gift 2022


I'm married to a tall, slender, wonderful man who does not love the hurry scurry flurry of December. He's all about faith, family, humor, and good times, but he is just so not about the long train of sparkly events and gift wrapped expectations around Christmas Day. 

In contrast, that poor man is married to me, a procrastinating perfectionist Christmas addict who loves everything about the holidays, even the hurrying, scurrying, and especially the flurrying. So much so that I often create more hurry and scurry than strictly necessary. 

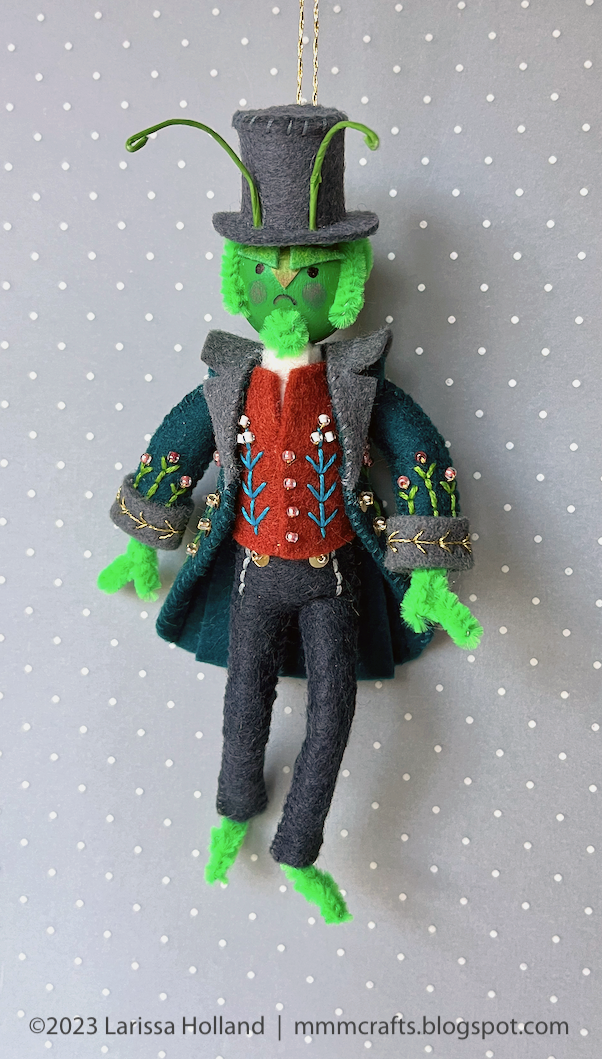
He does his best to put up with the yearly cavalcade of Christmas crazy with no comment and only a little bit of good natured grinchiness. Bless him. So this year I crafted him this specially made-with-love Humbug ornament. Cute little guy! With his grumpy wumpy face and curly green antennae. So fun to make – I was smiling the whole time.

I put it together (at the 9th hour of course!) by modifying the head of Mr Scrooge, the body of Mr Marley, and the hat from Lord a-Leaping. I used a 22 mm head instead of 20 because I wanted to exaggerate it a bit, and I elongated and slimmed down the legs to look more like my beloved real-life six-feet-four-inch Christmas curmudgeon. 

His hair, insect feet, and hands are made from mini green chenille stems, which just do not photograph very well. They are not this neon bright in real life but somehow that particular shade just really blows out in my photos.


It will be so fun to put this Humbug up on our family tree year after year! And I hope it brings a grinchy smile to my sweetie's face every time he sees it.

Wednesday, December 29, 2021

Last Minute Holland comes in under the wire

On Christmas Eve as I sat feverishly stitching two Twelve Days ornaments for dear loved ones, I once again reflected on my time management skills. I feel like I'm busy ALL the ever lovin' time. Perhaps I actually am? Probably not as busy as I think. Surely I can do a better job at this. Heck, I still don't even have my own personal set of any of my ornaments. I have a lot of MmmCrafts samples of course, but those I need to keep in my office for photos/promos. My two girls do not have their own sets either. I do manage most years to make a special one-off ornament for them, but not always. Not this year. Argh.

Next year is my year for sure. 

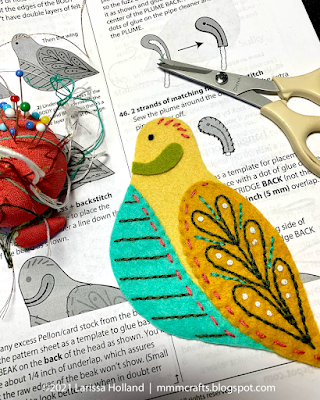
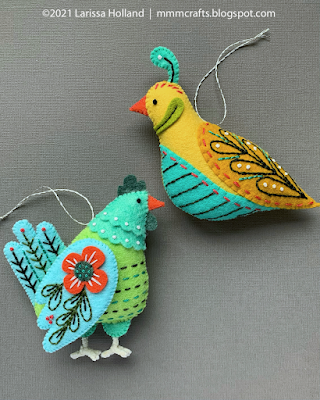
So this Partridge and French Hen were completed by 1 AM Christmas morning and checked off my list. They were received on Christmas afternoon with joy, and that is the best feeling!

It was nice to revisit these two patterns. If you are curious, yes, I follow my own pattern instructions. LOL. I have so many patterns now it's easy to forget the best way to put them together. It's essential to have a cheat sheet. 

Sunday, December 19, 2021

fun with pinecones, poms, and pipe cleaners


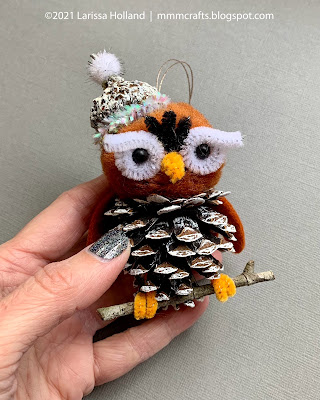
I made this little owl ornament for Robyn (don't look, Robyn! haha) from stuff you might have laying around your house and yard, if you are like me: An acorn cap, large and small poms, chenille stems, wool felt, a small pinecone, touches of white acrylic paint, some metallic thread, and a stick. All held together with blobs of hot glue. 

I have a love/hate relationship with hot glue, and after an evening of burning my fingers, taking a chunk out of my work surface from a hot glue leak, and getting hair-thin snarly hot glue strings all over my clothes and in my hair, I asked folks on my Facebook page to recommend a good mini hot glue gun that won't be out to get me. I am 100% sure hot glue is not supposed to be this hard to use. 

I'm going to check this one out, as Surebonder was the brand recommended by several different commenters! Thanks, guys.

Welp, it's the last week before Christmas. Y'all ready? I'm not! I'm fine this is fine

Tuesday, September 24, 2019

birthday kits for loved September babies


When my big sister Leigh said she wanted a 'Twas the Night Ornaments Santa Claus pattern and custom kit for her birthday I was like, girl, please. 110% can do. My mom is a September baby too, so I put together a Snow Bird pattern and kit for her also while I was at it.

It’s ridiculously pleasing to me when my friends and family tell me they’d like to try one of my patterns. It makes me kind of giddy, but it's also a lot more pressure. I spent a long time overthinking everything in the kits, providing alternate options, and making custom color key illustrations to include with their patterns and materials.

Kits are also just fun to me because of the neat folded bits, tiny bundles, and tins of small supplies. It's a bonus when I can find the perfect sized box for the kit just lying around in my studio closet. I knew I was keeping those for something. #packrat

Monday, July 15, 2019

baby name banner for Teddy Graham


A blessing in the form of a tiny baby boy will soon be joining my extended family. Theodore Graham will no doubt be super cute just because of his parents, but I'm also crossing my fingers for some curly red hair. Please oh please! See what you can do, Lindsey. :-)

This wool felt teddy bear banner was designed to coordinate with human Teddy's nursery in muted and manly shades of gray, maroon, navy blue, and brown. Since Theodore is quite a long name, I did this banner at half the size I did for the previous two banners. The finished length is just right, I
think.


The banner was constructed basically in the same way as the others, with nice wool felts for the flags, stiffened white acrylic felt for the backings, and grosgrain ribbon. The letters are also backed with the stiffened felt. (It's really inexpensive and can be found in most big craft/hobby stores located near the acrylic craft felts.)


The fun part was making the bears. I designed the two affable fellows at the ends to be spiffed up in fabric bow ties and collars. Their look was a bit trial and error and involved a lot of squinting. (I squint when I test out colors and arrangements. I don't know why.) I could have done them completely as applique, but I wanted them to have some dimension. Their ears and noses are craft store pom poms. The bow ties are two layers of quilting fabric adhered together with Heat n Bond® (a really great iron-on adhesive), which gives the fabric the right amount of stiffness and will prevent the edges from raveling. The eyes and collar are stiffened craft felt.


I designed the whole banner on my Mac first, then output it directly to my old 'bad' batch of Sulky Sticky Fabri-Solvy (see this old post for more on that). As I've mentioned, I'd use even the good stuff for this because it really streamlines the whole process. You just print each flag once on the Sulky and use it four times over to cut the backing, flag, letter backing and letter. It's so easy. Then I used my usual method of glue basting everything together and then sewing it down.


I did attach the ribbon differently this time. I usually thread an entire long piece through the sewn channels on the backs of the flags, space the flags as I like, then secure them in place. It occurred to me that is a waste of good ribbon. So this time I glued on short, measured pieces of ribbon between the flags on the backs, then hot glued the back flaps in place. Tada. It looks the same but uses less ribbon, and it's less frustrating to do. (Unless like a complete numpty you find you've glued the flags in the wrong order and have to puzzle out how to fix this after the flaps were already hot glued down over the ribbon. *loud clearing of throat*)

I did manage to fix that without having to start over, so it's all good. There were some pretty negative comments made about myself to myself, I'm afraid. But all's well that ends well. I'm so pleased with this banner, and I can't wait to welcome little Theo to our family, no matter what color his hair turns out to be. :-)

Friday, May 24, 2019

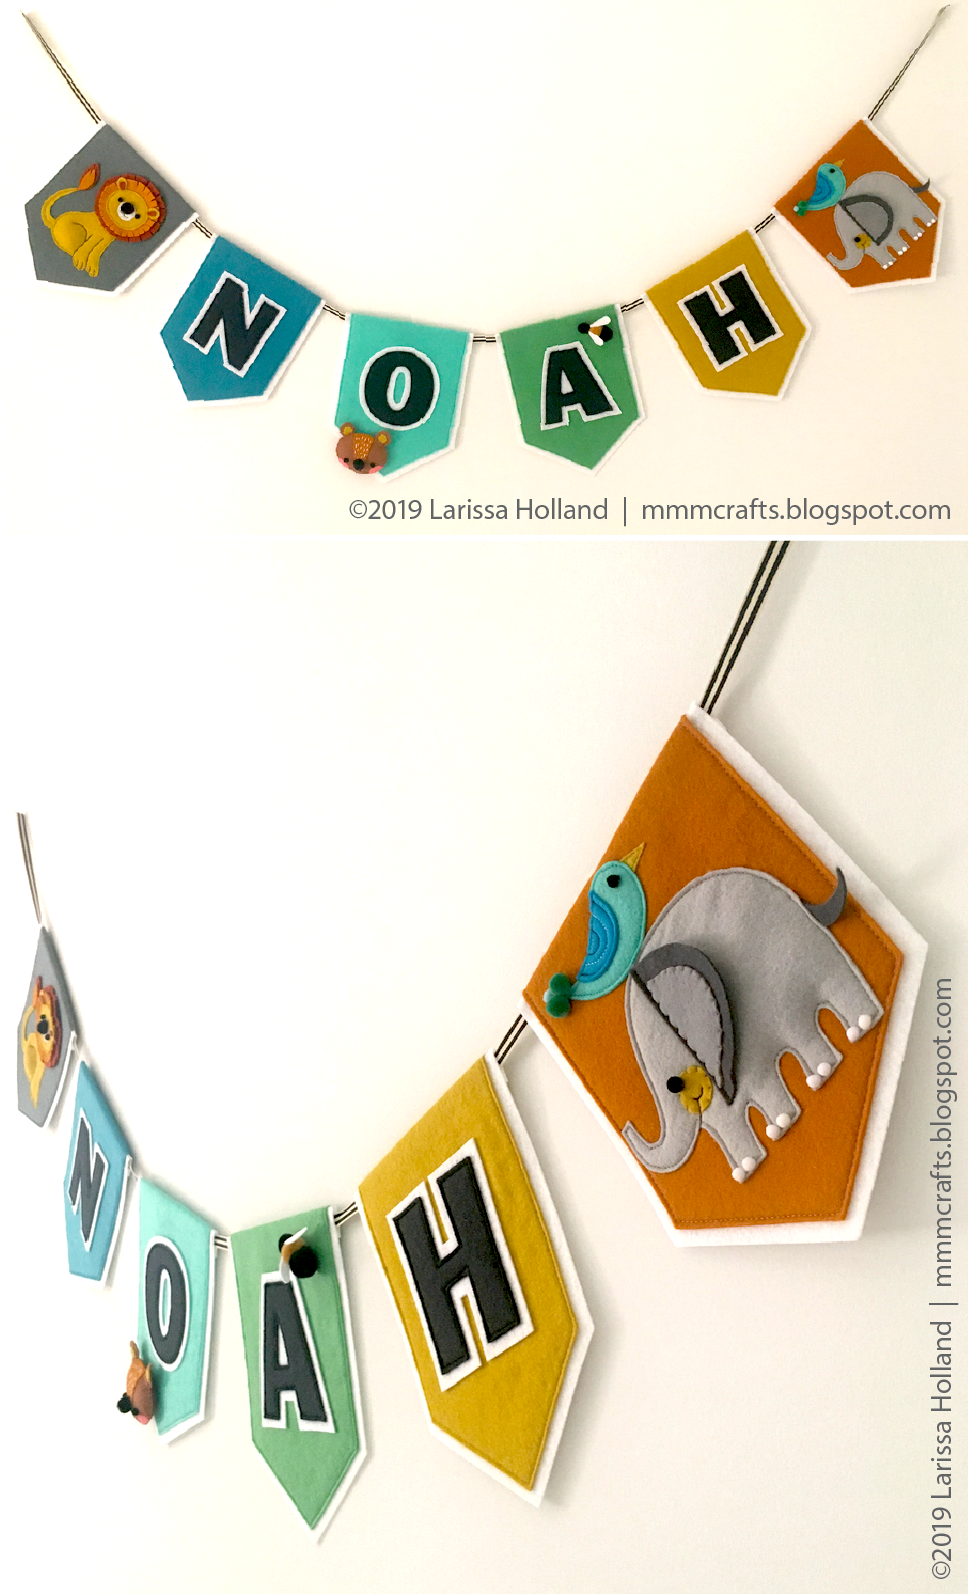
baby name banner for wee Noah


I designed this wool felt name banner for my sweet friend Holley who is welcoming her 5th child very soon. Little Noah doesn't realize this yet, but he is such a lucky kid to have Colby and Holley for parents! You'll never meet nicer, more loving folks. I'm a big fan of their four other kids too. In short, I love them.


While photographing this, it came to my attention that I'm running out of blank walls at my house. Blank walls are kinda boring from a decor standpoint but they are shazam for photographing baby banners you want to blog. Luckily I have this one bare wall left in our room, but it doesn't give much contrast between the wall and the white felt backing. Use your imaginaaaaation to add color to the wall. *Makes rainbow shape with fingers*


I've made one other felt name banner. It was for a sweet little girl baby, so it was flowery and pretty and right in my wheelhouse. I took what I learned from that first one and used it to improve the construction of this one. First of all, instead of regular felt, I used cheap, craft store stiffened white felt as the base for the banner. It's right there next to the stacks of craft felt. It rocks for this. So easy to cut, keeps it's shape, takes glue and hot glue well, and you can sew through it. Did I mention it's cheap? OK. Also no stretching out of shape like the felt I used to back the first banner. It adds just the right amount of stiffness and body to the pennants. I used it to back the lettering too. (And I had an epiphany while using it -- it would make a great substitute for the stiff Pellon stabilizer in my Twelve Days patterns. I'm not sure it's actually cheaper than the Pellon per sq inch, but it might be easier to find.)


The construction was similar to my first one. I designed the banner in Illustrator, and then I output the flags with letters in place on my faulty batch of Sulky Sticky Fabri-Solvy. Since I can't use it with my felt ornaments, this is a bang-up way to make it so useful -- and to be honest, even if it wasn't the 'bad' stuff I'd still use it like this because it's just makes construction so easy.

There's a way to do it so you only have to use up one sheet of the Sulky per flag. Cut from the outside in and re-use it until you've cut everything out. So:
1) I cut the backing outline out of the stiffened felt, peeled off the stabilizer, then applied it to
2) cut the flag color felt, peeled off the stabilizer, then applied it to
3) cut the stiffened backing for the letter, peeled off the stabilizer, then applied it to
4) cut out the letter itself.


I used a selection of felt colors from my vast, embarrassing stash of wool felts to match the colors that Holley would like for Noah's room. They are a mix of wool-blend and 100% wool felts. (Benzie Design and Felt On The Fly colors.) I don't sweat mixing these two types of wool felts. I always have mixed them because getting the colors I want trumps being fussy about matching fiber content. And I already have the stiffened felt thrown in there that's made from plastic or something, so it's all a smorgasbord.


I wanted to add interest by giving the animals some 3D elements. This meant using small amounts of stuffing and some of my prodigious pom pom stash. I have a thing for poms. Like three gallon-sized jars, a half gallon jar, and two small jars for the mini poms kind of thing.


As you can see, the animals (I still say aminals in my head because two kids) are a mix of machine sewing and hand sewing. One thing that did not improve from last time: I had like a month and a half to make this thing and I was still up to 2 AM on the night before the shower sewing it together. I've come to accept this about myself, but still hoping to magically wake up one day as a motivated non-procrastinator.

I used Tacky Glue to baste the parts together before sewing and I used hot glue to add the poms and some of the felt elements to the banner, as well as to secure the folded flaps on the back for the ribbon (last time I sewed that but didn't like the seam showing) and also to secure the loops in the ends of the ribbon for hanging. I only burned myself a couple of times. *thumbs up*

If I had to do it over again I might add more animals? Maybe use the same gray for the end flag as the beginning flag? I'm not sure I'm completely happy with the overall design in terms of balancing the animals and colors. (Don't worry, I feel this way after making everything.) But that doesn't keep me from being happy with this baby boy banner. I got to use some of my favorite materials and favorite animals. It was a fun project!

Thursday, January 17, 2019

some belated 2018 handmade Christmas gifts to show you


Unfortunately, December was not the leisurely, fireside, cozy crafting hiatus that I always always hope it will be. Always. Every year -- hopes dashed. It was of course (yes, of course, Larissa, you know this), a completely manic series of holiday events, graphic design deadlines, schoolwork, school events, speed shopping, gift wrapping, packing, traveling and cooking, the endless COOKING. With my birthday wedged in there in the middle.

But THIS year will be different. It's going to be magical and I'm going to have time to take it in and savor it! *squelching sound of slightly battered hope springing eternal*

Anyway, I did manage to make four small things, which I'll show you now, slightly after the fact. This pair of Twelve Days ornaments represent ALMOST the end of my serial gifting to my bestie, Robyn. I started this whole thing with the first gift to her in 2009 of a partridge and pear, so it's only been like 10 years. During the interim I designed the complete series of retail patterns, so now I feel I need to go back and redo the ones I sent her before I designed the patterns, because they don't match. She insists she does not need the redos and loves the originals, but it's really not about her anymore. LOL. No, just kidding, it is, but this way she gets a set that makes me happy and also a few extras that she can hide at the back of the tree.


I just had to redo her French Hen because this was the first one I gave her and I just like this new one so much better! I pulled in more corals to tie in her goose. These closeups show the sparkle I added in the form of glass beads and iridescent sequins.


And this is her yellow bedecked Lady Dancing (nailed it on the first try, at least until further notice), with the addition of some sparkle also.

On to the next pair of handmades:


Because I had the unbending desire to make my girls a handmade ornament that would be unique and special and different, I found myself staring at a pile of craft supplies at 1am on December 22nd (the day were leaving to go out of town), willing my exhausted muse to get off her fanny and make magic.

After some false starts, I pulled over a bin of wool balls (Benzie Design) and crafted these two Christmasy snowman... things... for my girls. They were supposed to be ornaments, but somehow ended up on mason jar lid stands. So now they are just figurines or something.


I pondered adding a clip underneath to clip them on the Christmas tree branches, but my girls say they prefer them freestanding. In that case I need to go back to IKEA and get another tiny cloche for the other one. If they still have them.

To make them, I used some acorns and acorn caps I had on hand, and these adorable painted wood Erzgebirge bunny and bird figurines I scored online a while back.


Isn't the tiny bird cute? The snowman's eyes and buttons are straight pins glued on. The nose is a cotton pipe cleaner. The scarf is a bit of wool felt.


I wasn't super happy with the finished products at the time, but maybe that was because it was 4 am and my frazzled muse was glaring at me while calling her union representative. They've grown on me since then. I think next time I make them I'll trim the bottoms off the wool balls (which are surprisingly dense) so the snowman parts can seem a bit more squashed together.

Friday, March 2, 2018

baby molly's floral felt banner


My dear friends Marc and Amanda adopted a beautiful newborn girl recently. I helped throw a shower for them and this banner was a present from me. A few years ago I made a paper name banner for their older son, Micah, so when they requested a name banner for new little Molly I decided to do felt for a change.


I think name banners are satisfyingly easy and fun to sew, especially if you are like me and have illustration software and can print directly to Sulky Stick n Stitch*. Skidoosh! Not only do name banners make easy handmade, personalized gifts, (#forthewin, #oohahhfactor) they also double as pretty shower decorations.

*Why/how did I used the Stick n Stitch and not freezer paper? I used it just as a quick, no tracing way to adhere the printed pattern to the felt, cut it out, and then I peeled it away. I did this in stages so as not to waste the stabilizer. I adhered the composite printed pattern to the cream. Cut. Peeled it off, adhered the same piece to the colored felt. Cut. Peeled it off. Adhered what was left to the letter felt. Cut. Peeled it off. It saved a lot of freezer paper tracing. I didn't feel bad about using it that way because it was from my stash of 'bad' stabilizer -- the batch of stabilizer that doesn't wash away. There's no other way to use it. Not to mention I was kind of in a hurry. But to be honest, I'd do it again, bad batch or no. It was a huge time saver.

Sizewise, Molly's banner is fairly large, with each flag being about 7 x 9 inches and total length about 76 inches from ribbon end to ribbon end:


Here it is where I hung it for the shower - over my couch. I also recommend waiting until the night before the shower to sew yours, just to add that extra bit of excitement and danger! (#2am #woolfeltavalanche #sleepisforquitters)


Designing it was pretty fun (I did not do that on the night before, at least). I looked around on the internet for some images and decided I liked this notched shape for the flags. Then I tested out a few fonts 'til I landed on one that had presence and was not too complicated to cut and sew. The felt colors I chose coordinate with Molly's nursery decor.


It seemed wasteful to use wool felt for the cream colored background that's only seen at the edges, so I bought sheets of acrylic craft felt from the store for that, and then the rest of the banner (including the letters) is wool felt. Bad decision in hindsight. After struggling mightily with the cheap cream stuff I remembered why I despise acrylic felt. It's too lightweight. It bunched, stretched, frayed, stuck too much to the stabilizer, didn't stick enough to the glue, walked away under the machine foot and was a general pain to work with. Next time I make one of these I'll try the stiffened felt for the backgrounds or just give up and use wool.


I did not initially plan to have the charcoal outline around the letters. I added that later because it needed a little oomph, and also to tie in the black centers of the anemone flowers. OK, the flowers!


If you look around on Pinterest you will realize there are one million felt flower tutorials out there. I tried a few of them for a rose, anemone and whatever that loopy poof thing is supposed to be. Chrysanthemum? After figuring out the best sizes by trial and error, I customized some templates for myself on the computer. I found the key to nice looking flower petals and leaves is not to leave them as flat pieces. You have to add curve by snipping and overlapping the ends. Hot glue was used to put the flowers together. I have a love/hate relationship with hot glue. Love the immediacy. Hate the inevitable burns caused by my apparent lack of common sense (the basic disconnect of brain cautioning hey, that's hot, you probably shouldn't pinch it with your fing-- as fingers make contact with sticky lava. Again.)

Now that I have all the kinks worked out, templates made, and know what I'm doing, bring on the baby showers and birthday parties! I'd love to try the letters or flags in a pretty print fabric also, and maybe another font.

Monday, December 26, 2016

handmade Christmas gifts 2016 - two more ornaments for Robyn


OK, yes, this is a repeat. Again. Because I do not love the swan I made her last year. Its beak looks funny. Clearly inferior. I have requested that she ceremonially burn it but it's unclear whether she will follow through. I guess she can have a tree with the real, final, Larissa-approved set of ornaments and then a smaller tree in the garage with all the reject inital attempts.


Anyhoo, this is her FOR REALS Swan a-Swimming and her Right-The-First-Time-Unless-I-Change-My-Mind Maid a-Milking. I added a few sequins and glass beads to them for sparkle.

On to Drummer Drumming. Yes, that is right, the drummer! Not the Lady Dancing. Because I'm using the song from the 1700s that has Colly Bird and the Lady has to wait to dance until no. 11. Ha cha cha.

As I sit here and ponder it I'm seriously rethinking Robyn's Partridge and Pear. Also her French Hen has to go. I'll address that next year. She's going to have to commit to being my friend for a few years more to complete her set. That's my evil plan!

Saturday, December 24, 2016

all that is merry and bright to you


I wrapped presents earlier this week. Bags are so much faster but I do love looking at a pile of nicely papered and beribboned packages. I'm still making a couple of handmade things but I pledge to relax and enjoy over the long weekend.

I wish you and your families a bright and beautiful and hopeful Christmas, filled with the love of Christ, warmth, and good things to eat. And a nicely wrapped present.

Monday, September 26, 2016

another set of literal quilt blocks


This time the set is for my friendy friend, Robyn, and the third color is coral instead of blue green. 


I packaged up this block set to her along with a paper HST birthday card and a guide sheet showing many of the possible combinations for the blocks. 


(If you are wondering about that excellent acorn/squirrel ribbon, it's designed by the ever willowy and affable  Jessica Jones  for  Renaissance Ribbons.)

The blocks are very relaxing to make, if you enjoy repetitive preciseness. You can totally zone out while painting and binge watching Gilmore Girls. (Unfortunately I've found I can't watch a Korean drama while painting – too hard to keep looking up at the subtitles.)

Beware: These just-for-fun quilty display pieces are real time suckers. It's addictive. 


And, as I mentioned before, if you are careful to paint each block the same way you will get two designs each time, one on the front and a different one on the back side. I like flipping the set over to see what I got. It's a surprise!

If you'd like to try making your own Literal Quilt Blocks I've included construction tips with the earlier post.