
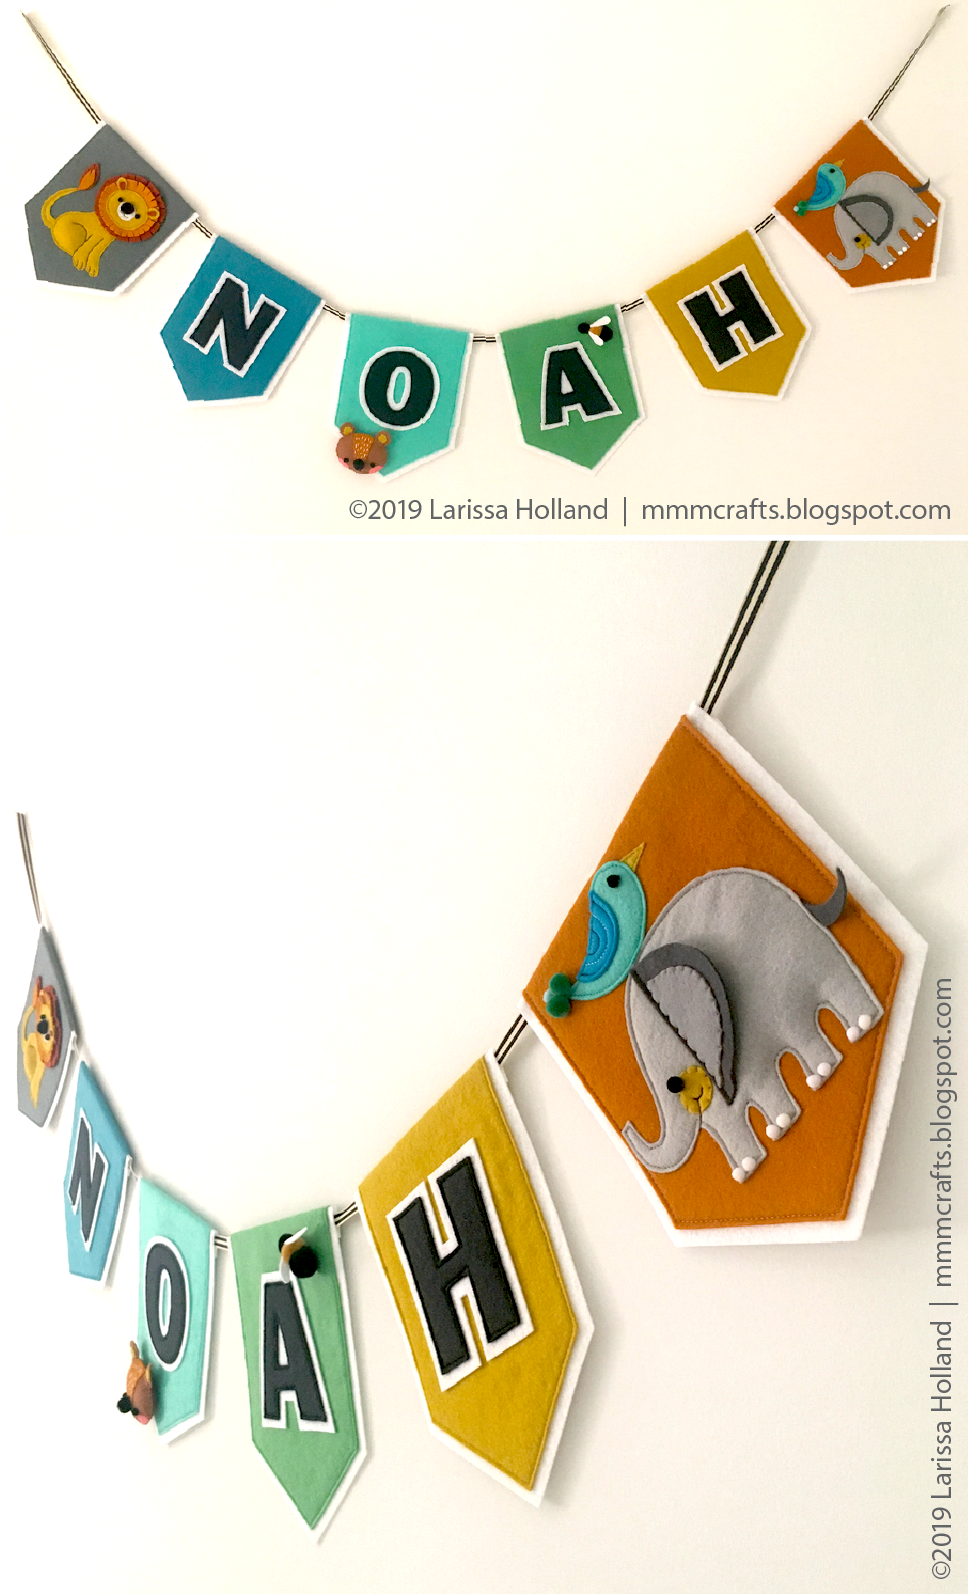
I designed this wool felt name banner for my sweet friend Holley who is welcoming her 5th child very soon. Little Noah doesn't realize this yet, but he is such a lucky kid to have Colby and Holley for parents! You'll never meet nicer, more loving folks. I'm a big fan of their four other kids too. In short, I love them.

While photographing this, it came to my attention that I'm running out of blank walls at my house. Blank walls are kinda boring from a decor standpoint but they are shazam for photographing baby banners you want to blog. Luckily I have this one bare wall left in our room, but it doesn't give much contrast between the wall and the white felt backing. Use your imaginaaaaation to add color to the wall. *Makes rainbow shape with fingers*

I've made one other felt name banner. It was for a sweet little girl baby, so it was flowery and pretty and right in my wheelhouse. I took what I learned from that first one and used it to improve the construction of this one. First of all, instead of regular felt, I used cheap, craft store stiffened white felt as the base for the banner. It's right there next to the stacks of craft felt. It rocks for this. So easy to cut, keeps it's shape, takes glue and hot glue well, and you can sew through it. Did I mention it's cheap? OK. Also no stretching out of shape like the felt I used to back the first banner. It adds just the right amount of stiffness and body to the pennants. I used it to back the lettering too. (And I had an epiphany while using it -- it would make a great substitute for the stiff Pellon stabilizer in my Twelve Days patterns. I'm not sure it's actually cheaper than the Pellon per sq inch, but it might be easier to find.)

The construction was similar to my first one. I designed the banner in Illustrator, and then I output the flags with letters in place on my faulty batch of Sulky Sticky Fabri-Solvy. Since I can't use it with my felt ornaments, this is a bang-up way to make it so useful -- and to be honest, even if it wasn't the 'bad' stuff I'd still use it like this because it's just makes construction so easy.
There's a way to do it so you only have to use up one sheet of the Sulky per flag. Cut from the outside in and re-use it until you've cut everything out. So:
1) I cut the backing outline out of the stiffened felt, peeled off the stabilizer, then applied it to
2) cut the flag color felt, peeled off the stabilizer, then applied it to
3) cut the stiffened backing for the letter, peeled off the stabilizer, then applied it to
4) cut out the letter itself.

I used a selection of felt colors from my vast, embarrassing stash of wool felts to match the colors that Holley would like for Noah's room. They are a mix of wool-blend and 100% wool felts. (Benzie Design and Felt On The Fly colors.) I don't sweat mixing these two types of wool felts. I always have mixed them because getting the colors I want trumps being fussy about matching fiber content. And I already have the stiffened felt thrown in there that's made from plastic or something, so it's all a smorgasbord.

I wanted to add interest by giving the animals some 3D elements. This meant using small amounts of stuffing and some of my prodigious pom pom stash. I have a thing for poms. Like three gallon-sized jars, a half gallon jar, and two small jars for the mini poms kind of thing.


I used Tacky Glue to baste the parts together before sewing and I used hot glue to add the poms and some of the felt elements to the banner, as well as to secure the folded flaps on the back for the ribbon (last time I sewed that but didn't like the seam showing) and also to secure the loops in the ends of the ribbon for hanging. I only burned myself a couple of times. *thumbs up*
If I had to do it over again I might add more animals? Maybe use the same gray for the end flag as the beginning flag? I'm not sure I'm completely happy with the overall design in terms of balancing the animals and colors. (Don't worry, I feel this way after making everything.) But that doesn't keep me from being happy with this baby boy banner. I got to use some of my favorite materials and favorite animals. It was a fun project!


