Wednesday, December 29, 2021

Last Minute Holland comes in under the wire

On Christmas Eve as I sat feverishly stitching two Twelve Days ornaments for dear loved ones, I once again reflected on my time management skills. I feel like I'm busy ALL the ever lovin' time. Perhaps I actually am? Probably not as busy as I think. Surely I can do a better job at this. Heck, I still don't even have my own personal set of any of my ornaments. I have a lot of MmmCrafts samples of course, but those I need to keep in my office for photos/promos. My two girls do not have their own sets either. I do manage most years to make a special one-off ornament for them, but not always. Not this year. Argh.

Next year is my year for sure. 

So this Partridge and French Hen were completed by 1 AM Christmas morning and checked off my list. They were received on Christmas afternoon with joy, and that is the best feeling!

It was nice to revisit these two patterns. If you are curious, yes, I follow my own pattern instructions. LOL. I have so many patterns now it's easy to forget the best way to put them together. It's essential to have a cheat sheet. 

Sunday, December 19, 2021

fun with pinecones, poms, and pipe cleaners


I made this little owl ornament for Robyn (don't look, Robyn! haha) from stuff you might have laying around your house and yard, if you are like me: An acorn cap, large and small poms, chenille stems, wool felt, a small pinecone, touches of white acrylic paint, some metallic thread, and a stick. All held together with blobs of hot glue. 

I have a love/hate relationship with hot glue, and after an evening of burning my fingers, taking a chunk out of my work surface from a hot glue leak, and getting hair-thin snarly hot glue strings all over my clothes and in my hair, I asked folks on my Facebook page to recommend a good mini hot glue gun that won't be out to get me. I am 100% sure hot glue is not supposed to be this hard to use. 

I'm going to check this one out, as Surebonder was the brand recommended by several different commenters! Thanks, guys.

Welp, it's the last week before Christmas. Y'all ready? I'm not! I'm fine this is fine

Tuesday, November 30, 2021

Thank you and get crackin' :-)


Wow! Thanks so much for making this year’s sale the best ever! Y’all got some serious sewing to do! Chop chop! :-) Love to see what your clever hands are making, so be sure to tag me on Instagram with @mmmcrafts or post to my FB page! And merry merry merry mmmaking to you, wherever you are on this beautiful planet!

Shown: Mrs Claus ornament pattern, the 2nd pattern in my #twasthenightornaments. She's made using Benzie Design's lovely felts, sequins, and glass beads. Here's the color guide and link to kits:

All my patterns are available exclusively in my Etsy shop.

Monday, November 29, 2021

Reminder: only hours left in my annual sale

Had your eye on that pattern? Now's the time! Only a few hours left in my annual pattern sale. It ends at midnight tonight, 11/29 EST, so if you occupy a different time zone on the planet, be sure to factor that in. Happy sewing to you! :-) Click here to shop!

Thursday, November 25, 2021

Happiest of Thanksgivings to you! My sale is on!


Thank you, 2021, for being a year to make me more conscious than ever of life's blessings, in awe of God's providence, and more aware of just how quickly life can change. I'm holding my dear ones a bit tighter this year (under their loud protests LOL) and resolving to be a person who is more deliberate about giving thanks in all circumstances. One huge blessing I'm counting right now is YOU, who so kindly stuck with me and sent so many encouraging notes and messages. Thank you! I'm looking forward to jumping back into doing what I love, designing new patterns for you to enjoy. 

If you've been waiting for my annual sale to buy a pattern from my Etsy shop, wait no more, this is it! 20% off your pattern purchase through Monday with no code necessary. Please note: the sale is keyed to my time zone, Eastern Standard, so factor that in if you are in a different part of our lovely world.

Many many thanks to you! And please accept my wish to all, wherever on this beautiful planet you may be, that God richly blesses you with happiness, health, and special times with those you love. And may you snag the very last piece of pecan pie.  

Monday, November 8, 2021

Ghost of Christmas Past: detailed Benzie color guides – kits available!


Ghost of Christmas Past is the third pattern in my Ebenezer Ornament Series. Here are the detailed felt/floss/sequin/bead color guides for you so that you can easily make spirits that look like my Benzie felt samples!

Benzie Design has long been one of my favorite places to purchase wool-blend felts. They have stellar customer service, quick shipping, and their felt, floss, sequins and beads are an absolute joy to work with! They will be very happy to help you with what you need.

First, some handy links to get you started:
To buy the Ghost of Christmas Past pattern: mmmcrafts.etsy.com
To buy the Modern Pastel or Victorian felt palettes shown here:
To shop their sparkle and shine:
Benzie sequins and beads and also their metallic felts

OK! Here are the color guides:

Modern Pastel Silver Ghost

BENZIE FELT COLORS:*
Silver: Tunic and capelet
Gold Metallic Bellwether:** Snuffer, belt, tunic leaves
Peach: Body and arms
Moss: Holly leaves
Fern: Center holly leaf
*Note: You will need matching floss or thread colors
**Substitute Mustard felt if you do not have metallic felt

FLOSS/SEQUIN/BEAD COLORS:*
Capelet: DMC 937 and D3852. Benzie Teal seed beads, Benzie Red seed beads. Trim: Benzie White seed beads, 5 mm iridescent translucent sequins
Belt: DMC 905, 5 mm gold sequins, 8 mm iridescent white sequin topped with 6 mm gold sequin, Benzie Gold seed beads
Tunic: DMC 934, 905, 3705, 943, and D3852. 6 mm metallic kelly green sequins topped with 5 mm aqua sequins, 5 mm lime metallic sequins, 8 mm lime metallic sequin topped with 6 mm metallic kelly green sequin, Benzie Red seed beads, Benzie White seed beads, Benzie Teal seed beads, Benzie Kelly Green seed beads
Snuffer: DMC E301, 4 mm Benzie Gold metallic sequins, Benzie Rose Gold seed beads 
Holly Staff: gold sewing thread, semi-precious 4 mm beads
Year on back: DMC 943
*All sequins/beads sewn with gold sewing thread

OTHER NOTIONS:
Holly staff: white 26 gauge paper wrapped stem wire
Hanging Loop: DMC 5282 Metallic Pearl


Modern Pastel Ecru Ghost

BENZIE FELT COLORS:*
Ecru: Tunic and capelet
Gold Metallic Bellwether:** Snuffer, belt, tunic leaves
Peach: Body and arms
Moss: Holly leaves
Turquoise: Center holly leaf
*Note: You will need matching floss or thread colors
**Substitute Mustard felt if you do not have metallic felt

FLOSS/SEQUIN/BEAD COLORS:*
Capelet: DMC 3848 and 732. Benzie Foxglove seed beads, Benzie Red seed beads. Trim: Benzie Rainbow seed beads, 5 mm iridescent translucent sequins
Belt: DMC D301, 5 mm gold sequins, 8 mm iridescent gray translucent sequin topped with 5 mm gold sequin, Benzie Gold seed beads
Tunic: DMC 3848, 732, and D3852. 6 mm metallic copper sequins, 5 mm pink sequins, 8 mm pink sequin topped with 6 mm copper sequin, Benzie Red seed beads, Benzie Foxglove seed beads, Benzie Rose Gold seed beads
Snuffer: DMC D301, 5 mm gold sequins, Benzie Rose Gold seed beads 
Holly Staff: gold sewing thread, semi-precious 4 mm beads
Year on back: DMC 3705
*All sequins/beads sewn with gold sewing thread

OTHER NOTIONS:
Holly staff: white 26 gauge paper wrapped stem wire
Hanging Loop: DMC 5282 Metallic Pearl


Victorian Swan Ghost

BENZIE FELT COLORS:*
Swan: Tunic and capelet
Bronze Metallic Bellwether:** Snuffer, belt, tunic leaves
Peach: Body and arms
Turquoise: Holly leaves
Peacock: Center holly leaf
*Note: You will need matching floss or thread colors
**Substitute Copper felt if you do not have metallic felt

FLOSS/SEQUIN/BEAD COLORS:*
Capelet: DMC 3808 and D301. Benzie White seed beads, Benzie Red seed beads. Trim: Benzie Rainbow seed beads, 5 mm iridescent translucent sequins
Belt: DMC D168, 5 mm iridescent gray sequins, 8 mm iridescent gray sequin topped with 5 mm teal sequin, Benzie Rose Gold seed beads
Tunic: DMC 3808, 3848, White, 815, and 3712. 8 mm iridescent gray translucent sequins topped with 5 mm teal sequins, 5 mm metallic red sequins, 8 mm red metallic sequin topped with 5 mm pink sequin, Benzie White seed beads, Benzie Red seed beads, Benzie Teal seed beads
Snuffer: DMC D168, 4 mm Benzie Copper sequins, Benzie Rose Gold seed beads 
Holly Staff: copper sewing thread, semi-precious 4 mm beads
Year on back: DMC 815
*All sequins/beads sewn with copper sewing thread

OTHER NOTIONS:
Holly staff: white 26 gauge paper wrapped stem wire
Hanging Loop: DMC 5283 Metallic Pearl


Victorian Midnight Ghost

BENZIE FELT COLORS*:
Midnight: Tunic and capelet
Silver Metallic Bellwether:** Snuffer and belt
Bronze Metallic Bellwether:** Tunic leaves
Peach: Body and arms
Turquoise: Holly leaves
Swan: Center holly leaf
*Note: You will need matching floss or thread colors
**Substitute Bronze felt if you do not have metallic felt

FLOSS/SEQUIN/BEAD COLORS:*
Capelet: DMC 958 and D301. Benzie Red seed beads, Benzie Aquamarine seed beads. Trim: Benzie Rainbow seed beads, 5 mm iridescent translucent sequins
Belt: DMC 958, 5 mm silver sequins, 8 mm copper sequin topped with 6 mm silver sequin, Benzie Rainbow seed beads
Tunic: DMC D168, 958, 943, and 3801. 6 mm brassy gold sequins, 5 mm aqua sequins, 8 mm brassy gold sequin topped with 6 mm teal sequin, Benzie Rainbow seed beads, Benzie Red seed beads, Benzie Aquamarine seed beads
Snuffer: DMC D301, 5 mm iridescent translucent sequins, Benzie Rainbow seed beads 
Holly Staff: silver sewing thread, semi-precious 4 mm beads
Year on back: DMC 832
*All sequins/beads sewn with silver sewing thread

OTHER NOTIONS:
Holly staff: white 26 gauge paper wrapped stem wire
Hanging Loop: DMC 5283 Metallic Pearl


I hope this was helpful! These color guides can be followed exactly, but feel free to vary the choices to match your tastes and make your own unique combos. The way I've combined the Benzie Victorian and Modern Pastel felt colors are just a few of the possibilities! I'd love to see what you make. :-) #ebenezerornamentseries

Thursday, November 4, 2021

Ghost of Christmas Past pattern now available!


It took a bit longer than planned, but I'm very thankful to say that Ghost of Christmas Past is now in my Etsy shop. This pattern is the third in my Ebenezer Ornament Series, which is inspired by my love for Charles Dickens' spooky Victorian novella, A Christmas Carol

You'll find the difficulty level to be intermediate – not for beginners. If you've completed my Twelve Days Ornament Series, you are likely ready to step into the Ebenezer series! (Twelve Days is a great primer as it builds your skills when you do the patterns in order.)

Skills needed for this particular pattern are backstitch, whipstitch, drawing on the face, precision cutting of small pieces, beading, and working with stem wire. This one is not as complicated as Mr Marley, IMO. And not to worry, as with all my ornament patterns, Ghost of Christmas Past is organized into detailed step by step instructions with scads of diagrams and tips.

The pattern includes 21 years to trace and embroider on the back, if you like

Male or Female Spirit?
It's a bit hard to tell, but despite his long hair and fancy tunic, this is a male spirit. My ornament is designed to reflect the ghost as written by Mr Dickens, who describes this spirit as a candle-like shape shifting youth/old man with long, white hair and blooming cheeks, wearing a flowered white tunic and golden belt. He carries a large snuffer hat under his arm and also a fresh branch of holly, and a bright clear light jets from his head. (At the end of the encounter, Mr Scrooge sends him on his way by squashing the extinguisher over his head and body, under which he disappears, though the light refuses to be extinguished.)

Despite the original text, I've seen many productions which cast this spirit as a woman, so I've provided a list of tips at the end of the pattern for converting this ornament design to a feminine version. Like skipping the sideburns and thick eyebrows, making the hair longer, adding a braid, cinching the waist, skipping the capelet, etc... I hope that will help match your nostalgia for lovely productions you may have seen. I'll have to make a female sample and photograph it for you guys. On my to-do list!


Just like my other heirloom ornament patterns, it takes about two crafternoons to make a Ghost of Christmas Past. Using metallic wool felt for the snuffer, belt and leaves and using metallic tinsel or iridescent pipe cleaners for the crown of light adds such a rich, festive sparkle to the look.

This ornament is best constructed using Sulky Stick 'n Stitch, which makes the process so fast and accurate. If you already have the materials on hand to make Scrooge or Marley, you just need a few more things like metallic wool felt, tinsel pipe cleaner, plastic or semi precious 4 mm beads (for holly berries), some larger sequins, and paper or cloth covered white stem wire. There's a full materials list on the first page of the pattern.


What's a fun collective pronoun for a group of these? A sparkle of spirits? All four samples you see above are made with the same two Benzie Ebenezer color palettes I curated for the rest of the series. I exercised a bit of artistic license in the color of his tunics #becausecolors. I will be publishing detailed color guides for these samples soon, which coordinate directly with the amazing felt/floss/notions kits put together for your buying convenience at Benzie Design

To purchase the instantly downloadable PDF pattern, visit my Etsy shop. :-) 

Friday, October 1, 2021

an update to the Sulky post!


Hey guys! I've updated my previous post regarding the recent issues with Sulky stabilizer. Please read the update here! :-)

Wednesday, September 29, 2021

alert: your Sulky stabilizer may be faulty (read the update!)


IMPORTANT UPDATE TO THE BELOW: I've just spoken again with Patti Lee and she says the glue problem seems to be isolated to bogus Amazon vendors selling counterfeit product rather than coming from Sulky's own glue manufacturer (and so far the bogus product seems to only be using the Stick'n Stitch branding but that could change). Sulky is reporting the bogus vendors to Amazon and hopefully getting them eliminated from the marketplace. 

Because this will be an ongoing problem, and because the faulty stabilizer isn't coming from them, Sulky cannot offer to replace your counterfeit product for free if it's purchased from Amazon. Understandably! You should pursue getting a refund of your purchase price via Amazon. They will refund your money even if the vendor is no longer there. 

However, please continue to contact Patti Lee (info@sulky.com) if you get scammed on Amazon - this will help them shut the crooks down and also she will offer you a generous coupon code to purchase the real stuff from Sulky.com.

I'll post updates as I receive them, but her recommendation for now is to only purchase from reputable resellers and if you purchase directly from Sulky.com you can be confident that you are receiving the legitimate product. Just like always, I can personally recommend these resellers:
Benzie Design, both on Etsy and also their own benziedesign.com
And, as always, I think you can rely on large hobby/craft websites to have the legitimate product, like Jo-ann or Michaels or other reputable large sewing retailers or vendors you have purchased the real stuff from in the past. 

I understand from Patti that the Amazon counterfeit packaging is done very well so that the average person would not be able to tell just by looking at the outer packaging that's it's fake. However, you can sometimes tell just by looking at the sheets themselves. From Patti: "One thing that might help folks is that it is fairly easy to identify the fake goods by the release paper. The release paper on our product is a fairly slick, off white in color, silicone paper - while the fake goods have a very dull, white paper that would more closely resemble copier paper than silicone."

Tips for water testing and tips for fixing a sticky project are below in the edited original post:

+++++++++++++++++++

Hey guys! I need to alert my customers to a potential problem with Sulky Stick N Stitch (also marketed as Sticky Fabri-Solvy): There appears to be Amazon vendors selling counterfeit product with the wrong adhesive applied, according to Patti Lee at Sulky America. (See update about the counterfeit product above!)

1) THE PROBLEM:
The product with the wrong adhesive will not rinse away as normal — instead it turns clear and gummy and refuses to budge no matter how long it’s soaked in water. This bad product seems to be coming from crooked Amazon vendors.

2) AFTER STITCHING IF YOU DISCOVER YOU HAVE THE BAD STUFF:
Patti says to try this: Apply a coat of Dawn* dishwashing liquid soap (for hand washing dishes) to your wet flat (sticky) pieces and let it sit for 2 hours. Then gently rinse away using cold water and air dry. If you find it’s still sticky, repeat that process.
*If you are outside the US use any good quality liquid soap used to hand wash dishes

3) BEFORE YOU STITCH: TEST EACH SHEET OF SULKY STABILIZER BEFORE USING ON YOUR PROJECT!
It's a good idea to test each sheet. Luckily, the test is easy. Go ahead and print the pattern on the sheet JIC. Before using it, cut off an unprinted corner and adhere it to a scrap of fabric. Submerge the fabric in water for a few minutes and see how it does. If the stabilizer turns clear and gummy, do not use that sheet!! If it turns white, stringy, and lifts away, it’s the good stuff and you can go ahead.

4) CONTACT PATTI IF YOU HAVE THE BAD STUFF!
Patti Lee and Sulky would love to know if you have a bad batch from Amazon. Do not hesitate to get in touch with her if you have a problem, because it will help them to pinpoint the counterfeit Amazon vendors. She will also offer you a generous coupon code to purchase the real stuff from them:
Patti Lee at Sulky
(800) 874-4115, extension 173
Or email info@sulky.com with Attn: Patti Lee in subject

(If you are outside the US you might need to visit Sulky.com to get the correct phone number)
Refund: If you purchased on Amazon, you'll need to pursue a refund of your money via Amazon.

This stabilizer is such an integral part of making my ornament series, and in its legitimate form is 100% awesome, so I wanted to get the word out so you can avoid frustration. I truly love the product, so I hope you give it a second chance if you have this issue!

Thursday, July 29, 2021

all new releases on hold for now, please read this post


Where to begin. I'll just dive in. My family is currently in the middle of a medical emergency* that began three weeks ago. While Ghost of Christmas Past is very close to completion, the release is on hold and will be on hold for at least a few weeks while God gets us through this. Your prayers are very welcome.
*See update below!

2021 has presented a series of hard personal challenges to me beginning with the illness and death of my Dad in January and including my own health issues, but I've been coaching myself this whole time that there is no problem, still plenty of time to catch up on my design goals for this year. With this latest challenge, I must face facts. Catching up is just not realistic and I need to reset my goals:
  1. I still plan to release Ghost of Christmas Past as soon as I am able. I cannot say when that will be but hopefully in the next few weeks. God willing.
  2. I cannot guarantee any other releases this year. I humbly apologize, I know many of you were looking forward to the releases. I was too. God has different plans for me.
  3. As time allows after Ghost is released, I will be tackling the next pattern and will release it this fall if at all possible. It may not be possible.
  4. The shop is open for now. I'm available and happy to assist with questions via the shop. You'll get your speediest answer there, as opposed to FB or IG. There may be a time coming when I need to close my Etsy shop temporarily, but I will keep it open if I can.
  5. This blog is a huge resource for tips, tutorials and links while you work on my projects. Have a look through my sidebars and nav buttons to get started.
As always, I so appreciate your patience and support. Once again, I do sincerely apologize for the delay. I will update more when I can.


MEDICAL UPDATE: Thank you thank you thank you for your prayers and encouraging messages, wonderful folks! This man right here came home from the hospital after eleven long days. He is 12 lbs down, poked full of holes, exhausted, but making very steady progress day by day. It will be a long time 'til he's back to normal, but what counts is now he's HOME. Thank you, merciful God!
(Photo is from his birthday a few months ago.)

Wednesday, May 26, 2021

Ghost of Christmas Past prototypes underway

I'm working hard on producing the third pattern in my Ebenezer Ornament Series, Ghost of Christmas Past. I only have a few tweaks to make before I have the final version. I'm pretty happy with how it's all gone so far! Earlier version is on the left, Mr Headless on the right is the latest.

I've seen many productions or movies which portray this ghost as a woman, so you may be a bit surprised to learn it's actually described as a boy/man in the book. That's the version I'm going with, however, this is DIY and you are the boss. If you'd like to craft this spirit as an ethereal woman instead to match the nostalgia of your memories, it is entirely up to you! 

As written by Dickens, this ghost is kind of tricky to represent faithfully as a felt ornament. I've done my best to hit the highlights! And some artistic license is thrown in there. Here's the description of what Scrooge sees when his bed curtains are drawn aside:

"It was a strange figure–like a child: yet not so like a child as like an old man, viewed through some supernatural medium, which gave him the appearance of having receded from the view, and being diminished to a child's proportions. Its hair, which hung about its neck and down its back, was white as if with age, and yet the face had not a wrinkle in it, and the tenderest bloom was on the skin. The arms were very long and muscular; the hands the same, as if its hold were of uncommon strength. Its legs and feet, most delicately formed, were, like those upper members, bare. It wore a tunic of the purest white; and round its waist was bound a lustrous belt, the sheen of which was beautiful. It held a branch of fresh green holly in its hand; and, in singular contradiction of that wintery emblem, had its dress trimmed with summer flowers. But the strangest thing about it was, that from the crown of its head there sprung a bright clear jet of light, by which all this was visible; and which was doubtless the occasion of its using, in its duller moments, a great extinguisher for a cap, which it now held under its arm."

Admittedly already a challenge to represent with a crafted Christmas ornament, but even further than that:

"Even this, though, when Scrooge looked at it with increasing steadiness, was not its strangest quality. For as its belt sparkled and glittered now in one part and now in another, and what was light one instant, at another time was dark, so the figure itself fluctuated in its distinctness: being now a thing with one arm, now with one leg, now with twenty legs, now a pair of legs without a head, now a head without a body: of which dissolving parts, no outline would be visible in the dense gloom wherein they melted away. And in the very wonder of this, it would be itself again; distinct and clear as ever."

So um yeah, you'll just have to use your imaginations for that last shape-shifting part. As a designer, I landed on a candle-like youth with blooming cheeks and long white hair, sporting bare arms and feet, wearing a tunic trimmed with flowers and holding a holly branch and a hat-sized snuffer in his hands. The light pouring from his head is tricky to represent, so I'm probably going to settle for a tinsel crown with a simple flame shape in the back. I'm still thinking that one through.

New craft items you'll need to make this pattern: If you've been making the Ebenezer series already, you have most of what you need already on hand, but there are a few things that are new:

  • 24 or 26 gauge cloth covered or paper wrapped floral stem wire (for the holly branch). I've used white in my sample photo, but I will probably also use green, which is easier to find than white. It takes one 18 inch stem to make a holly branch. 
  • Benzie Design's Bellwether metallic felts for the belt, snuffer, and some leaves. It adds such a rich sheen! I love using it for this. You may of course opt to use regular wool felt for those parts if you wish. It still works!
  • Three 4 mm round jewelry beads for holly berries. I found the tiny glass seed beads just didn't have enough presence for the berries. The sample you see is made with semi-precious stone beads I grabbed at my local Michaels, just because I liked the natural variations in hue.
  • 8 mm and 6 mm sequins in addition to the 4 or 5 mm ones you are already using. You'll need them for the belt buckle and flowers.
  • The spirit's hair is white DMC embroidery floss, and you can get two heads of hair from one skein.
I think that covers any new stuff. The rest is the usual wool felts, floss, wood beads, pens, stabilizer, tinsel pipe cleaner, metallic Diamant and metallic threads that you are already familiar with. 

Ever wonderful Benzie Design will continue to offer Ebenezer materials kits to get you going with most of what you need to make ornaments that match my color guides.

I hope to begin writing the pattern soon. Sooooo back to work for me! 

Monday, May 24, 2021

Xfinity's block on my blog is now fixed!

Yay! Just to let those of you know who subscribe by feed or email, the erroneous block put on my blog by Xfinity's service Safebrowse.io seems to be fixed now. It only took seven days. :-(

I can now load my blog using Xfinity wifi on any of my devices and I hope you can too. Thanks so much for your patience, and if you notice the Safebrowse warning is still happening for you, can you contact me via FB or my shop and let me know? Thanks!

Friday, May 21, 2021

getting a Safebrowse.io warning when you go to my blog? me too >:(

UPDATE: THE ERROR SEEMS TO BE FIXED! At least on my end. If you get the erroneous Safebrowse warning, can you contact me via FB or my shop and let me know? Thanks!

I reference my own blog almost every day when I grab helpful links to send my customers. Imagine my surprise on Tues May 18th when suddenly I got the above intimidating screen (in several languages) from a URL called safebrowse.io when I loaded it on my Mac. Panic immediately set in. Had my blog been hacked? What was going on?

As you might imagine, I started researching and testing immediately. I spent all day on it and reached out to a lot of my friends to help me test it. Here's what I figured out:

  • Safebrowse.io is a legit policing service used by Xfinity (my internet provider).
  • It was flagging my blog for no apparent reason.
  • My blog was not flagged on any other internet provider or cellular service that I could see. Non-Xfinity users and anyone using cellular data could access it just fine.
  • Not all Xfinity wifi users were getting the same screen, but everyone who got the screen was an Xfinity user.
  • If we turned off the Advanced Security Filter on our router, voila, the problem was solved. If we turned it back on, the flag appeared again.
  • The problem seemed to be with the Xfinity advanced security algorithm or blacklist.
Obviously, asking my customers to click 'proceed anyway' after getting a malicious site warning is not an option. Neither is telling them to take their security fence down on their router just to reach my site. Unacceptable.

After two long phone calls with Xfinity support, they told me that my blog was erroneously flagged in a recent security update which referenced certain server ports. This has presumably affected way more websites than just my own. They tell me their engineers are aware of my issue and are working to solve it.

I'm currently waiting for them to whitelist my poor ol' innocent blog (which is a legit web site on the internet since 2008). Today is the fourth day it's been held hostage by Xfinity, scaring my visitors and ruining the reputation of my business. 

HURRY UP, XFINITY.

If you are an Xfinity user, obviously you won't be seeing this post. If you did, I'd tell you a good workaround during this time to reach my blog is to turn off the wifi service on your device and access it via cellular service using the usual link:


Tuesday, April 20, 2021

helpful tips for nicely done ornament heads – you can do this – no really


Let's put our heads together! haha. Do you find that you are intimidated by the idea of making the tiny wood bead heads for some of my heirloom ornaments? This is the post for you. I'm going to break this process down to hopefully digestible little bites, and you will realize this is not a big deal at all. No lie. You can do it. *high fives* *down low* (whips hands away) *too slow!* 
OK, here we go:


FIRST: BUY THE RIGHT BEADS

My patterns usually call for 20 mm (3/4 inch) wood beads. It's important to get the correct size so that the heads look in proportion to the bodies, and so that the tiny hats/hair/noses/mustaches etc... all end up fitting the way they are designed to. 


There are tiny variances in sizes even if they are labeled 20 mm or 3/4 inch, but you don't want to stray too far in either direction. To test for yourself, cut a skinny strip of paper and mark 20 mm or .75 inch on it using a ruler and a fine point pen. Then feed the strip of paper through the bead hole and check. The bead should be fairly close to your measurement.


When buying, look for:

  • hardwood beads that have a nice, uniform, woody color and subtle graining
  • consistent size and roundness
  • drilled holes that are around 4 mm
Avoid purchasing beads that:

  • are very light colored, as they seem to be softer/more prone to bleeding, wonkier shaped, and there's not much contrast if your head will have white hair
  • have holes that are too large or too small (around 4 mm is good)
  • are not consistently round and look tall or squatty


Are you planning to add a different skin tone to your beads? 
I recommend painting the whole bead ahead of time (plus the smaller beads for hands if needed) with a good quality watercolor paint and a large-ish brush. Using semi-transparent mediums like watercolor will keep the nice, matte finish of the wood bead, and the color will have some depth.

In the photo above^ the top and righthand beads are painted with washes of watercolor. The bottom left is unpainted. If you find it hard to get uniform color using watercolor, try adding more than one coat of diluted color and using a larger brush.

Of course, you can also use acrylic paint if you prefer that, but be aware that it will add a slight sheen and the color will be more opaque/flat. I do love to use acrylic paint to fill in white hair, as shown on the Mrs Santa head in the photo above.

Confession: I could not find my good watercolor set to make these (I suspect the children). All I could find was the ancient, cheap tray of Crayola watercolors we picked up from Target when they were small. It took some mixing and experimentation to get the colors I wanted, but I'm just saying it's possible if that is all you have handy. The super cool thing is, I have noticed the watercolor wash seems to partially seal the wood so that it is way less prone to bleeding and it's easier to add the faces. Bonus! Note: It's important to let the bead dry completely before adding the features.


SECOND: HAVE THE RIGHT TOOLS


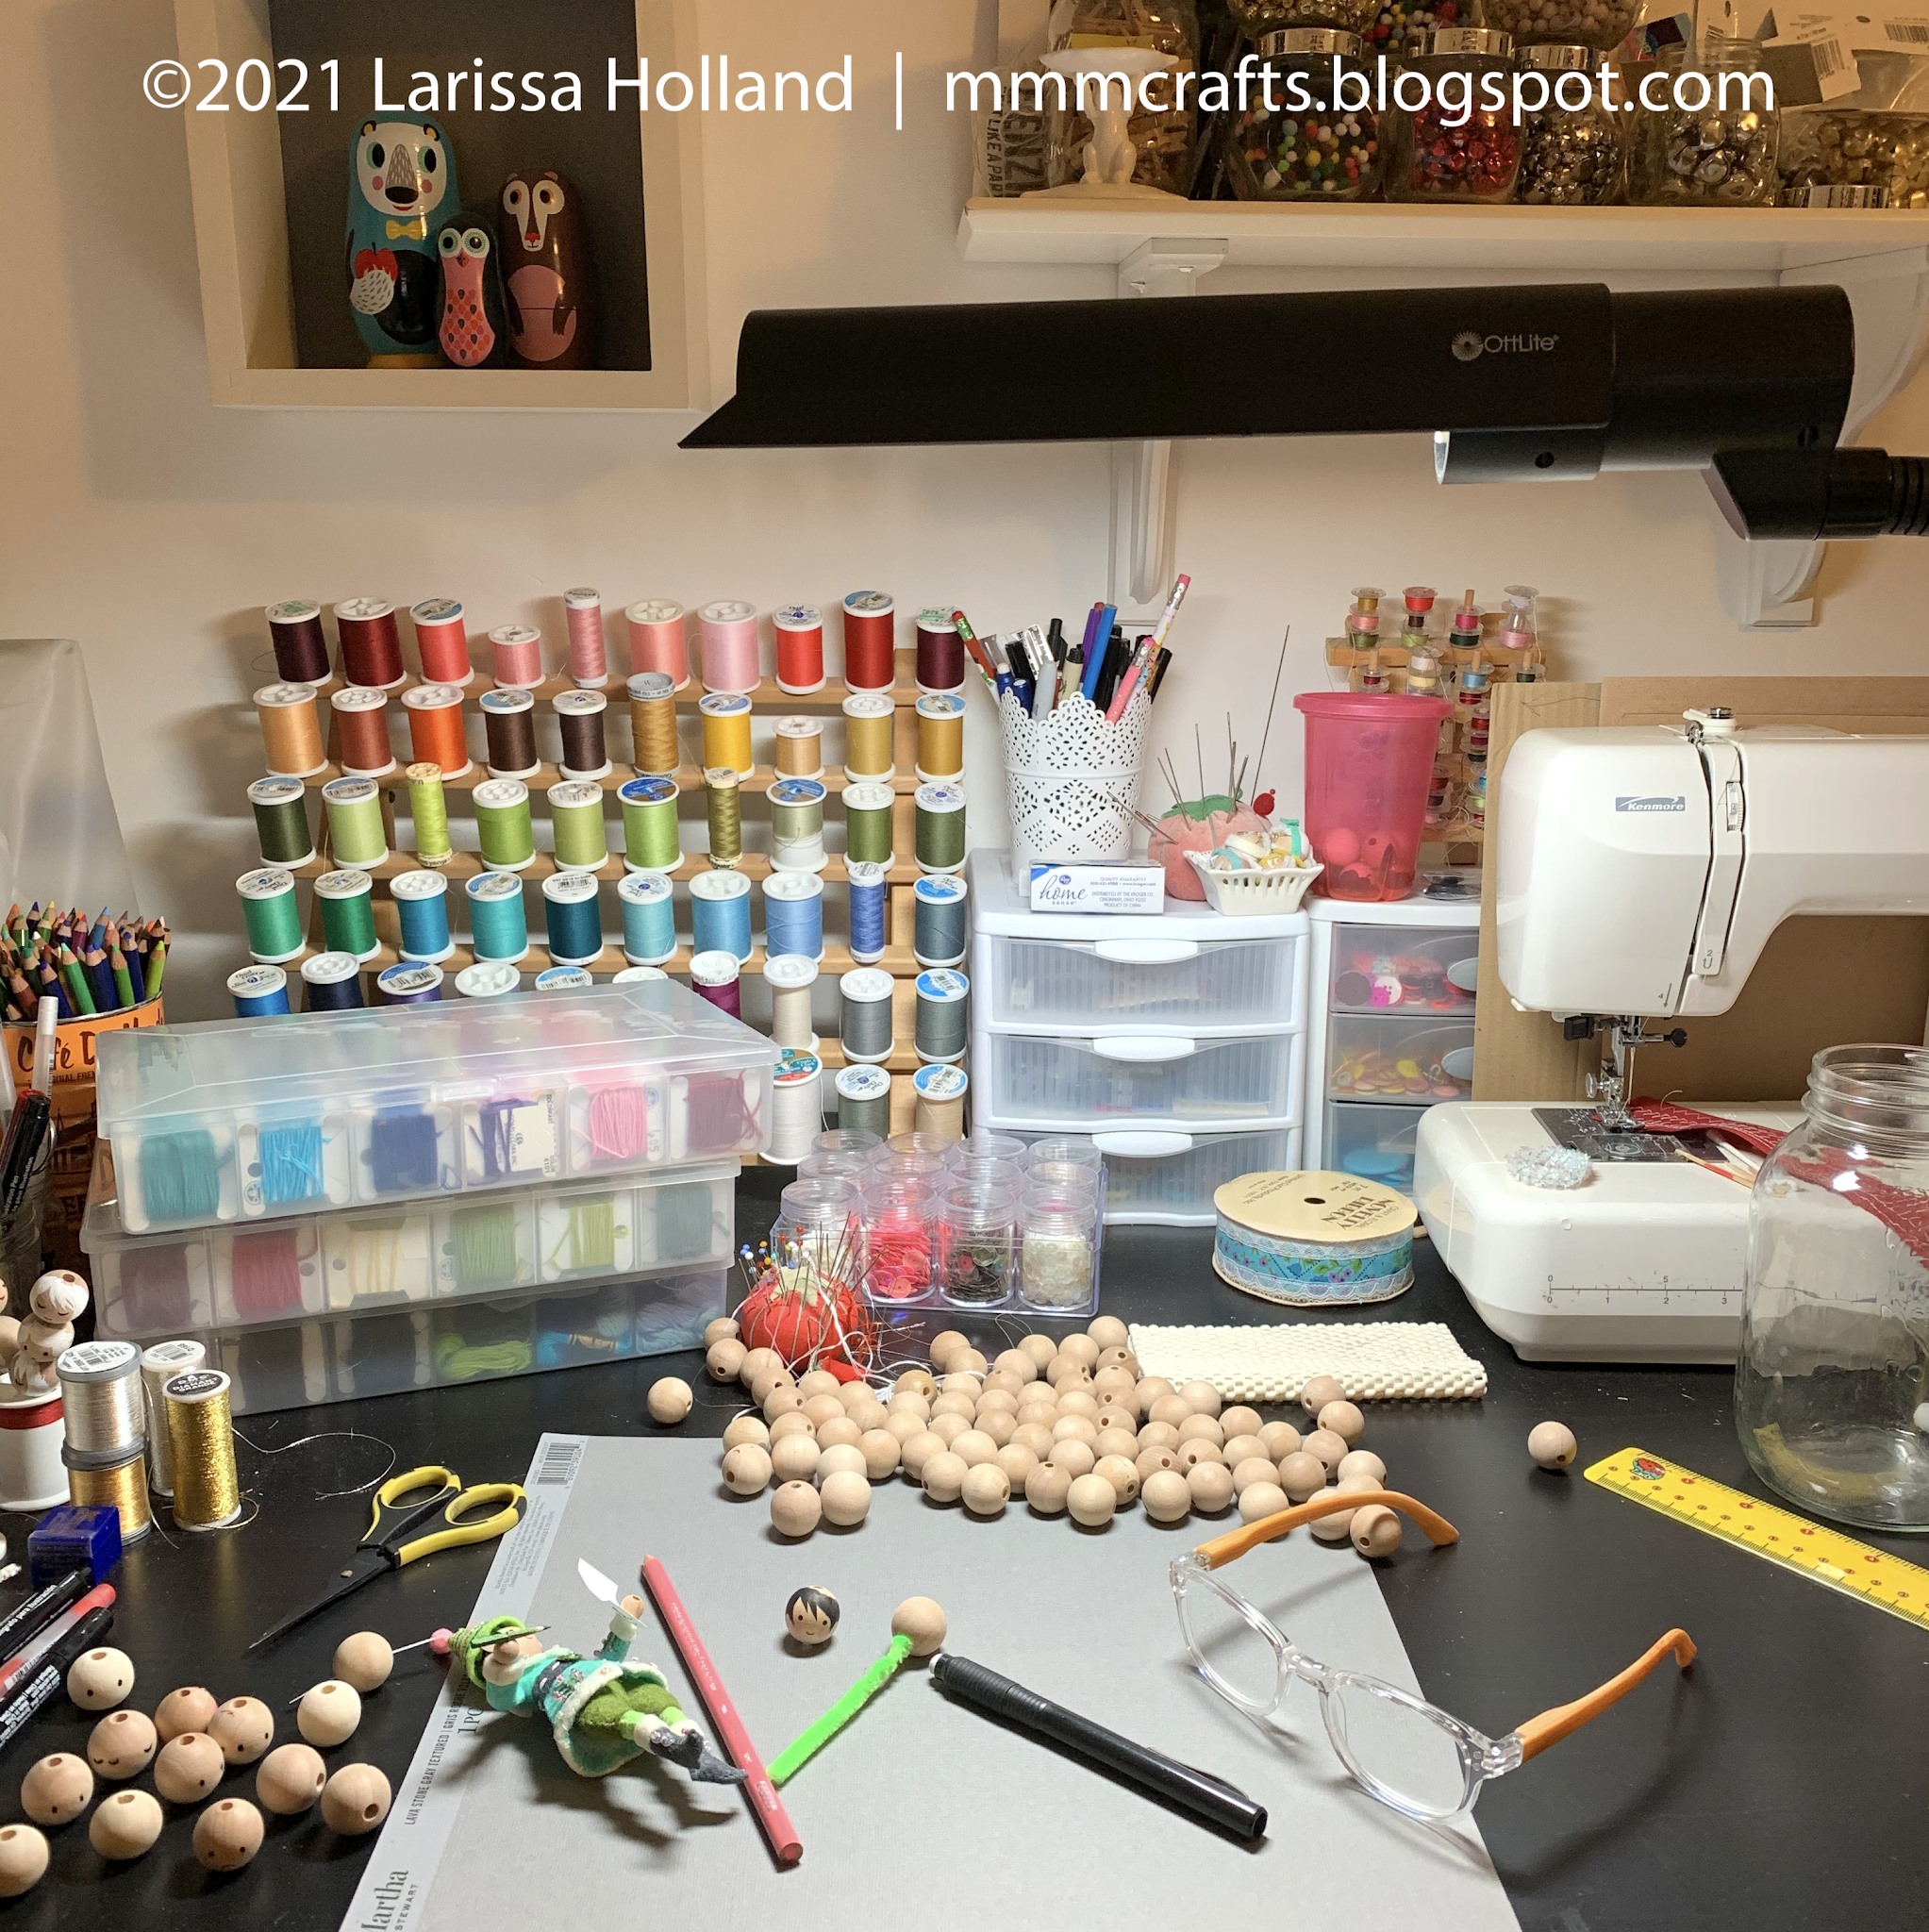
1) Good lighting and reading glasses: OK, some of you young thangs with sharp eyes may not need the glasses, but they are a must for me at this small scale. I have an OttLite directly over my work space and also a nice big window near my desk. This shot of my desk is at night, so you can see the OttLite still gives plenty of light, even without the window.


2) Pencil: One with a nice, fine point. Mechanical pencils have a consistently sharp tip.


3) A good eraser: I like white eraser pens rather than the old school pink eraser on the end of the pencil, which can leave marks/smears. These click-up type eraser pens do an excellent job of getting rid of stray pencil marks (after your head is dry) without leaving residue or smears.


4) Fine point pens: My instructions call for you to use either a good quality gel pen or a fine point permanent fabric marker to draw on the eyes, mouths, and hair outline. It's tempting to use that Sharpie marker or your kid's felt marker because they are at hand, but don't do it! Why? Because unfinished wood beads tend to bleed inks along the wood grain, and fabric markers and gel pens are great at minimizing this unattractive effect.

(I've also heard some folks get good results from Sakura Micron fine tip pens, so you are welcome to try that too! If you have extra beads on hand you can afford to test some different pens, but be sure they don't bleed and have permanent ink.)

Please note: If the unfinished wood makes you nervous or if you just can't seem to minimize the bleeding there are other options:
  • Don't use markers/pens. It's perfectly fine to use colored pencils to draw on the face. It's a softer look but more forgiving than the pens if you do not have a steady hand.
  • Or you can opt to seal the entire bead with a clear coating like matte Mod Podge before adding the face/hair. I don't prefer this because even the matte coating can be a bit shinier than I like, but it's a surefire way to avoid bleeding. If you do this, don't use a gel or fabric pen – use a permanent marker like a Micron or a Sharpie. 
  • Or you can opt for a Waldorf look by simply leaving the faces entirely blank, or with only some rosy cheeks and hair. I've seen lovely sets done this way.


5) Broad tip fabric marker: In some cases, it's helpful to have a broad tip fabric marker to fill in the hair after you get the outline done with the fine point pen. It's just quicker than coloring with the fine tip. On heads with white hair, you can use an opaque white paint pen to fill in, or brush on white acrylic paint.


6) Good quality colored pencils and a Q-Tip to blend: to add details like rosy cheeks, red noses, and ghostly hollowed cheeks. I remember I had a rolled paper blending pencil shaped thingy a hundred years ago from my college charcoal drawing classes that would probably work great for the cheek blending instead of using a Q-Tip, but I can't find it in my stuff. (Yes, I do still have my art supplies from college, don't you?) But Q-Tips do the job and everyone has 'em.


7) Tacky Glue and a toothpick: On some heads you need to glue on tiny noses, ears or mustaches. Tacky Glue does the job nicely because you need to use so little to make a bond. The toothpick comes in handy to place teeny tiny amounts of glue just where you need it.


8) Folded chenille stem, pipe cleaner, or skinny dowel: Use these to hold the bead more easily while you work with it, and when you're finished you can just prop the stem in a thread spool or handy cup to let the head dry.


9) Extra beads: Understand that you may need a few extra beads if something goes awry. What you don't need is the added pressure of nailing this in one try. (Shall I show you my impressive reject pile of heads?) If you don't like your first face, most times you can attempt another face on the opposite side of the bead, provided the first face will be covered by hair or a hat.

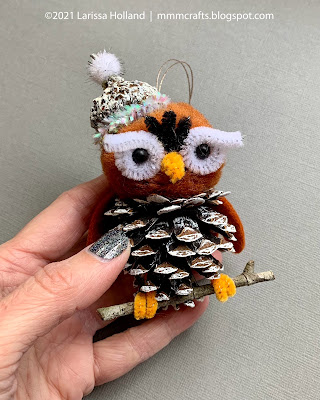
10) And finally, CONFIDENCE. Have a close look at some of my photos in this post. You'll notice my faces are, in fact, not perfect. They are a bit flawed, but hopefully still charming. (Kind of like me.) In short, you got this. Tackle this part of the ornament project in the same methodical way you do the embroidery and sewing portions – it's no different. Just follow the step by step instructions and you can have a winsome little face you are delighted with. Really.


THIRD: LET'S MAKE A SAMPLE HEAD

I'm going to show you how to do a basic face here, but please follow the specific instructions included in my patterns for your ornament. There are variations with each pattern.

1) Look at your bead. Is there a larger hole on one end? That's the neck. (If the holes are the same size, no worries, use either.) Skewer the bead on a folded chenille stem. Like my fuzzy green one? It's been around. 

 
Just a note here: I've noticed some of the wood beads I've bought lately have holes that are on the small side (less than 4 mm). If you do too, just keep that in mind when you cut your felt body out and maybe trim a tiny bit off the width of your neck to accomodate. You can also trim the fuzz on the pipe cleaner neckbone to reduce bulk and make it easier to slide on the head later. What if you've already sewn the neck? If the fit is too snug, my favorite trick is to wrap the neck tightly with matching sewing thread. It really helps to get it in the bead hole when it's a bit too tight. Remember to twist the head on and not shove.

2) Turn the bead so the stripey end grain will be the face. (This side tends to bleed less, unless your bead is painted, in which case you can use any side you like.) If there are obvious flaws or burn marks on the bead, you'll want to turn that toward the back or choose a different bead. Find the halfway point and mark it lightly with a pencil if you need to. Folks tend to place the eyes too high, and that will help. The eyes should go at the halfway point, where the bead is the widest.


3) With your pencil, lightly mark two eyes and a mouth. As a general rule, my eye dots are about 3/8 inch (9 mm) apart from center to center, with some small variations. Place the mouth about halfway between the eyes and the neck, centered between the eyes. Err on the small side for the mouth. It's cuter. The eyes and mouth will visually form a squatty triangle. (If you like a more kawaii look for your faces, place the mouth a little higher and closer to the eyes, but keep it just as small or smaller. It will increase the cute factor, and conversely, placing the mouth lower will decrease the cute factor.

Not quite happy with your sketched face? Simply erase and make adjustments. Do this before you move on.


4) Now to dot your eyes. haha. Use a permanent fabric marker or gel pen to color two dots for eyes over your pencil marks. The larger the dots, the cuter the look. I keep the dots about 2 mm, give or take. Experiment to find the size you like. Remember: you can always make them larger but you can't make them smaller, so be conservative.


5) Use a permanent fabric marker or gel pen to draw on the mouth over your pencil mark. A fine point is essential here – it's very easy to make the mouth too large for the scale of the face. Think thin and small.  You can always dot on more if it's too small. Don't worry if you don't completely cover your pencil mark. You'll erase it later. DON'T erase until you are sure your head is dry.


6) Your pattern may call for adding rosy cheeks (or ghostly cheeks). Do not add cheeks until your face is dry. Here's how: Grab a good quality colored pencil. (No crayons or markers please.) Using a circular motion, lightly color a circle just under each eye and close to the mouth. Smaller circles = more kawaii. Larger circles = more vintage. Use a Q-tip or a folded cotton pipe cleaner in a circular motion to soften the edges of the circle, if you like. You can go back in and darken the center of the circle if you want a deeper color.


7) Add some hair. Sketch in the outline lightly first with pencil, then follow with a fine point fabric marker or gel pen to outline. Then fill in with either the fine point pen or the broad tip marker or paint pen you have handy. 

Note: The hairstyle can be as simple or fancy as you like. Start simple, and get fancy later when you gain some confidence. This sample hair above^ is more on the complex side. It's for Little Elves. Here's a simpler style for Mrs Claus


Really, the key to the hair is getting it fairly close to the eyes, so that the face of the bead looks smallish, cute, and surrounded by hair, and does not look like it's a tiny face island in the middle of a big blank wood ocean. Check my pattern directions for how much of the sides and back of the head you are supposed to color. It could be just a partial since a lot of them are wearing hats.


8) When your face/hair are totally completely and utterly dry, you can safely erase any stray pencil marks. Be aware the eraser will also unfortunately erase your rosy cheeks, so you may need to touch those up. Finished! Tada!


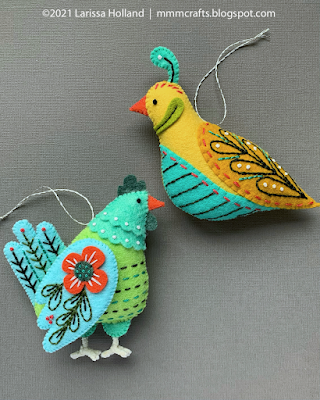
Still nervous? You can always simplify the faces if they seem too complex. For instance, the two Mrs. Santa heads on a pike above. The top one is a more complex one with fancier hair, and the bottom one is a simpler version with just dots. I think both faces are so cute! So you won't lose any style points for going simple. As a bonus, the dotted faces evoke a more vintage look, which I always love. 

So that is how it's done, lovely mmmakers. You have faced your fears. *wink* After following this tutorial you'll be ahead of the game. haha. OK sorry, I'm finally out of puns. There are a lot of variations in the faces and hair between my designs, but each of the patterns includes detailed step-by-step instructions for the faces. Use the tips you learned here to help you along. 

I hope this tutorial has been helpful! Happy mmmaking!