Showing posts with label decor. Show all posts

Wednesday, December 6, 2023

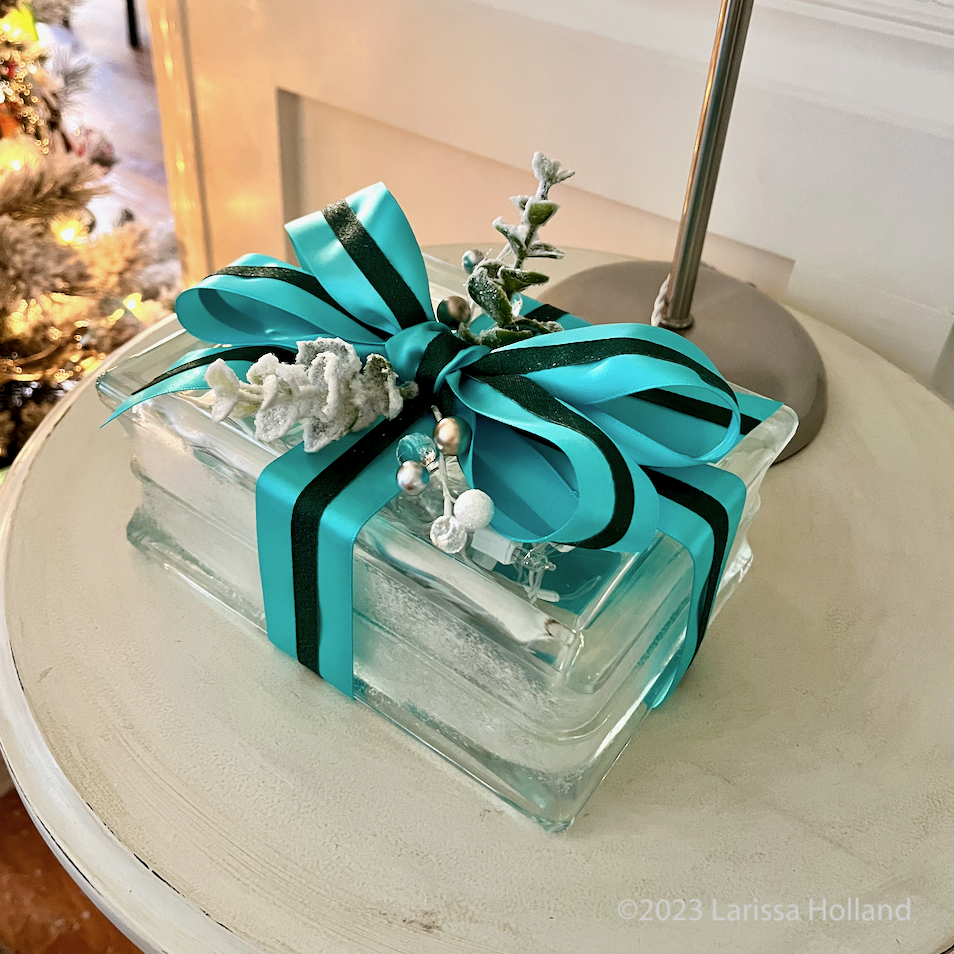
make lighted glass block Christmas presents


Have you guys ever done this Christmas craft? It's pretty easy and I love the way the lighted presents add festive magic to tabletops and bathrooms. Anyone who can tie a bow and use a hot glue gun can do this craft. My sister Leigh had a Christmas craft party years ago and we made them. I got the big idea a couple years ago to repeat that party with my own friends and I planned it all and bought the supplies and then ended up getting sick and not being able to attend my own craft party. But my friends had a blast making them.


WHAT YOU NEED:

  • Glass brick with a hole in the side to feed in a string of lights. Back in the day you had to purchase the bricks from your local Home Depot or Lowes and make the hole yourself using a drill bit for glass. Forget that! Craft stores have clued into this and nowadays you can usually find glass bricks in various sizes with handy premade holes available at your local craft/fabric superstore. 
  • If your brick is clear and not frosted you will want to frost just the sides (not the top or bottom) with a spray paint designed to look like frosted glass. That's at the craft store too.
  • A string of lights to put inside. Battery powered or electric, depending on whether you have an outlet handy where you want to put the finished present. Just make sure the wires are either white or metallic. The green wired kind won't look as nice. I think warm white lights look best. 
  • Wired ribbon to make the bow. It's also nice to glue on some festive berries, pine cones, or greenery if you like. If you make your bows using a bowmaker jig, you may need some thin wire or twist ties to secure the loops. You can also use non-wired ribbon (I did on one because I loved the color) but wired ribbon gives nicer results and you can fluff it up after storage.
  • Fray Check to keep the cut ends of the bow from raveling
  • A hot glue gun
  • A frothy coffee (optional)


TO MAKE:

1) Frost the sides (not the top or bottom) of your glass brick using the frosted glass spray paint and let that dry. (I won't attempt to tell you how to drill a hole in a glass brick since I've never done that, so I'll assume you can purchase a brick with nice big hole in back from your craft store.)

2) Feed in your string of lights, leaving the electric plug or battery pack on the outside of the brick. The hole/plug will be in the back. 

3) Measure and cut lengths of wired ribbon to wrap around the center of your brick in both directions, being sure to neatly overlap and hot glue the ribbon to the center top of the brick and not the bottom (so it can sit flat). Don't worry, your big ol' bow will cover the overlaps.

4) Make a big ol' bow with your wired ribbon. (Bow tutorials abound online.) A classic bow or a fancier one with more loops are both fine, just be sure it's big enough to cover most of the top of the brick. It's a nice touch to angle or notch the ends of the bow. Use Fray Check on the cut ends to keep them looking nice. 

5) Hot glue the bow in place in the center on top along with any little embellishments you want to add, like berries, greenery, sparkly bits, etc.

Tada. You're done! Plug it in or turn on the battery pack and enjoy. Makes a nice gift too! 

Sunday, July 23, 2017

no more 'feed me, seymour' fixture


Recently we were able to call in an electrician to hang our new fixtures and do some other electrical work at the new house. I'm very happy to look at this new, minimal kitchen light instead of the leafy, tentacled one that was there before:


I was surprised at how many folks on Instagram expressed their love for this very large fixture (nine bulbs!). I have missed the style boat on that one. I can see it would look nicer in the right setting if it was all painted white and had some smooth candelabra installed. I'm giving it to a sweet lady at church who loves it. I do wish it well.

Things are slowly coming together in other rooms also. No more large boxes to unpack, but there is a lot of clutter in every corner that I'm slowly finding spots for, or giving away. I have a shocking number of framed pictures currently piled against the stairwell. How did I get this many? Putting in some shelving before September in the school room would be nice so that I can get the hundreds of books off the floor.

I have to keep reminding myself that it took years to organize my other house and arrange everything just so. We had rooms with no furniture in them for a year or two when we first moved in. It's all a process. Like a fun puzzle that is slowly coming together and won't be as much fun when it's finished!

Saturday, June 10, 2017

what I'm up to


Doors going in. That's Dave, possibly the
best person in the whole wide world.

Was my last blog post really in April? All May I've been in a vortex. Here's almost half of June gone and we are still digging out from our remodel, house move and an unplanned kidney stone surgery for my Schmoopie. (doh!)

May is always completely crazy every year because of:
- ending the homeschool school year
- our anniversary
- couple of family birthdays including my daughter's (13!)
- standardized testing
- Mother's Day
Sooo adding in the remodeling, packing, moving and the surgery just made this May extra action-packed*. Honestly, I was feeling a little desperate on a few of those days. Some hysterical tears were shed (by me). Balls were dropped. Spinning plates crashed to the ground. Hamsters fell out of their wheels. The surgery happened the day after we moved our furniture to the new house. Aaaand I felt like the worst mother in the world when I wasn't present to see my freshman in high school get several awards at the year-end celebration. ("Wait...you got awards tonight??") Gahhhh. She'll tell it all to her therapist in future years I guess. Gotta let it go. -whoosh- (there it goes)

*most positive wording I can think of.

But it's all good. All of it.
The remodel was finished. Mostly. We are moved. Schmoopie feels better! Thank the Lord! We love the new house. No one got hurt (except a few pieces of furniture were winged).

More memories from the remodel:


All the new doors and wainscoting were compliments of Dave.


Banisters were painted.


Carpet was replaced.


The entire interior of the house was repainted, ceilings, walls and trim. I painted the upstairs bedrooms but left the rest to professionals. I chose grays and whites. No pictures yet of the pretty new paint. Forgot to take pre-move shots! I went with Titanium for the main area, with some White Dove, Simply White, Sedate Gray and Revere Pewter thrown in. You can see a tiny wedge of Titanium on the wall in this next photo.


Oh, and we also had to replace the hardwood floors. Didn't expect that. But loving the new floor! It's hickory. The color is called Prairie Dust. 


We still need to replace the lighting. This evil, tentacled pendant in the kitchen (Feed me, Seymore!) has stabbed all of us in the head at least once. It's going. There's also a dark, aggressive looking Viking fixture in the dining room whose days are numbered. That stuff had to jump down the list for later along with the cabinet repainting.


Presently I'm buried in an avalanche of 20 years worth of stuff thrown into the new house. Squaring it all away will have to wait as we are in the middle of coordinating some improvements to the old house to get it listed:


You might remember the old color. Now the entire house has been painted Sherwin Williams Agreeable Gray, which my realtor and her designer assure me is the perfect, appealing shade of greige for house lookers. And it really is! Not too dark either. I think it looks so fresh.


And this carpet is just about to go in. The color is called Mink and I think it will look really spiffing with the new paint. Soooo close to listing the house. Feeling excited to get that going!

And feeling the pull to get back to my craft life -- Mr Drummer has been waiting and the last three of the Twelve Days patterns too, all tapping their tiny felt feet to be brought to life.

I hope your school break is going swimmingly!

Wednesday, April 19, 2017

what I'm up to


What is going on with me? You may have noticed I've dropped off social media. It's because we are moving! Just 15 minutes away but this process has taken over my life at the moment. After searching diligently for an ideal (slightly larger) house for 2 years we've pretty much found it. Our poor realtor! After about 6 months of fruitless showings we told him to forget about us and we'd just call him when we saw a house we wanted to see. Last month we saw the house listed online, went to view it and whamm-o, that was it. It's been a contracting/mortgaging/packing/painting/flooring whirlwind ever since. And throw in some home schooling and pattern design. And so much coffee.

My two girls are kind of freaking out. I caught Thing 2 hugging our refrigerator the other day. She's not ready for a strange refrigerator. I need to remember they didn't grow up like I did – moving every couple of years. They were excited about finding another house until we found one. They've never lived anywhere else but here. Unlike the moves in my formative years, nothing will change for them except for their house. Church and school are still the same. But it's still an adjustment and I have to remember to be sensitive to that! But not that sensitive. Adversity makes you grow. And there's a huge consolation for two teen girls in the new house: they each get their own bathroom. That will be epic. Plus they get to pick their own paint color for their rooms. Within reason*.

Our current house is pretty great. We built it in 2001. Picked out all the colors. Brought our babies home to it. It's packed with memories. It's our first house. I remember how huge it seemed after we moved here from our apartment. It has an awesome studio for my business. I think the sentimentality will surely hit me at some point. I'll be sad about leaving it. But for now I just ain't got time for that.

*No glitter. No green. No darks. No color that will be hard to look at. Nothing in the pink family. OK, basically they are constrained to white, blue or gray.

Tuesday, October 6, 2015

branch and berry applique pillow covers for people I love


Handmade gifts. I sewed these two pillow covers over the course of the last month for beloved people Robyn and Leigh. And they were mailed embarrassingly late for their September birthdays. Sorry, guys.


That's what they look like stuffed with pillows. This grey one is Robyn's, shown flat:


The colors were chosen to match her decor. So if it clashes, Robyn, please feel completely free to never tell me.


While I'm showing Robyn's cover I'll throw in the other handmade item in her package (but not made by me): this pretty embroidered necklace by Skrynka. Natalka is really so friendly and handles custom orders with ease. I got one for myself a few months ago and love it. Her work is so neatly done and I dig the antiqued finish on the chain and settings.

The orangey browny cover is Leigh's, made with her family room in mind:


Covers are much easier to mail than actual pillows, you know. All this goes on the assumption that they already have handy an 18 inch pillow that needs a fall makeover. Fingers crossed, ears plugged.

Both covers were made with the same pattern. I sketched the original design small on paper (I work much better with thumbnail size) and then scanned it and scaled it way up to actual size. I printed it out and traced a cleaner copy over it with freezer paper and punched holes for placement guides.


The fabric is heavyweight canvas. The leaves were appliquéd with a zig zag and the stems were done by many passes of straight stitch machine sewing while I re-watched Dr Who series 5. (My favorite is the first episode. "You're Scottish, fry something." Prisoner zero. Fish custard!) The berries are cut from wool felt and sewn on by hand.

I always wonder when I'm in the middle of sewing these stems if there is a heavier weight of thread that I can use (like jean thread) that wont mess up my machine in the process. I'll have to look into that.

I finished the covers with the envelope backs and piping method from my pillow cover tutorial of yore. Tacky glue sure beats pins.

Thursday, February 12, 2015

mustard + leaves + pillow


What do you do when you have company coming over and a long list of things to do that are more pressing than sewing random decor items? Why, you disengage your brain and make a pillow. And when I say 'you' I mean me.


See? It needed a blot of mustard yellow just there. In my defense I actually had intended to sew this pillow cover for quite a while now because I ordered the cotton before Christmas specifically for that purpose. A very quick, sew-it-and-be-done-with-it, plain, solid pillow.

After the brain disengagement happened somehow the 'solid' part turned into 'eighteen leaf applique'. I'm not sure how that happened. But I loves it.


It was quick and scruffy looking applique. All on the machine. Cut the leaves from chambray, layed them down with dots of Tacky Glue, zig zagged the edges, and ran a white vein down the middles. The black stems are machine stitched with intentionally wobbly lines and the leaf veins got several back-and-forths of white stitching so they are more visible.

Tuesday, December 24, 2013

a very merry Christmas to you!

It's Christmas Eve. Our tree is lit and the presents are wrapped. The girls did a great job trimming the tree, I think.

 The matryoshkas are on parade.

 The normally useless foyer pole is now bedecked with cards from people we love. (Another Christmas card fail logged for me this year. Lettin' it go.)

 The mantel is forested and the mirrored advent is now empty. Christmas books have been read and enjoyed.


  The paper crafts have been made and laughed over and dangled and mounted.

The snowflakes are hung from the chandelier. Yes, those are paper clips. No, after five years of hanging them I still can't be bothered to cut thread for them instead. Plus, paper clips add sparkle.

 The doors merrily ring when opened or closed. My husband will not miss this, but I will.

 My sixteen year old Christmas village on fuzzy mountain is still glowing warmly. See Santa on top of the Library?


All the tiny wooden ornaments from the mirrored advent have been hung on the girls' tree. 


 Playmobil Advent Santa has finally made his appearance, bringing a sleigh full of food for all his woodland friends.

And I'm hosting our family dinner this evening. I should really be cleaning. Or getting a shower. Before I go panic over the beef tenderloin I want to wish all of you a blessed, peaceful Christmas filled with joy, family and most of all, the love of Christ.

Tuesday, August 27, 2013

thank you, Rachel Shippy and Ladies' Home Journal!


I was very excited when Rachel Shippy, professional lovely person, contacted me about featuring my oft-pinned foyer plate wall in the September issue of Ladies' Home Journal. Understatement. And there it is! Our entryway on page 30. Things 1 & 2 were impressed. Michael said, "I think I see some dust on the plates." Thanks, Babe. (Probably true.)

 
And here is Rachel herself in the editor's letter on page 8, next to a wonder wall of her own making. Hi, Rachel! I'm loving your chevron wall.

Tuesday, April 23, 2013

six cushions only took ten years. now you make some.


Nine years, eleven months, twenty-six days
to carefully think about it.
Four days to make.

I love them. My tush loves them. The girls both said, 'Wow, Mom, our chairs feel so GOOD now.' Poor kids. Looking on the bright side, I guess sitting on hard chairs may have built some character along the way. The chairs were purchased about ten years ago from Crate & Barrel and they are, in fact, pretty booty-friendly, even without the cushions. But it was time.

 I love that 'booty' is in my dictionary. 'Shake one's booty'. *snort*

Anyways, all the cushions have wild, patterned fabrics from my stash on one side,

and conservative black ticking on the other. 
I guess that kind of makes them the mullet of chair cushions.


If you want to make some similar ones, first you'll need to make a pattern from your chair similar to this:


(And there's a glimpse of my messy studio. I haven't cleaned up from cushion construction. I fling leftovers across the room as I go to keep them out of my way and off the work surface, and I honestly try to aim for the trash can with scraps, but mostly I miss. It's a pay-the-piper situation.)

As you can see, I find it helpful to make construction notes to myself directly on the pattern as I go. That way if I use the pattern again I can avoid all the really goofy mistakes I made the first go round.

Here's how to make your pattern:

1) Measure the width and depth of your chair seats and make a drawing on freezer or craft paper from your measurements. Add about an inch all round to compensate for the stuffing. You'll also need to add the 3/8 inch seam allowance (which is the same size as the flange on the piping to keep things simple for the cushion seam, but you'll use 1/2 inch allowance for the straps). Round your corners using a jar lid or coffee cup to trace around.

Now curve the straight sides slightly. I'm adding this in because I didn't do it with mine and I wish I had. Reason: after you stuff them, the cushion sides pull inward a bit. So you will do a better job than me.


2) Add holes for the button placement on your pattern as shown below. Make the holes big enough for a marker or pen to fit through. This makes it super easy to mark the placement on the right sides of the fabric at the same time that you trace and cut. (BTW, don't use a disappearing marker to mark your fabric because who knows how many years days will go by before you actually finish the cushion, and you don't want the marks to vanish. I used a Sharpie marker, which was fine because the marks are eventually hidden under the buttons.)


3) Go ahead and make a test cushion or two with cheap fabric or muslin in order to test the pattern and make any adjustments. Just skip adding the piping and actual buttons, but it's a good idea to test your straps. You'll still tuft the cushion, just without buttons, making the knots with the floss. Try the test cushion on your chair and tweak your pattern as needed.

I like a chair cushion to be pretty much the same size as the chair bottom, not spilling over the edges or looking shrunken. Here's a test cushion I made that was pieced. (It used to be stuffed and have buttons but I robbed it all to use with the final cushions.) The final design is not pieced because I decided piecing + piping + 8 buttons x 6 cushions = Crazy Town


Once you get your pattern finalized, the process of making them is pretty easy. And here's how to do it:

4) Now you'll need to gather:
  • Fabric for tops and bottoms (Decor weight works best, but I used quilting cotton on some of mine. You can always add fusible interfacing to beef it up.)
  • Eight self-cover buttons for each cushion you make. I used 7/8 inch buttons on mine.
  • One-inch wide cotton webbing or ribbon for the straps. I used about 20 inches per cushion (four 5-inch pieces), but that will vary for you because your chairs are different.
  • Velcro for closures (see note below about using a long piece as opposed to a square)
  • One package of premade piping for each cushion (Jo-Ann had a nice selection of Wrights bias piping, which comes 2 1/2 yards per package. I had about 18 inches leftover from mine, so this should cover a variety of cushion sizes.)
  • Scraps of fabric to match your piping for the self-covered buttons
  • Bags o' stuffing. I used 2 1/2 large bags (32 oz) of Polyfil stuffing for six cushions, and I probably err on the understuffed side. I really hate to stuff things. Late note: I ended up adding more stuffing after we sat on them for a few months, so stuff them as tightly as you can.

5) Cut lengths of cotton webbing or sturdy ribbon for the velcro straps. You'll need two pairs for each cushion. Use this formula for sizing:

Length needed to wrap around chair back and overlap opposite velcro
+ 
1/2 inch for finished edge 
+ 
1/2 inch for seam allowance

*** Late Note *** After some real-life road testing, I've found it's probably better to use a longer piece of velcro (as opposed to a square) unless your house contains only small, waif-like adults who do not squirm and fidget. Otherwise, a longer piece of velcro with more overlap will provide a more secure fastening.

6) To make the straps, press over 1/2 inch of one end. Tack with a dot of glue, then sew the velcro square rectangle so that it covers the cut edge. The picture shows a short piece of velcro, but you are going to use a longer piece because you are smart. You'll have four straps for one cushion. Two with the fuzzy side, two with the hooky side. Hooky is the technical term.


7) Trace and cut out two pieces of fabric for each cushion from your pattern and mark the button placement on the right sides.

8) Glue baste the piping round the edges of one of the cushion halves (see this post for glue basting instructions: Four Leaf pillow tutorial) except since you used a 3/8" seam allowance you can glue the piping so it is flush with the raw edge of the material. Snipping the flange around the corners makes it easy to curve the piping.


9) Using a zipper foot, sew the piping down just a few inches along the back of the cushion half, so that when you hand sew the opening together later you won't be juggling loose piping as well as two layers of fabric. You can also take this opportunity to sew a corresponding few inches along the seam allowance on the opposite piece of fabric, so you can use that as a guide when you hand stitch it closed later. I highly recommend that.


10) Next, glue baste the straps on with 1/2 inch overlapping the seam line, two straps per corner, one with fuzzy and one with hooky. Make sure that in each corner one strap is basted on with the velcro up and the other with the velcro down - learned that the hard way.


11) Glue-baste the other piece of fabric on top of that, right sides together, leaving an 4 inch opening in the center back so you can stuff it later. Pin around the inward side of the piping for extra security. Using your zipper foot, sew as close to the piping as you can, all the way around except for the opening. Be sure to backstitch at beginning and end.


12) Notch the curved corners of the cushion and turn it right side out through the opening. I always love that part.

13) Now set up your iPad on your work surface with Doctor Who Series 2 streaming (that last bit is optional) and stuff and stuff and stuff, until each cushion has a nice shape and is filled out but still pretty spongy. Don't sew it shut.

14) Add the buttons at this point. Thread a doll needle with a long piece of embroidery floss, doubled.

15) Go into the pillow at the button mark you made, then out of the pillow at the corresponding mark on the other side. You'll leave a tail of floss out the other side. Don't worry, you are going back to meet it. Now thread on a button (which you have already covered in matching fabric, right?), then go back through the pillow very close to where you just came out, and come out on the opposite side very close to where you came in (see the transparent diagram below).

16) Cut off your needle and tie a very tight square knot with the floss, pulling it as tight as you can to create a tuft (see diagram below). Ooh, look at that. It's tufted. Cool. Tie an extra knot for security. Then thread on another button and tie another couple of tight square knots that will disappear under the button as you tighten them. Trim the floss ends so they are hidden under the second button. Repeat those steps to add buttons on the other three sets of marks.

(The diagram below shows a single strand going in and out of the pillow, but it will in reality be two strands since you've doubled your floss)


17) Now stuff the pillow more and more and more around the buttons until it is just the right shape and firmness all over. I have learned by experience that when you think it's done, it's time to stuff it more. When you are really really done, wrestle the opening shut and pin it with your seam allowance tucked inside (aren't you glad you sewed the guideline there now?) and hand sew the opening closed. Finished!


Now go put them on your chairs and sit down a while.