Showing posts with label fabric crafts. Show all posts

Tuesday, July 25, 2023

maybe a chip in the cup?

This teacup in progress will have a chip in it. If I like the chip I'll make it an option in the pattern. Little known fact: House mice are commonly known to repurpose your discarded china cups as their tiny little beds. Actually, that is not a little known fact nor a generally known fact because I just made it up, but it sounds true. 

The chip is part of another round of revisions and samples I'm making as I fine-tune all of the pattern pieces. I think I like this teacup embroidery pattern better than the previous coral pink cup (see earlier post), but I'll wait to see how it all looks sewn together. I can't believe I forgot to include the year on the cup somewhere. Doh! I'll have to work that in somehow. More photos to come!

This Not Even A Mouse pattern is the upcoming 5th pattern in my 'Twas The Night ornament series. 

Friday, April 21, 2023

two new lodestar samples done, two more to go


Two more final Lodestar Tree Topper samples completed, with probably two more to go. I need to make at least one pendant version to show you, and I think I may do that one as a simplified star, without the embroidery. 

I'm working on edits to the PDF pattern instructions on the fly. Progress is slow but steady, y'all!

Shown: Benzie felts: Aqua, Julep, White, silver metallic and gold metallic

Saturday, April 4, 2020

what I'm up to


Mask life.

Making this thing took me way longer than it should have.

  1. I haven't sewn on my machine in a long while, so I was a wee bit rusty.
  2. Somehow during that interim my machine broke. *shrugs* Now it won't switch between types of stitches. Boo.
  3. I'm kind of bad at following video tutorials. I watched it once and then got all cocky thinking I know what I'm doing. Had to throw out my first one. (This mask features a nose wire, replaceable elastic, and a filter pocket, so it's a bit more involved than some.)
  4. If you are curious what pattern I used, my superhero quilter sister recommended this one. She and a bunch of her sewing friends are making up huge numbers of these for hospitals per their request. And also of course for friends and family, since it's recommended we all wear something to cover our faces while we are out.
  5. There are a LOT of free patterns to choose from out there right now, like this one and this one and this one.

The one I made feels pretty comfortable on. Note: The elastic allowed for the ears was too small for my husband's face, so keep that in mind if you are making it for a guy. I added 2 inches or so to the elastic for him.

Let's all look forward to a time when we can put these things in a drawer and forget about 'em. Stupid virus. Die, virus, die.

Monday, July 15, 2019

baby name banner for Teddy Graham


A blessing in the form of a tiny baby boy will soon be joining my extended family. Theodore Graham will no doubt be super cute just because of his parents, but I'm also crossing my fingers for some curly red hair. Please oh please! See what you can do, Lindsey. :-)

This wool felt teddy bear banner was designed to coordinate with human Teddy's nursery in muted and manly shades of gray, maroon, navy blue, and brown. Since Theodore is quite a long name, I did this banner at half the size I did for the previous two banners. The finished length is just right, I
think.


The banner was constructed basically in the same way as the others, with nice wool felts for the flags, stiffened white acrylic felt for the backings, and grosgrain ribbon. The letters are also backed with the stiffened felt. (It's really inexpensive and can be found in most big craft/hobby stores located near the acrylic craft felts.)


The fun part was making the bears. I designed the two affable fellows at the ends to be spiffed up in fabric bow ties and collars. Their look was a bit trial and error and involved a lot of squinting. (I squint when I test out colors and arrangements. I don't know why.) I could have done them completely as applique, but I wanted them to have some dimension. Their ears and noses are craft store pom poms. The bow ties are two layers of quilting fabric adhered together with Heat n Bond® (a really great iron-on adhesive), which gives the fabric the right amount of stiffness and will prevent the edges from raveling. The eyes and collar are stiffened craft felt.


I designed the whole banner on my Mac first, then output it directly to my old 'bad' batch of Sulky Sticky Fabri-Solvy (see this old post for more on that). As I've mentioned, I'd use even the good stuff for this because it really streamlines the whole process. You just print each flag once on the Sulky and use it four times over to cut the backing, flag, letter backing and letter. It's so easy. Then I used my usual method of glue basting everything together and then sewing it down.


I did attach the ribbon differently this time. I usually thread an entire long piece through the sewn channels on the backs of the flags, space the flags as I like, then secure them in place. It occurred to me that is a waste of good ribbon. So this time I glued on short, measured pieces of ribbon between the flags on the backs, then hot glued the back flaps in place. Tada. It looks the same but uses less ribbon, and it's less frustrating to do. (Unless like a complete numpty you find you've glued the flags in the wrong order and have to puzzle out how to fix this after the flaps were already hot glued down over the ribbon. *loud clearing of throat*)

I did manage to fix that without having to start over, so it's all good. There were some pretty negative comments made about myself to myself, I'm afraid. But all's well that ends well. I'm so pleased with this banner, and I can't wait to welcome little Theo to our family, no matter what color his hair turns out to be. :-)

Sunday, November 19, 2017

curated color guide/felt & floss color guide for Piper Piping ornaments


 Photos courtesy of Benzie Design

All three of the Pipers Piping up at the top ^ there were made using this ^ Benzie wool-blend felt in my pre-chosen palette #4, which covers two of my Twelve Days ornaments: Colly Bird and Piper Piping. Thanks again for organizing that bundle listing, Renae!

Benzie Felt Bundle #4 (Colly Bird/Piper Piping): 
Black
Graphite
Julep
Moss
Coral
Mustard
Peacock
Cyan
Copper
Orange

You can purchase the felt bundle with or without the matching flosses, which is a nice option. You'll need matching floss anyway to sew your ornaments together, so having the pre-matched flosses comes in handy!
NOTE: You will still need to purchase floss for the contrast decorative embroidery! 

See specific color guides below:


Green/Mint/Coral Piper colors:

FELT:
Moss: Hat, cuffs, body, leaves
Julep: Coat/sleeves
Coral: Tunic, feather, flower
Mustard: Pipe

EMBROIDERY:
DMC White
DMC 3685
DMC 783
DMC 937
DMC 943
DMC 3847


Blue/Orange/Yellow Piper colors:

FELT:
Peacock: Hat, tunic, leaves:
Mustard: Coat/sleeves, pipe
Orange: Feather, flower
Copper: Cuffs

EMBROIDERY:
DMC White
DMC Black
DMC 413
DMC 783
DMC 918
DMC 3844


Blue/copper/gray piper colors:

FELT:
Graphite: hat, body, leaves
Cyan: coat/sleeves
Copper: feather, tunic
Coral: cuffs, flower
Mustard: pipe

EMBROIDERY:
DMC White
DMC 413
DMC 783
DMC 918
DMC 3846

There are a total of six curated bundles of Benzie felt for the Twelve Days patterns, and you can purchase them all under that same Benzie listing in the drop down menu. See this post for links to all of color guides.

Happy hand sewing!

Wednesday, January 11, 2017

having problems with your Sulky Printable Sticky Fabri-Solvy?

PLEASE NOTE: THIS IS AN OLD POST FROM 2017 and the issue described here no longer exists. If you are having trouble rinsing away Sulky stabilizer please review this current post. Thanks!


Hello, guys! This is a Sulky PSA. You folks know how much I love their Printable Sticky Fabri-Solvy. I can't live without it! It's an integral part of my Twelve Days ornament series. However, I've heard from several heartbroken crafters just lately who can't get the Sulky stabilizer washed off of their embroidered ornament pieces even though they have followed all the directions and are doing everything right. If this is YOU, you are not crazy. You have some faulty stabilizer!

I've just spoken to Patty Lee at Sulky. She was so helpful and apologetic! She tells me the manufacturer who makes the glue for the stabilizer reformulated the glue without informing Sulky. While the reformulated glue worked for some industrial applications it did not work for Sticky Fabri-Solvy. Sulky was not aware of the problem until some of the faulty stabilizer had already been distributed to resellers.

Have they fixed the problem?
YES! There are no batch numbers to check, so you will need to test your product before using if you have the old packaging and name. The stabilizer has now been renamed and repackaged, so the new stuff should be fine. New name: Sulky Printable Stick 'n Stitch.


Questions? She will be very happy to help:
Patty Lee
(800) 874-4115, extension 173
(If you are outside the US you might need to visit the website to get the correct phone number)

How do I know if my stabilizer is the bad batch?
If you are breaking open a new pack of the old packaging/name (see above), test it first! Go ahead and print the pattern on the stabilizer just in case it's good. Then cut out a blank corner or strip of the page, peel the backing off and stick it on a piece of scrap fabric. If it doesn't soak away in cold water after a few minutes, you may have the bad stuff. This is what it looked like for me. The bad stuff is on the left (turns clear and gooey), the good stuff is on the right (turns white and dissolves away):


I have the bad stuff. What do I do?
Sulky will gladly replace your faulty stabilizer. Please contact:
Patty Lee
(800) 874-4115, extension 173
(If you are outside the US you might need to visit the website to get the correct phone number)

OK, but how do I fix my current project?
There are some things to try! Patty has a list of suggestions that will hopefully fix the problem and she even offered to foot the bill for dry cleaning for your project if that would help. Please contact her.

Thanks very much to the crafters who let me know about this problem! I'm so sorry you ran into it and I hope you will be willing to try another project with the REAL stabilizer (with the new name!) so that you can discover just how wonderful it is!

Wednesday, April 15, 2015

what I'm up to


Making something fun. Just playing. Digging in the compacted stash piles. Poking through my ribbons. Opening drawers to see what I have. This idea has lived in my head for a great long while and now it's becoming real. It's changing as I go. I'm always fascinated with the process of bringing an idea to life.

My sketches always seem to have more appeal to me than the final product. Does that happen to you? Maybe it's the potential that makes them so attractive. The final product is never exactly like the sketch or the phantom in my head, but sometimes they are better. Other times just...no. However, it's that over-confident feeling that the end product is going to be fantasmic that keeps me going.


In other news: Spring break was fun. We got away to the beach. This is the girls sharing a drink. Like two angry badgers arm wrestling. Feeling like it's the home stretch on home schooling. 5th and 7th grades almost in the bag. Can I get an ay-men? I'm hoping that this academic year can end earlier than other years. We usually school from September through mid-July but this year is different because we were on the Konos schedule and we've logged a lot more days than we usually have by now. A longer summer than usual...oh what will I do? *throatclearingthatsoundslikeornaments*

Tuesday, January 7, 2014

handmade gifts 2013, part 2


This year I gave the girls two ginormous craft organizer thingies to keep all their stuff in, and more importantly, keep them from borrowing my stuff. Who knew glorified tackle boxes could be so pricey? I'm glad I had a coupon plus a sale.


Anyhoo, to go along with all their spiffy new color coded sewing and crafting supplies (Thing 1 =  pink, Thing 2 = purple), I made them each a T.O.U.C. pincushion with a tiny attached strawberry cushion for needle parking.

Tuesday, September 3, 2013

fall scrap card for Leigh


Here's a scrap card how-to if you get inspired to make some of your own. I know it's not officially autumn yet, but I can pretend. Isn't September such a pretty word? *dreamy sighhhh* Fall is my favorite. With the buckets upon buckets of summer rain that were poured over Georgia (thank you, Father) I'm crossing my fingers for some eye popping tree leaves.

Bring on the pumpkin spiced everything.

In related news, I updated the blog's masthead with pretty pretty fall colors and a cinnamon stick. If you are reading via RSS, pop over to the mothership to see it. 

Happy birthday, big sis. I looooooove youuuuu. Wanna trade birthdays? But not ages. Haha. (Ducking)

Friday, January 11, 2013

Thing 1's woodland critters

This is Stitches.

 This is Buttons.

My 10 year old created these two softies using the embroidery book and sewing kit gifted to her by Miss Robyn and of course I must feature them too.

I invited Thing 1 to write this post also, but she became very quiet as I sat expectantly with fingers poised above the keys. Then she suggested no text, just pictures. Too much pressure.


Here are the backs. Thank you again to Beth for the very appropriate Stampin' Up fat quarter she used for Buttons. She zeroed right in on it.


Her preliminary sketch. She informed me these two are the first of five softies in a series she has designed, dubbed 'Woodland Critters'. How 'bout that.

I had to be all casual and smooth about it, because if I get excited or too involved it kills it for her. I don't want to be the crafting equivalent of a stage mommy: "Put down that silly book! Have you practiced your french knots today? You KNOW the Mother Daughter Pan Gran Embroidery Regionals are coming up! SMILE as you thread and no squinting! SMILE! Show me the sparkle!"

Monday, January 7, 2013

handmade gifts 2012, part 3


The last handmade gift is a reprise of the Phil 4:6-7 papercut I made for Robyn a while back. This version is for my sister, Leigh.

It fits an 8 x 10 inch frame. I changed it a bit from Robyn's with more leaves and no birds included. I included several background colors with it so she could switch it up and find one that worked best for her decor.


I gifted it to her along with a pillow cover you see folded and tied above that I made from some Crate & Barrel napkins. I forgot to take a picture of it on an actual pillow. Oops. It's a nice, Christmasy array of bold green stripes. I made it in my favorite, quick no-zipper-required envelope method, which took three napkins. Also no hemming, since the edges of the napkins are finished already. Boom.

In addition to those I gave some Rifle Paper Co. notes and the Penguin Classic edition of Cranford, in honor of the afternoons we spent watching the mini-series together and drinking tea. The scene about the oranges. Oh my word. "We will repair to our rooms... and consume our fruit in solitude." So funny. The book is a wonderful read, too.

That wraps up the making for Christmas. I had pie-in-the-sky visions of making the quilts for the girls, but I've set my sights on Valentines for that. Which is probably just as unrealistic. Oh, I did have one more handmade gift besides these, but you've already seen the photos. I made a gift of these two stockings to my lovely sister Lori along with some books. She's a book addict like me.

Thursday, December 13, 2012

hey, Larissa, do you have any tips to improve my cutting skills?


Why, yesh, I do. Twelve of them.

First of all, have the right tool for the job at hand. There's more about that in this post.

So let's assume you have the correct scissors in hand for what you are cutting. Here are some tips for excellence in scissor craft! I sound a bit like Dolores Umbridge when I say that.

First a few prep-work tips:

1) Seems a no-brainer but seriously, have some good light on hand. Daylight is the ideal, but of course many of us have to wait until evening to make stuff because of the small (or big) people at our house who expect to be cared for, fed, educated, played with, etc... Good task lighting is a huge help.

2) If you are tracing a shape to cut out, it is important to trace with a thin, precision line. For instance, cutting along a line made with a fine point pencil will give a better result than cutting along a fat marker line.

3) Getting a nice sharp line on felt or fabric is sometimes a challenge. Whenever possible, I trace the shape on the wrong side so I can use a permanent thin marker/gel pen that is clearly visible and won't disappear or bleed. As much as I love the disappearing purple markers, the lines fade quickly, so I only use them when I need to. I avoid using the blue water soluble markers, because even though they don't fade, which is nice, you have to blot with water to get rid of them and that adds an extra step. Fine point chalk pencils and markers are a nice option for tracing on darker colors and the chalk brushes off. (Never trace on the right side of the felt/fabric with a permanent pen or marker, because even after cutting it will leave unsightly inky bits on the edge of your shape.)

4) Another great way to accurately cut a shape on fabric or felt* is to use freezer paper.
*I mean wool felt. Don't try this with acrylic felt - 1) it might melt 2) freezer paper doesn't stick to it very well.

First, trace the shape on the dull side of freezer paper. Iron it shiny side down to the right side of the felt/fabric.

Then carefully cut around your traced outline.

  After you are done cutting, the freezer paper peels off easily. It leaves no trace and your shape will have a nice clean edge.

Now some tips for the actual cutting part:

5) For a clean, controlled cut, you must constantly maintain a good tension between the blades of the scissors. My kids can't grasp that part. (ha ha. Punny.) They saw up and down with the scissors handles but their hand stays too limp and their cuts are not clean. Maybe it was the fact that I had a lot of dull scissors growing up, but I figured out pretty early that my cutting hand should always be doing this:

It basically feels like your hand is cramped as you hold the scissors. My thumb is pushing its scissors handle away and my fingers are pulling their handle in towards my palm. Keeping that tension will press the scissor blades against each other and will help you maintain control and get a clean edge every time.

6) If the scissors are in your right hand, your left hand will actually be doing most of the finesse work. Did you hear that? That's right. The hand that is not holding the scissors is the key to neat, accurate cutting. Think of your scissors hand as the brawn, and your free hand as the brains of the operation. As you cut, keep your scissors hand cutting away from you without turning. Your other hand should be busy rotating the paper (or felt) in a smooth motion to meet the blades of the scissors. The smoother this motion is, the better your cutting will be. Vary the speeds you rotate to maintain accuracy. For instance, the tighter the curve is, the slower your free hand will be rotating the paper.


7) On larger shapes, start each cut with your scissors opened wide. That way you don't have to open them back up a lot and you can get longer, more fluid looking cuts.

8) Don't attempt to cut out a complex shape all the way around in one direction, without repositioning the scissors. Most things I cut out are cut from all kinds of different approaches in order to get the very best result. I save the tricky parts for last, repositioning my scissors to get the best angle at each part.

9) If you want cleanly cut interior angles, you can't cut down into the angle then back out of it. The best way to tackle those is to go down one side and end the cut on the point, being careful not to cut beyond the point. Then reposition and cut down the other side, slowly cutting toward the point until the wedge of paper falls away and you have a perfectly clean interior point. Don't be tempted to cut almost to the point, then pluck the wedge of paper out by hand. That just leaves an untidy hanging chad. Which are bad during elections and also in paper cutting.


10) Don't cut directly towards a rounded shape at a right angle. Cut obliquely towards it instead, so that you come in at a shallow angle and go on from there.


11) If the shape you are cutting has interior pieces to cut out (like the inside counter of the letter A or a donut hole), you'd typically want to cut those first before you cut the outer line. On paper and sometimes wool felt this is best done using an Xacto knife on a cutting mat. This method works best on wool felt if the cutout is small.


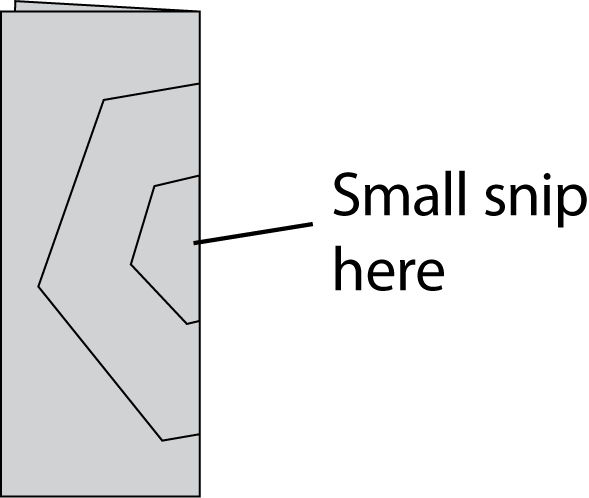
For fabric or larger pieces of felt, I use scissors. To cut out an interior shape with scissors, fold the fabric/felt together so the cut away area is on the fold. Make a snip with your scissors. Unfold and insert the scissors blade in the hole and cut your way toward the line of the interior shape, going on from there.


12) To get a nice continous zig zag or scallop pattern when cutting with pinking or scallop shears, there're a couple of things to watch for. Never completely close the shears as you are cutting as this sometimes adds a deeper cut at the end. Also, when you reopen the shears to continue, be careful to reseat the opened scissors with a scallop (or point) inside the last one you cut before you continue. This will prevent getting half scallops and half points, which detract from the uniform look.


So those are a few of the methods I used to get nice, clean edges and accurate cutting by hand. I hope they are helpful to you!

Thursday, December 6, 2012

hey, Larissa, what do you use to cut felt (and fabric)?

You can thank mmmaker Maggie for this post. She asked me yesterday what tool I use to cut felt and then I wrote a novel back to her and she kindly suggested I use it for a blog post. I think yes.

So what do I cut stuff with?


1) GINGHER DRESSMAKING SHEARS
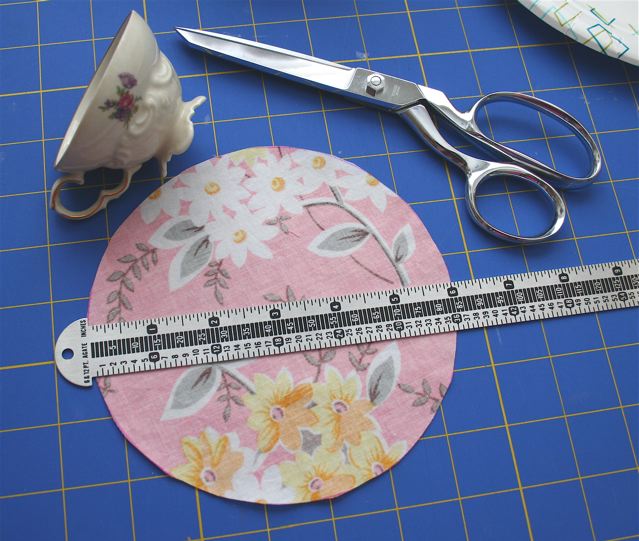
For cutting larger pieces of woven fabrics or felts you just can't beat a good pair of Gingher dressmaking shears. Period. They've made cameo appearances in many of my sewing tutorials as shown below:


They are weighty, feel great in your hand, and make a very satisfying *swack* as they close. The *swack* indicates that they Mean Business. Also they are very shiny and pretty, so. Bonus.

I've had this pair since 2000 and had them sharpened only once. (There's a whole story there where I think my sister 'accidentally' switched my new Ginghers with her older ones when she was visiting, but it would be petty to mention it. Again.) The entire length of the blade delivers a clean cut right down to the very (sharp) tips, so it makes cutting interior acute angles and clipping seam allowances a breeze. They don't come cheap, they run about $30ish from various places (save your coupons), but if you work with fabric or felt they are a must-have.

BTW, never, never, never use your Gingher shears on paper. Paper will quickly dull the blades and their magical properties will be lost. Hide them away from grabby children and their construction paper projects.


2) SMALL, SHARP DETAIL SCISSORS
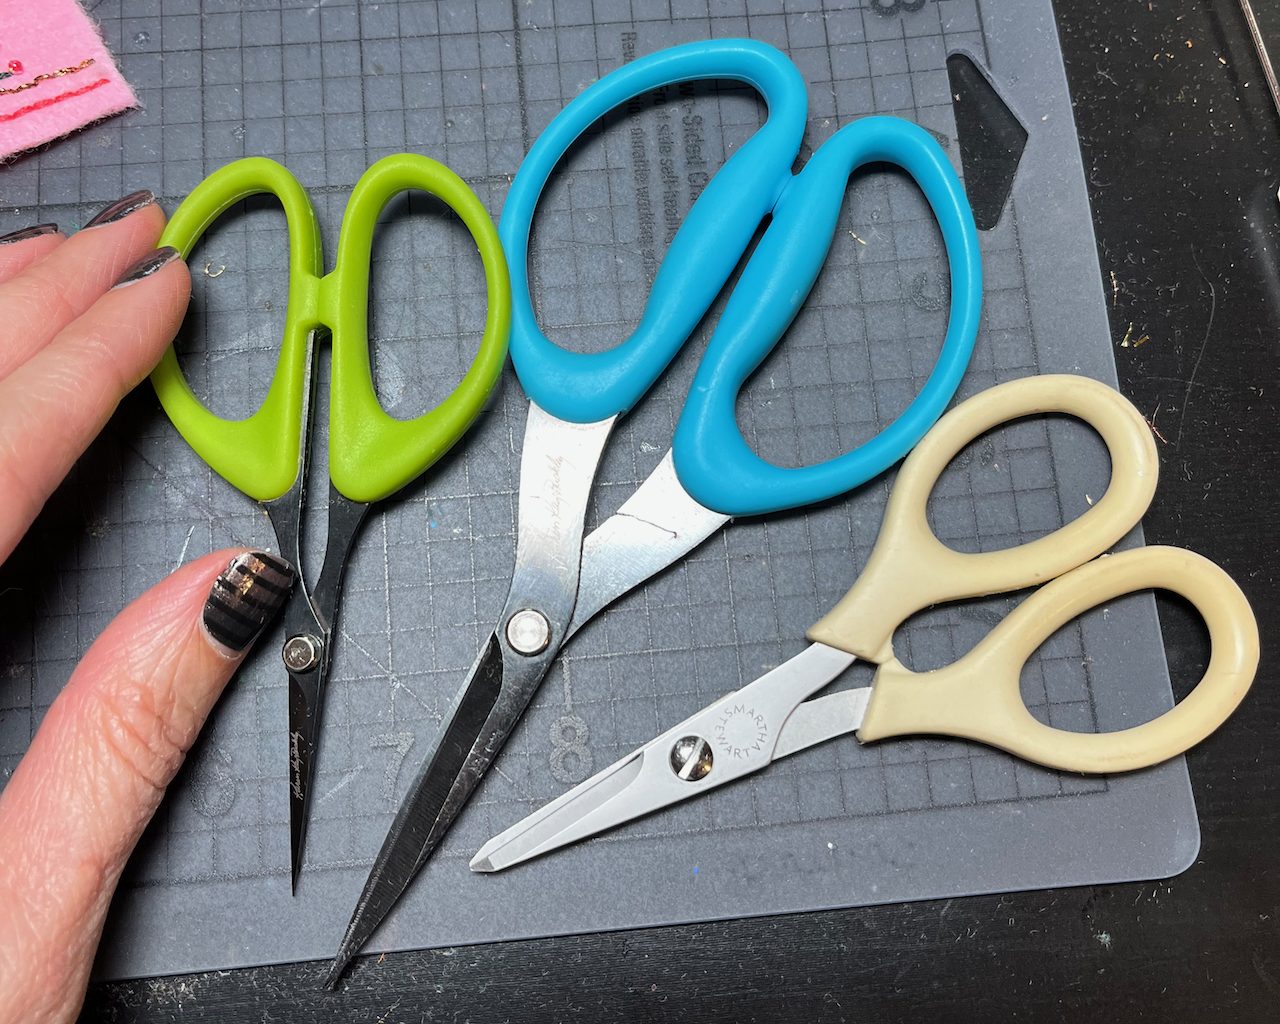
A shorter pair of scissors is needed for small scale detailed fabric/felt cutting (like for my ornaments) and I use the three pairs shown below constantly. They are my faves. The green and blue pair are both serrated Karen Kay Buckley scissors. So worth it. My sister gave me the green pair and then I bought the blue because I liked the green so well. The blades are super sharp to the very tips and make precision cuts a breeze. I also have worn out two pairs of the creme handled Martha Stewart precision scissors shown below. They seem to be discontinued but I see them sometimes if I do a google search. I use them a LOT so it's a shame they are no longer readily available. They are lightweight with comfortable rubberized handles. Crazy sharp all the way to the thin tips. They make it easy to cut tiny shapes and details. They come with a nice protective cap for the blade. (I confess I use the MS blades on paper too, but despite this abuse they still bite cleanly through felt.)

Green and blue serrated ones are here
 
 
Discontinued? Looks that way. :-(

That's always what happens to my lipstick color too. I find one I like and then whamm-o it's gone forever.


3) X-ACTO KNIFE
Normally used for cuts on paper, this handy craft knife also makes quick work of cutting small interior shapes cleanly out of felt (like the windows on my All Through The House ornament). For straight cuts I use a nice new blade alongside a plastic quilt ruler. Curved cuts are best done with multiple tiny straight cuts as opposed to dragging the blade across the felt in one motion.


4) ROTARY CUTTER
If it's a long, straight cut on fabric or felt I use my Olfa rotary cutter and a ruler on a cutting mat. You get a much cleaner cut than with scissors and quicker too. Unlike most folks, I prefer to use a metal ruler as opposed to plastic. I've actually shaved off the edge of a couple of my plastic rulers with the blade. Oopsie. 

(Note: if you use a metal ruler, which is thinner than plastic rulers, you need to be super careful to seat the blade firmly and go slowly so you don't jump the edge and cut your fingers! When in doubt, use plastic – it's better to shave your ruler than your fingers.)


5) SCALLOP AND PINKING SHEARS
Now for decorative edges. I have two kinds of shears for that, scalloped and pinking.


Pinking shears (pointy teeth) are widely available. I picked up mine at my local fabric store. Sorry, I can't find a brand name on them. Benzie Design sells a nice pair. They power through several layers of fabric when needed and cutting felt is a cinch. Pinking shears are a practical and quick way to finish a seam allowance so that it doesn't ravel, but also they are great for giving items a decorative zig-zagged edge.


Scalloped fabric shears are harder to find and they can be more expensive. I got my first pair via ToolTron forever ago and I've been very pleased with them. The brand name might be Nikken, it's really hard to tell because it's so tiny. They are marked "Made In Japan". I also now have two really nice new pairs of large and small scallop shears from Benzie Design, and you can find those here. It's so nice they have three scallop sizes to choose from!


NOTE: Please do not confuse good pinking and scallop shears with similar looking paper edging scissors. 100% NOT the same. Attempt to use paper edgers on fabric or felt and they will make a big ol' hash of your project.


6) REGULAR OL' CHEAP SCISSORS
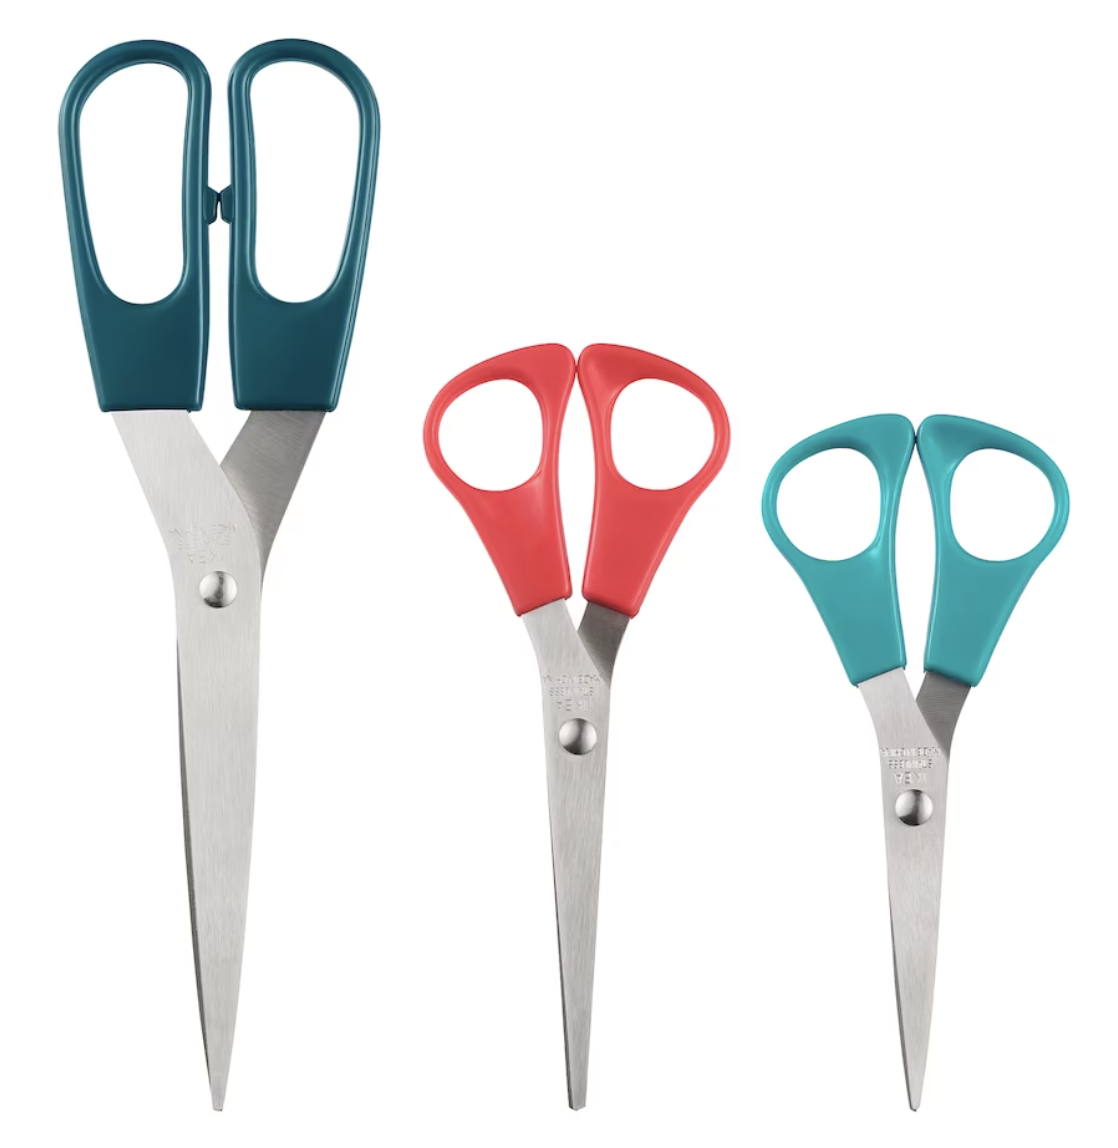
Of course, I also have myriad pairs of cheap IKEA scissors laying around for cutting out freezer paper, ribbons, rough cutting card stock... It's great to keep several pairs of cheapies within easy reach so you are not tempted to pick up your expensive Ginghers or detail scissors to cut a pipe cleaner or slit open a package. Horrors!

That's the 411 on my fancy fabric cuttin' tools. If neat, precision cutting matters to you, having the right tools will help you get there. Good hand cutting skills are also essential. That sounds like another post.