Showing posts sorted by date for query momma bird card. Sort by relevance Show all posts

Thursday, May 8, 2014

make a felt bouquet card for mom


I like to make cards. As well you know. Here's this year's handmade Mother's Day card. It's made of handcut felt flowers and leaves with a paper punch label in the middle.

Would you like to make a similar card? It's a cinch to make if you have some know-how, pretty felt and a little time. I'd say it is intermediate level crafting. Bonus: these flowers won't wilt and they won't cost a fortune. (Are you a beginner? Try this one!)

You will need:
  • A laser print of this template at actual size (no scaling)
  • Letter-sized piece of black card stock
  • Scrap of white card stock
  • Two 1/8 inch thick pop dots
  • Scraps of wool felt in various colors for the flowers (do not use acrylic craft felt!)
  • White pencil or gel pen
  • Black ink pen
  • Tacky Glue®
  • Scraps of freezer paper and a pencil for tracing
  • Small scissors
  • Toothpick
  • Black embroidery thread and a largish embroidery needle

1) Start by cutting the letter-sized black card stock in half so you have two 5.5 x 8.5 inch pieces. Keep one piece and set the other aside for later to make another card.


2) Fold the piece in half so you have a 4.25 x 5.5 inch card.


3) Now's the time to add your haiku on motherhood to the inside of the black card with a white gel pen. Or whatever message you like. Just in case you mess up. Because if you add the message now and mess up, no big deal; you can just use the extra half of the paper to make another card. If you wait and attach the elaborate, gorgeous flowery outside of the card and then mess the inside up you will have a slightly larger problem. Let the ink dry.


4) Write a cursive greeting on the scrap of white card stock with a black ink pen. You can do this. Don't cop out and print it from Microsoft Word. Handwritten is charming! Call up your best penmanship and keep it simple:
"I love you, Mom"
"For my Mom"
"Mummy Dearest"
Something like that. Just write it somewhere on the white card stock with plenty of room around. Practice if you need to.


5) When you are happy with it, use a light table or handy window to center your writing over the rectangle shape on the template and lightly trace the rectangle. Cut out the label and erase any stray pencil marks on the edges. (Or if you have a fancy label punch like mine, center your writing in the window and punch that baby.)


6) Put two pop dots on the back of the white label and place it in the center of your black card.


7) Lay freezer paper (shiny side down) over the template and trace all the flower and leaf shapes separately with a pencil. The shapes are overlapped on the template so be sure to trace the whole shape. Group the traced shapes together according to felt color, leaving a little space in between them for trimming.


8) Cut the freezer paper apart roughly by color grouping. Iron the freezer paper shiny-side-down on the corresponding colors of wool felt scraps. Carefully cut out the felt shapes with small scissors. Leave the freezer paper in place for now, and peel it off as you use each piece. It will help you keep your shapes oriented right side up.


9) Squirt a nickel-sized blob of Tacky Glue on a scrap of paper and use the toothpick to add small dabs of glue to the backs of the flower parts to layer them together. Less is more - it only takes a small dab here and there to adhere the parts. Don't worry about symmetry. It looks better when it's wonky.


10) Use all six strands of embroidery thread to sew a star in the middle of the orange flower as shown. Use one big stitch for each leg. Easy.


11) Test the two largest flowers in place on the card. You may have to trim a bit of the petal from the orange flower if it bumps into your pop dot. Keeping them in place with a finger, lift the edges and add a dab of glue to the middle of the backs with the toothpick. Don't glue the whole shape down. You need the edges loose so you can underlap the other pieces.


12) Now glue on the smaller roses, one underneath and one above the large rose.


13) Add the leaves, putting them in place first and then using small toothpick dabs of glue to secure them. (I use another toothpick that has no glue on it to tuck the ends under where I need to.)


14) You are almost done. Looks pretty nice already, huh? Use a white pencil or gel pen to add two curved lines like this:


15) Now add the last few little leaves to these stems.


16) TADA! A pretty, handmade bouquet of love for your mom and now you are the favorite child and now you have the satisfaction of making something special by hand! If you do make one, I'd love to see it! Share a photo by adding it here.


If you are running low on wool felt you could also make this card with paper flowers instead. Same instructions apply. I have ironed freezer paper on card stock with great success.

Looking for other card crafting ideas that you can use for Mother's Day? Here are some from previous posts:
http://mmmcrafts.blogspot.com/2011/05/make-momma-bird-card-or-two.html

http://mmmcrafts.blogspot.com/2010/11/more-scrap-cards-you-make-one.html
  http://mmmcrafts.blogspot.com/2013/05/made-it-ms-pop-up-flower-card.html

Just a reminder that all of my paper crafts templates are for personal use only. Thanks so much for respecting that.

Wednesday, May 8, 2013

made it: MS pop up flower card


The moment I saw this MS Mother's Day card project I fell in love. What's not to love? It's a gorgeous and clever design. Flowers are pretty. But pop up flowers? Shazam.

I finally got around to making one late last night, and it was a squidge harder than I thought it would be. Maybe it would be best not to attempt this after 11pm. But when it came together, it made me so happy. It's fascinating to watch the flowers pull in and collapse and then open again. I opened and closed the card a lot. Well, it was pretty late when I finished.

I watched this video about one thousand times to try and decipher the way you adhere the finished flowers together. I really like her voice! In the end, the written tutorial was the most helpful for that, so I recommend you use both their video and the written tutorial. Just keep in mind each flower will be tacked in three places, except for the middle flower which is tacked on every petal.

Helpful notes for you:
  • Do not use heavy paper for the flowers. I didn't have any regular 20 lb stock in pretty colors, so I ended up using a smooth construction paper, which is slightly heavier than 20 lb. It worked OK, but a lightweight paper would work the best, since you will be cutting through 8 layers of paper to cut each flower. Origami or printer paper would be the right weight.
  • Instead of double sided tape, I used small dots of my favorite paper glue Fabri-Tac because I didn't have any double sided tape, and it worked like a charm. (I know, technically that's a fabric glue, but I just love it for tacking paper because it dries almost instantly and doesn't pucker paper. However, I would never use it to spread over a large area.)
  • If you want to add some vavoom to the center of the flowers like me, use a soft colored pencil and add the centers while the flower is still flat.
  • I added another layer to the outside of the card by adhering a darker ever-so-slightly-larger-than 10 x 6 inch piece on the outside. It gives the card more stiffness and adds some color.
  • Be aware the finished size of the project is 5 x 6 inches, which does not fit a standard envelope. You can always whip up one of your own, because you are crafty like that.
  • I added a faux tag in the back because I didn't want to write on the pretty pretty inside:

And I sent it with love along with her flowery needle book. Mother's Day just seems to call for flowers. (Don't worry, my mom doesn't have a computer so this post won't ruin her surprise. Yes, that's right. No computer. No smart phone. And she still manages to have a full and meaningful life.)


Happy Mother's Day to all my fellow moms out there who love, teach and nurture their children and grandchildren 24 hours a day, every day of the year. No better job in the universe.

Need other ideas?
Make a Momma Bird Card
More Scrap Cards. You Make One!
Make a Flower Card for Mom

Sunday, May 1, 2011

make a momma bird card (or two)


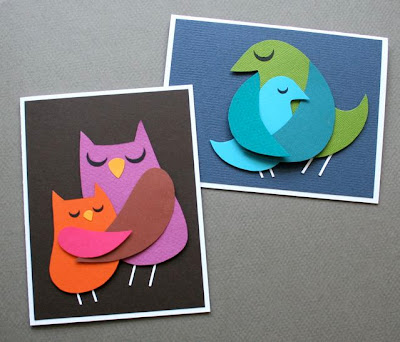
I designed these two Momma Bird cards and the downloadable template is available for you to make your own. Perhaps your Momma Bird needs a handmade thank you from her little chick this week?

Here's how to put them together:
  1. Download the PDF template and print it on heavy paper. Cut out the shapes. These will be your re-usable pattern pieces.
  2. Cut a letter size piece of white card stock in half to make two 5.5 x 8.5 inch pieces. Fold them each in half to create two blank cards.
  3. Cut two 5.25 x 4 inch colored pieces of cardstock for the card backgrounds and glue one each to the fronts of the blank cards, centered within the white margin.
  4. Trace the bird shapes lightly on colored card stock and cut them out (using small, sharp scissors or a craft knife will help). I like to reverse the pattern pieces and trace them on the back of the paper, so you don't need to erase pesky pencil lines.
  5. Follow the build diagrams below to put them together. Use 1/16 inch thick pop dots to give each layer added dimension. For the smaller pieces, I put a blob of gel glue on a scrap piece of paper and use a toothpick to apply. The legs are tiny strips of white card stock.

To make the faces:
  1. Use a small circle punch to cut a hole in black card stock. Then shift the punch over a bit to cut a slim crescent shape from the side of the hole you made to make the eyes for both birds. I used a 1/2 inch and a 1/4 inch punch. 
  2. For the owl beaks, punch one 1/4 inch circle and one 1/2 inch circle. Trim off two edges of each circle to form a point.
Options to simplify for paper savvy kids:

  1. Skip the colored background.
  2. Don't use pop dots. Just glue everything.
  3. Cut small triangles for the owl beaks.
  4. Draw in the eyes and legs using gel pens instead.
Now send it to your Momma Bird with love. Perhaps along with an espresso machine.