Thursday, May 26, 2011

make a mini memo book cover


This is a reprint of a guest tutorial I did for the Southern Institute. Enjoy!

Well, hello Southern Institutioners! I'm so happy to be guest tutorialing here today. I met Jenny when she and Dana and a host of other talented ladies descended on Whipstitch for a class in Atlanta a while back, and let me tell you, that was fun. Delighted to do it again sometime, Jenny!

So a bit about me. I'm a graphic designer turned home schooling mom of two lovely girls. I love to make stuff and drink coffee, and even better if I can make stuff while drinking coffee. I write a blog, mmmcrafts, where you can find tutorials and see all my creative endeavors in sewing, papercutting, and felt makery. I also run an etsy shop where I sell my patterns and the occasional finished piece. Ok, enough about me, now on to the actual making. I'll wait a second so you can top off your mug.

Make a Mini Memo Book Cover


I love these inexpensive little 3.25 x 4.5 inch composition books. They are just the right size for tucking in my purse. I always seem to need paper to jot things down or keep an antsy child occupied, so I try to keep a supply handy. When I went to the Netherlands several years ago with my BFF, I took one as a travel journal and it was just exactly the right size and number of pages. You can find them at Wal-Mart, office supply and drug stores (and even a few places online), usually for less than a dollar US each.

So here's how to pretty them up with a nice re-usable cover. It can elevate a 77-cent memo book from plain jane to Gift Worthy.

You'll need:
  • this template
  • printer
  • letter sized card stock
  • scrap of decorative paper
  • craft knife
  • ruler 
  • glue (I used Fabri-Tac)
  • optional brad
  • optional embroidery floss
1) First step is to print the template at actual size on the back of the card stock. Then score on the dashed lines. I just use the back side of the craft knife blade to score, but be careful not to press too hard at the point. After all the folds are scored, cut out the template on the solid lines.


2) Use the provided spine pattern to trace and cut out a spine from a scrap of decorative paper.


It will be a bit longer than the cover, so it will overlap nicely when you glue it on and it is a cinch to get it centered:


 Then you just trim off the excess with your knife, and the spine is done:


3) Here's where you can opt for the brad/floss closure, or you can leave those off. If you want to leave it off, skip to step 6. If you are going to include it, insert the brad in the spot marked for it. I happened to have a decorative brad on hand, but a regular brass brad (like the one shown below) will work great too. Don't squish the brad down super tight. You want it to have a bit of play.


4) Now get your large embroidery needle out and thread it with a double length of embroidery floss that has a knot at the end. Poke through the card stock where it says 'optional string placement' and pull the floss through until there is about an inch left before the knot.


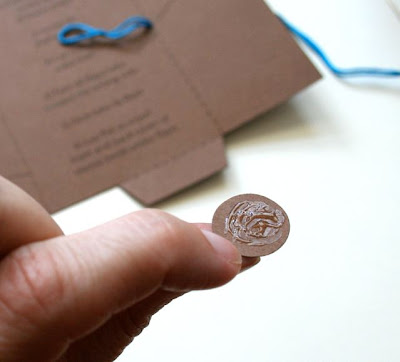
5) Put some glue on a small square or circle of paper and press it over the floss, flush with the knot and the hole. I just grabbed my circle punch and popped out a circle to use. Whichever is easiest. Make sure the glue has a nice bond over the floss.


6) Now fold all the flaps/tabs toward the wrong side and crease the spine folds. Since the scoring is on the back side, sometimes it makes a nicer fold if you fold the score backwards first, then toward the wrong side.


7) Glue the flaps to the tabs. Insert the memo book by laying the cover flat and inserting the front and back memo book cover under the flaps.


8) Wrap the floss around the brad two or three times to secure. Once you see what a good length will be, tie a knot in the floss and trim the excess. (Waxing the floss will also make it easier to wind around the brad.)


9) Cut out a label from contrasting paper and glue it to the front of the cover, if you like.


There! The cheap memo book is now a dressed up mini journal. Have fun. You can experiment with different paper color and pattern combinations. Use decorative edged scissors to give added cuteness to the spine. The possibilities are numerous. You might need to go get more coffee. Enjoy!

Thanks for having me here, Jenny!

Friday, May 13, 2011

corners of my house: foyer plate wall

Note: the paint color is Sherwin Williams Rainwashed

Hey, thanks for your nifty party game ideas. I'll blog her party eventually. Right now I'm shirking my party prep duties to write this post. I should be making the cake. So I'll be quick.

I've been doing little decor spruce ups around the house and you'll probably see several posts about it. I tend to leave things the same way for far too long, then suddenly I have this maniacal urge to change it all. It's happening bit by bit. This is one part of it, my new foyer plate wall. Just pretend that door bell box is not there. Man, I hate that thing.

I've seen this done several times on the web, including this beautiful example by Lisa Congdon. Plates were the perfect way to bring some interest and color to my foyer wall. Pretty cheap too, since I already had most of what I needed.


I love looking at it. I didn't think about it too much, just did it. I had the idea the other day, so I dug around in cabinets and gathered a bunch of plates I've accumulated over the years. Some were gifts, some souvenirs, and some thrift store finds. And a few I bought recently just to fill in the holes.

Then I started with three large plates in a triangle. Then I just randomly added more plates one by one until I felt it was finished. Having assorted plate sizes is a big help in giving it direction and swoop. Making new holes in my (freshly painted and mended) wall usually makes me nervous but for some reason I was able to just let go and whack the nails in without a second thought.


I like the effect at night too. Ok, I gotta go make party stuff.

Sunday, May 1, 2011

make a momma bird card (or two)


I designed these two Momma Bird cards and the downloadable template is available for you to make your own. Perhaps your Momma Bird needs a handmade thank you from her little chick this week?

Here's how to put them together:
  1. Download the PDF template and print it on heavy paper. Cut out the shapes. These will be your re-usable pattern pieces.
  2. Cut a letter size piece of white card stock in half to make two 5.5 x 8.5 inch pieces. Fold them each in half to create two blank cards.
  3. Cut two 5.25 x 4 inch colored pieces of cardstock for the card backgrounds and glue one each to the fronts of the blank cards, centered within the white margin.
  4. Trace the bird shapes lightly on colored card stock and cut them out (using small, sharp scissors or a craft knife will help). I like to reverse the pattern pieces and trace them on the back of the paper, so you don't need to erase pesky pencil lines.
  5. Follow the build diagrams below to put them together. Use 1/16 inch thick pop dots to give each layer added dimension. For the smaller pieces, I put a blob of gel glue on a scrap piece of paper and use a toothpick to apply. The legs are tiny strips of white card stock.

To make the faces:
  1. Use a small circle punch to cut a hole in black card stock. Then shift the punch over a bit to cut a slim crescent shape from the side of the hole you made to make the eyes for both birds. I used a 1/2 inch and a 1/4 inch punch. 
  2. For the owl beaks, punch one 1/4 inch circle and one 1/2 inch circle. Trim off two edges of each circle to form a point.
Options to simplify for paper savvy kids:

  1. Skip the colored background.
  2. Don't use pop dots. Just glue everything.
  3. Cut small triangles for the owl beaks.
  4. Draw in the eyes and legs using gel pens instead.
Now send it to your Momma Bird with love. Perhaps along with an espresso machine.