Tuesday, May 13, 2008
molly monkey doll
So here is Molly the Monkey, the doll I whipped out in a few days for my youngest daughter's birthday. I designed the doll and pattern on my computer, so I can share it at a future date once I make the adjustments to it that I made on the fly while I was sewing it together. She's made out of brown corduroy, yellow wool felt, and a mishmash of cotton quilting fabrics and ticking. I didn't stuff her really tightly for two reasons:
1) I wanted her to be squashy and lovable
2) I didn't see how the tarnation I was supposed to sew it all right sides together with the legs, arms and tail tucked inside if they were all stuffed to the max. Is there another method for this?
I used a modified Wee Wonderfuls shoe pattern which worked great for her little mary janes. I really like my Put Together Book I ordered of hers. I'd love to use her patterns for a whole doll one of these days. I have a hand sewing set of hers also that I'd love to break open! Too much to do.
Overall, and even with sleep deprivation, I'm really pleased with how she turned out! She was girly enough for me, and monkey enough for my four year old. Also, I got to use my Flutterby charm pack from a previous post for her clothes! So, yet another great use for charm packs -- doll clothes!
And now I can use this pattern as a base for Katy Kitty, my next doll creation for my other daughter's birthday in August.
Saturday, May 10, 2008
make a birthday present card
Whew! Today is over. My daughter is now officially four, her party was grand, and her monkey doll was finished in good time. And, more importantly, she loves it. She is currently sleeping with Molly Monkey, and I'll post pictures of her later. Her older sister made sure to remind me that her kitty cat doll (future Katy Kitty) would be made in time for her birthday in August, and she even generously offered for me to make it before her birthday, if that would help me not forget. So thoughtful. I'll be very glad to have 3 months to design and make a doll, instead of 3 days.
For now, here is how to make a card with a cute little birthday present on the front. This has become my signature card to send to my friends and family. Here is one I just made for my wonderful Mom-in-Law. It is so quick to make, the possibilities with paper and ribbon combos are endless, and everyone appreciates a handmade card. Unless they work for Hallmark.
You'll need:
• small sheet of decorative paper (You could go green here. I have recycled wrapping paper, cards, shopping bags, packaging, anything with a nice pattern, which I squirrel away in a drawer for future card making). Thicker works better, but if you adore a really thin piece you could always reinforce it by gluing it to card stock. The decorative paper I show here is actually from a recycled Talbots shopping bag.
• tiny paper price tag with string, I found mine in the office/school supply section at Wal-Mart.
• paper cutter or scissors
1) Ok, first cut the card stock in half on the long side, so that you have two 5.5 x 8.5 inch pieces. Set one aside (use it for a second card later). Fold the other one in half so that you have a card that is 4.25 x 5.5 inches.
2) Cut a tall rectangle out of your decorative paper, about 2-ish x 3-ish inches.
5) Write the birthday person's name on the tag and adhere the string to the top of the present and the tag to the card with little dabs of glue.
6) Fashion a little bow out of the remaining ribbon and glue it to the top of the present, covering the end of the tag. Trim the tag string ends if needed.
If you used Fabritac glue, you won't even have to wait for it to dry before mailing. This card will fit in a standard invitation envelope, which I also buy at Wally World (as my husband affectionately refers to Wal-Mart).
For now, here is how to make a card with a cute little birthday present on the front. This has become my signature card to send to my friends and family. Here is one I just made for my wonderful Mom-in-Law. It is so quick to make, the possibilities with paper and ribbon combos are endless, and everyone appreciates a handmade card. Unless they work for Hallmark.
• 8.5 x 11 sheet cardstock
• small amt of ribbon, enough to span about 3.5 inches and then another piece to tie a little bow. Thinner ribbon works best, like 1/4 or 3/8 inch wide.
• bone folder (optional)
• glue (I love and recommend Fabritac - it has an instant bond and won't wrinkle your paper.)
3) Cut a piece of ribbon that is about 1/2 inch longer than your rectangle. Put a dab of glue on the back of the ribbon on either end, align it in the center of the rectangle and fold the sticky ends around the edges to the back, as shown. Make sure the ribbon is not too loose on the front. You want it to lay tight 'n smooth.
4) Put a dab of glue in each of the four corners of the back of the rectangle and adhere it to the front of the card. I like to leave more room at the top for the bow and the tag.
6) Fashion a little bow out of the remaining ribbon and glue it to the top of the present, covering the end of the tag. Trim the tag string ends if needed.
Done.
Friday, May 9, 2008
mmmstrawberries
One of the joys of May -- picking your own strawberries. Extra fun when you are with good friends, and your very excited 4 and 5 yr old daughters. (OOOH mama! look at this one. OOOOH, look at THIS one!). Then of course, the joy of eating them.
I am run off my feet this weekend. I have mother's day prep, a singing to attend this evening, a birthday party for precious little boy tomorrow at lunch, then my own little sweetie is turning four tomorrow, so her party that evening at our house. Then, of course, Mother's Day is on Sunday, and the celebrating that goes on there.
Blessed but busy!
One of the things keeping me busy is the monkey doll I decided must be finished for my birthday girl's party. Tomorrow. Here's what it looked like on Wednesday evening. Late.
I'm much further along now, just need to give her a face and some shoes and hopefully some clothes. Clothes are optional at this point.
For the monkey, that is.
Monday, May 5, 2008
make a teacup pincushion
I've had these tiny vintage teacups for a couple of years, thinking I'd make candles out of them. Today, I decided to make one into a pincushion for my lovely mom.
If you'd like to make one, here's what you'll need.
a small teacup (mine is not the usual sized teacup -- of course, if your teacup is regular sized, you can size up your pincushion to match)
poly stuffing
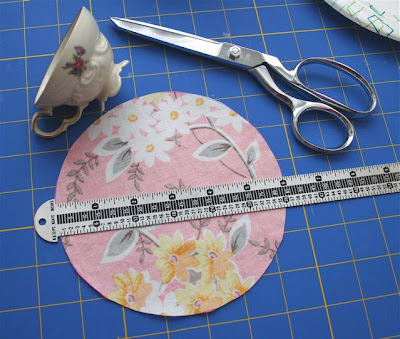
a 6 inch circle of coordinating cotton midweight fabric
needle
thread
hot glue gun
rubber gloves, if you are hot glue challenged and thrice burned, like me
Thread your needle, no knot, and sew a big running stitch all around the wrong side perimeter of the circle of fabric. Leave a long tail so you don't pull your thread through. I sewed about a quarter inch from the edge. If you know how to make yo yos, this is just like that, without the extra fold.
Gather your circle of fabric into a little pouch, leaving a small hole to stuff through, and tie off the ends securely.
Stuff, and stuff, and stuff until it's nice and compact and smooth. Using small pieces of stuffing rather than large blobs will make this look nicer. Squash it around to make it look even. (you could embellish the pincushion more at this stage than I did -- add a fabric button on the top, for instance, or some ribbon criss crossing)
Apply liberal amounts of hot glue in the bottom and sides of your cup, taking care not to come too close to the top. Squash your pincushion down firmly into the glue. This is where you might need gloves -- the glue makes the cup HOT.
Done. Put some coordinating pins in it and wrap it up for your sewing friend. Or keep it for yourself!
Subscribe to:
Posts (Atom)